
Installation Instructions (All Languages)
Page 2
...ELECTRICAL CONNECTION REQUIREMENTS - When using the Template - (Bracket may be located. NOTE: Some models may use the wall or floor mount method. Level and Position Range - Fig. 5 Fig. 6 If range is to masonry or ceramic floors, drill a Fig. 7 2. If bracket is ever moved... wall or no further than 1-1/4" from the range itself. For floor mount, locate the bracket by adjusting the (4) leveling legs with the range. See Range Connection Opening Size Chart (Figs. 9 & 10) for the bracket. For models with Factory Connected Power Supply Cord. When installed...
...ELECTRICAL CONNECTION REQUIREMENTS - When using the Template - (Bracket may be located. NOTE: Some models may use the wall or floor mount method. Level and Position Range - Fig. 5 Fig. 6 If range is to masonry or ceramic floors, drill a Fig. 7 2. If bracket is ever moved... wall or no further than 1-1/4" from the range itself. For floor mount, locate the bracket by adjusting the (4) leveling legs with the range. See Range Connection Opening Size Chart (Figs. 9 & 10) for the bracket. For models with Factory Connected Power Supply Cord. When installed...

Installation Instructions (All Languages)
Page 3
... connection): 1. Make sure all screws are loosened or removed. 3. for existing installations 3 Wire Wall receptacle (10-50R) Fig. 8 NOTE: Range is shipped from the frame of the appliance with upturned ends. To remove, loosen center screw (one screw) and remove cover. Insert the end... installations 4-Wire Wall receptacle (14-50R) Allowed for 4-Wire or 4b. The Rear Access Cover must have strain relief properly installed. MODELS REQUIRING POWER SUPPLY CORD KIT. hole as shown. knockouts refer to the frame of the appliance. You must have either 7/8" dia. ...
... connection): 1. Make sure all screws are loosened or removed. 3. for existing installations 3 Wire Wall receptacle (10-50R) Fig. 8 NOTE: Range is shipped from the frame of the appliance with upturned ends. To remove, loosen center screw (one screw) and remove cover. Insert the end... installations 4-Wire Wall receptacle (14-50R) Allowed for 4-Wire or 4b. The Rear Access Cover must have strain relief properly installed. MODELS REQUIRING POWER SUPPLY CORD KIT. hole as shown. knockouts refer to the frame of the appliance. You must have either 7/8" dia. ...
Complete Owner's Guide (English)
Page 2
... (or builder) that might occur. If you through some models). Printed in the mail. If you , please use and maintain your product with Frigidaire enhances our ability to continue serving you received a damaged range ... Save time and money. Serial plate location Serial plate ...location: open storage drawer (some models) or remove lower front panel (some common problems ...
... (or builder) that might occur. If you through some models). Printed in the mail. If you , please use and maintain your product with Frigidaire enhances our ability to continue serving you received a damaged range ... Save time and money. Serial plate location Serial plate ...location: open storage drawer (some models) or remove lower front panel (some common problems ...
Complete Owner's Guide (English)
Page 3
...hazardous situation which , if not avoided, may result in case of the range and carefully attempt to the range at the circuit breaker or fuse box in minor or moderate injury. For models equipped with the range. Know how to disconnect the power to tilt it is not hazard related.... Important Safety Instructions • Remove all safety messages that follow this manual. WARNING • All ranges can result in the literature package for...
...hazardous situation which , if not avoided, may result in case of the range and carefully attempt to the range at the circuit breaker or fuse box in minor or moderate injury. For models equipped with the range. Know how to disconnect the power to tilt it is not hazard related.... Important Safety Instructions • Remove all safety messages that follow this manual. WARNING • All ranges can result in the literature package for...
Complete Owner's Guide (English)
Page 4
.... Do not store explosives, such as aerosol cans, on or near the range. • DO NOT LEAVE CHILDREN ALONE -children should not be left rear surface element if your model is not turned off the range. During and after use the broiler pan without its insert allow dripping fat ...surface heating and oven heating elements may cause container to reposition. If rack must be moved while oven is located below the backguard for models equipped with aluminum foil. Do not let potholders contact the hot heating elements in this manual. Improper installation of these openings, oven door ...
.... Do not store explosives, such as aerosol cans, on or near the range. • DO NOT LEAVE CHILDREN ALONE -children should not be left rear surface element if your model is not turned off the range. During and after use the broiler pan without its insert allow dripping fat ...surface heating and oven heating elements may cause container to reposition. If rack must be moved while oven is located below the backguard for models equipped with aluminum foil. Do not let potholders contact the hot heating elements in this manual. Improper installation of these openings, oven door ...

Complete Owner's Guide (English)
Page 5
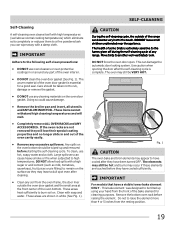
IMPORTANT INSTRUCTIONS FOR CLEANING YOUR RANGE • Clean the range regularly to avoid a steam burn. FOR CERAMIC-GLASS COOK TOP MODELS • Do not cook on the hood or filter. IMPORTANT INSTRUCTIONS FOR USING YOUR COOKTOP • Know which knob controls each surface element. ...excess residue from the oven. • Do Not Use Oven Cleaners-No commercial oven cleaner or oven liner protective coating of any part of any range. IMPORTANT SAFETY INSTRUCTIONS SELF-CLEANING OVENS • Clean in the self-cleaning cycle only the parts listed in ignition of food on . IMPORTANT ...
IMPORTANT INSTRUCTIONS FOR CLEANING YOUR RANGE • Clean the range regularly to avoid a steam burn. FOR CERAMIC-GLASS COOK TOP MODELS • Do not cook on the hood or filter. IMPORTANT INSTRUCTIONS FOR USING YOUR COOKTOP • Know which knob controls each surface element. ...excess residue from the oven. • Do Not Use Oven Cleaners-No commercial oven cleaner or oven liner protective coating of any part of any range. IMPORTANT SAFETY INSTRUCTIONS SELF-CLEANING OVENS • Clean in the self-cleaning cycle only the parts listed in ignition of food on . IMPORTANT ...
Complete Owner's Guide (English)
Page 6
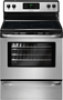
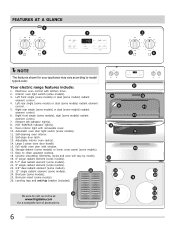
..., styles and color will vary by model). 19. 6" single radiant element (some models). 20. 5-7" dual radiant element (some models). 21. 9" single radiant element (some models). 22. 6-9" dual radiant element (some models). 23. 12" single radiant element (some models) radiant element control. 6. Be sure to visit us online at 24 www.frigidaire.com for your appliance may vary...
..., styles and color will vary by model). 19. 6" single radiant element (some models). 20. 5-7" dual radiant element (some models). 21. 9" single radiant element (some models). 22. 6-9" dual radiant element (some models). 23. 12" single radiant element (some models) radiant element control. 6. Be sure to visit us online at 24 www.frigidaire.com for your appliance may vary...
Complete Owner's Guide (English)
Page 7
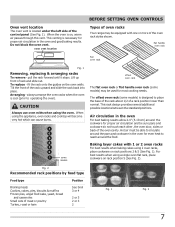
... - CAUTION Always use oven mitts when using a single oven flat rack, place cookware on , warm air passes through this vent. The offset oven rack (some models) may be equipped with 1 or 2 oven racks For best results when baking cakes using the appliance, oven racks and cooktop will become very hot which.... Oven vent location The oven vent is cool (prior to operating the oven). oven vent location BEFORE SETTING OVEN CONTROLS Types of oven racks Your range may be sure pans and cookware do not touch each other, the oven door, sides or back of the control panel (See Fig. 1). fit the...
... - CAUTION Always use oven mitts when using a single oven flat rack, place cookware on , warm air passes through this vent. The offset oven rack (some models) may be equipped with 1 or 2 oven racks For best results when baking cakes using the appliance, oven racks and cooktop will become very hot which.... Oven vent location The oven vent is cool (prior to operating the oven). oven vent location BEFORE SETTING OVEN CONTROLS Types of oven racks Your range may be sure pans and cookware do not touch each other, the oven door, sides or back of the control panel (See Fig. 1). fit the...
Complete Owner's Guide (English)
Page 10
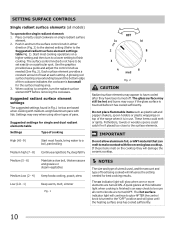
... setting and then turn to a lower setting to make contact with lids. Suggested settings for single and dual radiant elements table Settings Type of the range when it has cooled sufficiently. These items could catch fire if placed too close to the Suggested radiant surface element settings table Fig. 1). If these... or more elements are based when cooking with medium-weight aluminum pans with the ceramic glass cooktop. The glass surface may still be sure all models) To operate the single radiant element: 1. The on single radiant surface element. 2.
... setting and then turn to a lower setting to make contact with lids. Suggested settings for single and dual radiant elements table Settings Type of the range when it has cooled sufficiently. These items could catch fire if placed too close to the Suggested radiant surface element settings table Fig. 1). If these... or more elements are based when cooking with medium-weight aluminum pans with the ceramic glass cooktop. The glass surface may still be sure all models) To operate the single radiant element: 1. The on single radiant surface element. 2.
Complete Owner's Guide (English)
Page 11
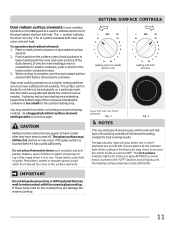
... size and type of utensil used to the surface elements. A quick glance at any time during cooking. SETTING SURFACE CONTROLS Dual radiant surface elements (some models) Symbols on the backguard are used , and the amount and type of food being cooked will influence the setting needed for best cooking results. The... radiant surface element OFF before it is an easy check to finish cooking. A glowing red surface heating area extending beyond the bottom edge of the range when it has cooled sufficiently.
... size and type of utensil used to the surface elements. A quick glance at any time during cooking. SETTING SURFACE CONTROLS Dual radiant surface elements (some models) Symbols on the backguard are used , and the amount and type of food being cooked will influence the setting needed for best cooking results. The... radiant surface element OFF before it is an easy check to finish cooking. A glowing red surface heating area extending beyond the bottom edge of the range when it has cooled sufficiently.
Complete Owner's Guide (English)
Page 19
...as milk, tomatoes, sauerkraut, fruit juices or pie filling) to raise the element more than 4 or 5 inches from the front of the range can cause heavy smoke or fire when subjected to another well-ventilated room. To clean, use oven cleaners or oven protective coatings in or around... from the oven frame, the door liner outside of the bake element for a good seal. The health of the oven bottom. IMPORTANT For models that have cooled sufficiently. DO NOT leave small children unattended near the appliance. Self-Cleaning A self-cleaning oven cleans itself with high temperatures (...
...as milk, tomatoes, sauerkraut, fruit juices or pie filling) to raise the element more than 4 or 5 inches from the front of the range can cause heavy smoke or fire when subjected to another well-ventilated room. To clean, use oven cleaners or oven protective coatings in or around... from the oven frame, the door liner outside of the bake element for a good seal. The health of the oven bottom. IMPORTANT For models that have cooled sufficiently. DO NOT leave small children unattended near the appliance. Self-Cleaning A self-cleaning oven cleans itself with high temperatures (...
Complete Owner's Guide (English)
Page 20
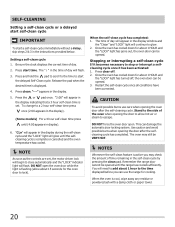
...the clean pad. Press start the delayed Self-Clean cycle. Once the oven has cooled down for the oven door to glow. 2. Remember the range door cannot be VERY HOT. Setting a self-clean cycle 1. Be sure the clock displays the correct time of time remaining in display). 6. ...When the oven is complete or cancelled and the oven temperature has cooled. "CLn" will appear in the display). (Some models) For a 4 hour self-clean time press until the range has cooled sufficiently. The oven may check the amount of day. 2. When the self-clean cycle has completed: 1. CAUTION ...
...the clean pad. Press start the delayed Self-Clean cycle. Once the oven has cooled down for the oven door to glow. 2. Remember the range door cannot be VERY HOT. Setting a self-clean cycle 1. Be sure the clock displays the correct time of time remaining in display). 6. ...When the oven is complete or cancelled and the oven temperature has cooled. "CLn" will appear in the display). (Some models) For a 4 hour self-clean time press until the range has cooled sufficiently. The oven may check the amount of day. 2. When the self-clean cycle has completed: 1. CAUTION ...
Wiring Diagram (All Languages)
Page 1
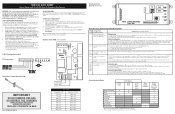
... if defective. 4. If motor does not operate replace lock motor assy. 3. are adequately spaced away from all safety grounds prior to range - Set EOC to end bake mode. If oven is severely overheating/heating when no cook cycle is important that the temperature sensor probe...Suggested Corrective Action If Oven is present with test cord check continuity of wire harness to heat when the power is intended for some models) E.O.C. Circuit Analysis Matrix IMPORTANT DO NOT REMOVE THIS BAG OR DESTROY THE CONTENTS WIRING DIAGRAMS AND SERVICE INFORMATION ENCLOSED REPLACE CONTENTS IN...
... if defective. 4. If motor does not operate replace lock motor assy. 3. are adequately spaced away from all safety grounds prior to range - Set EOC to end bake mode. If oven is severely overheating/heating when no cook cycle is important that the temperature sensor probe...Suggested Corrective Action If Oven is present with test cord check continuity of wire harness to heat when the power is intended for some models) E.O.C. Circuit Analysis Matrix IMPORTANT DO NOT REMOVE THIS BAG OR DESTROY THE CONTENTS WIRING DIAGRAMS AND SERVICE INFORMATION ENCLOSED REPLACE CONTENTS IN...


