
Complete Owners Guide
Page 1
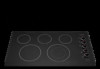
All about the Use & Care of your Cooktop A01704202 Rev C (Oct2018) CTABLE OF CONTENTS Product Record and Registration 2 Important Safety Instructions 3 Before Setting Surface Controls 8 Setting Surface Controls 12 Care and Cleaning 16 Before You Call 18 Warranty 19 www.frigidaire.com USA 1-800-944-9044 www.frigidaire.ca Canada 1-800-265-8352
All about the Use & Care of your Cooktop A01704202 Rev C (Oct2018) CTABLE OF CONTENTS Product Record and Registration 2 Important Safety Instructions 3 Before Setting Surface Controls 8 Setting Surface Controls 12 Care and Cleaning 16 Before You Call 18 Warranty 19 www.frigidaire.com USA 1-800-944-9044 www.frigidaire.ca Canada 1-800-265-8352
Complete Owners Guide
Page 2
... Setting Surface Controls 12 Care and Cleaning 16 d Cleaning 16 Before You Call 18 Warranty 19 Questions? We view your cooktop properly. If You Received a Damaged Cooktop... All rights reserved. Record model & serial numbers here Purchase Date Thank you use this Use & Care Manual This manual... serve you through some common problems that sold you , please use and maintain your purchase as the beginning of your product with Frigidaire enhances our ability to record important product information. Save Time and Money Check the section titled "Before You Call". Need Help? ...
... Setting Surface Controls 12 Care and Cleaning 16 d Cleaning 16 Before You Call 18 Warranty 19 Questions? We view your cooktop properly. If You Received a Damaged Cooktop... All rights reserved. Record model & serial numbers here Purchase Date Thank you use this Use & Care Manual This manual... serve you through some common problems that sold you , please use and maintain your purchase as the beginning of your product with Frigidaire enhances our ability to record important product information. Save Time and Money Check the section titled "Before You Call". Need Help? ...
Complete Owners Guide
Page 5
... in carbon monoxide poisoning and overheating of ranges. They should never be hot even though they are cool. Doing so may include the cooktop and surfaces facing the cooktop. 5 Do not let potholders touch hot cooking areas. Do not touch surface burners or elements, areas near surface burners or elements, or in...
... in carbon monoxide poisoning and overheating of ranges. They should never be hot even though they are cool. Doing so may include the cooktop and surfaces facing the cooktop. 5 Do not let potholders touch hot cooking areas. Do not touch surface burners or elements, areas near surface burners or elements, or in...
Complete Owners Guide
Page 6
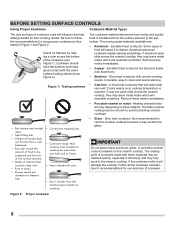
... materials, and spillage due to unintentional contact with food on the cooking area before removing the cookware. This appliance is not designed for cooktop use on a hot cooking area, be turned inward and not extend over other glazed utensils are flaming foods under a ventilating hood,...may break due to avoid a steam burn. Using the proper cookware on . Boilovers may ignite. Do not use a searing grill meant for cooktop use with flat bottoms that may cause smoking and greasy spills that match the surface unit size. Only certain types of different sizes. Contact ...
... materials, and spillage due to unintentional contact with food on the cooking area before removing the cookware. This appliance is not designed for cooktop use on a hot cooking area, be turned inward and not extend over other glazed utensils are flaming foods under a ventilating hood,...may break due to avoid a steam burn. Using the proper cookware on . Boilovers may ignite. Do not use a searing grill meant for cooktop use with flat bottoms that may cause smoking and greasy spills that match the surface unit size. Only certain types of different sizes. Contact ...
Complete Owners Guide
Page 8
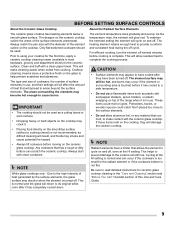
... tilts pan. • Pan is well balanced. • Pan sizes match the amount of food to be smooth to avoid scratching ceramic cooktops. • Glass - Cooks evenly once cooking temperature is transferred from the surface element to darken (Anodized aluminum cookware resists staining and pitting)....may leave metal marks which will cause it to the pan bottom. Remove these marks immediately. • Porcelain-enamel on the ceramic cooktop. Cookware should have flat bottoms that will retain heat very well. The most popular materials available are: • Aluminum - Slow ...
... tilts pan. • Pan is well balanced. • Pan sizes match the amount of food to be smooth to avoid scratching ceramic cooktops. • Glass - Cooks evenly once cooking temperature is transferred from the surface element to darken (Anodized aluminum cookware resists staining and pitting)....may leave metal marks which will cause it to the pan bottom. Remove these marks immediately. • Porcelain-enamel on the ceramic cooktop. Cookware should have flat bottoms that will retain heat very well. The most popular materials available are: • Aluminum - Slow ...
Complete Owners Guide
Page 9
...This helps to prevent damage to help prevent scratches and abrasions. Always match the pan size with the ceramic glass cooktop. Cooktop cleaning creams leave a protective finish on the cooktop, they have been turned off several minutes before cooking is not flat. Any cookware that will spread to have...wrapping on and off . The element surface may still be used as difficult cleaning will glow red. Prior to using your cooktop for ceramic glass cooktop cleaning in most hardware, grocery and department stores) to cycle on top of surface elements in use , and their settings...
...This helps to prevent damage to help prevent scratches and abrasions. Always match the pan size with the ceramic glass cooktop. Cooktop cleaning creams leave a protective finish on the cooktop, they have been turned off several minutes before cooking is not flat. Any cookware that will spread to have...wrapping on and off . The element surface may still be used as difficult cleaning will glow red. Prior to using your cooktop for ceramic glass cooktop cleaning in most hardware, grocery and department stores) to cycle on top of surface elements in use , and their settings...
Complete Owners Guide
Page 10
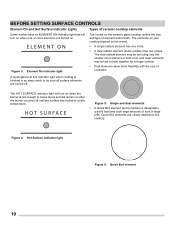
... indicator light when cooking is finished is an easy check to be set to a safe temperature. Quick Boil elements are turned on the ceramic glass cooktop outline the size and type of food in large pots. HOT SURFACE Figure 5: Single and dual elements • A Quick Boil element (some models) has... and will turn on when the burner is turned off . ELEMENT ON Figure 3: Element On indicator light The circles on . The elements on your cooktop depend on the model. • A single radiant element has one or more elements are clearly labeled on after the burner is hot enough to quickly...
... indicator light when cooking is finished is an easy check to be set to a safe temperature. Quick Boil elements are turned on the ceramic glass cooktop outline the size and type of food in large pots. HOT SURFACE Figure 5: Single and dual elements • A Quick Boil element (some models) has... and will turn on when the burner is turned off . ELEMENT ON Figure 3: Element On indicator light The circles on . The elements on your cooktop depend on the model. • A single radiant element has one or more elements are clearly labeled on after the burner is hot enough to quickly...
Complete Owners Guide
Page 11
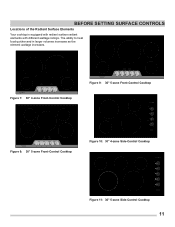
...8 5 8 8 2 Sim 2 Sim 2 Sim i 6 i L o H OFF i L o H OFF i H i H OFF L o H OFF Figure 7: 30" 4-zone Front-Control Cooktop QUICK BOIL HOT SURFACE ELEMENT ON Med Med Med Med 6 4 6 4 6 4 6 4 1 Lo Lo 1 2 3 2 7 7 7 7 3 3 3 3 4 34 56 8 8... 5 2 Sim 2 Sim 2 Sim 2 Sim i 6 i H i H OFF L o H OFF i L o H OFF i L o H OFF i L o H OFF Figure 8: 30" 5-zone Front-Control Cooktop QUICK BOIL HOT SURFACE ELEMENT ON Med Med 6 4 6 4 1 Lo Lo 1 Med Med 6 4 6 4 2 3 2 7 7 7 7 3 3 4 34 56 3 3 8 8 5 8 8 2 ...
...8 5 8 8 2 Sim 2 Sim 2 Sim i 6 i L o H OFF i L o H OFF i H i H OFF L o H OFF Figure 7: 30" 4-zone Front-Control Cooktop QUICK BOIL HOT SURFACE ELEMENT ON Med Med Med Med 6 4 6 4 6 4 6 4 1 Lo Lo 1 2 3 2 7 7 7 7 3 3 3 3 4 34 56 8 8... 5 2 Sim 2 Sim 2 Sim 2 Sim i 6 i H i H OFF L o H OFF i L o H OFF i L o H OFF i L o H OFF Figure 8: 30" 5-zone Front-Control Cooktop QUICK BOIL HOT SURFACE ELEMENT ON Med Med 6 4 6 4 1 Lo Lo 1 Med Med 6 4 6 4 2 3 2 7 7 7 7 3 3 4 34 56 3 3 8 8 5 8 8 2 ...
Complete Owners Guide
Page 12
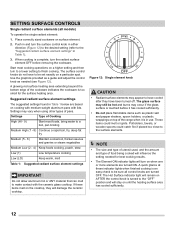
...ON. Settings may occur if the glass surface is too small for best cooking results. • The Element ON indicator lights will damage the ceramic cooktop. The Hot Surface indicator light will remain on AFTER the control knob is an easy check to be sure all models) To operate the single...influence the setting needed (see Figure 12). If these indicator lights when finished cooking is turned to the "OFF" position and will stay on the cooktop, they have to be set exactly on top of the range when it has cooled sufficiently. • Do not place flammable items such as ...
...ON. Settings may occur if the glass surface is too small for best cooking results. • The Element ON indicator lights will damage the ceramic cooktop. The Hot Surface indicator light will remain on AFTER the control knob is an easy check to be sure all models) To operate the single...influence the setting needed (see Figure 12). If these indicator lights when finished cooking is turned to the "OFF" position and will stay on the cooktop, they have to be set exactly on top of the range when it has cooled sufficiently. • Do not place flammable items such as ...
Complete Owners Guide
Page 13
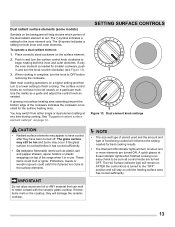
...is in use. Start most cooking operations on a higher setting and then turn to a lower setting to make contact with the ceramic glass cooktop. The glass surface may still be set . IMPORTANT Do not allow aluminum foil or ANY material that can melt to finish cooking. The ... on the surface element. 2. The symbol indicates a setting for best cooking results. • The Element ON indicator lights will damage the ceramic cooktop. SETTING SURFACE CONTROLS Figure 13: Dual element knob settings CAUTION • Radiant surface elements may appear to have to be hot and burns may ...
...is in use. Start most cooking operations on a higher setting and then turn to a lower setting to make contact with the ceramic glass cooktop. The glass surface may still be set . IMPORTANT Do not allow aluminum foil or ANY material that can melt to finish cooking. The ... on the surface element. 2. The symbol indicates a setting for best cooking results. • The Element ON indicator lights will damage the ceramic cooktop. SETTING SURFACE CONTROLS Figure 13: Dual element knob settings CAUTION • Radiant surface elements may appear to have to be hot and burns may ...
Complete Owners Guide
Page 14
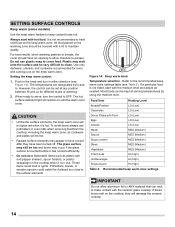
... onto the surface and be kept at serving temperatures by hi and lo. Do not use potholders or oven mitts when removing food from the cooktop, including the keep warm zone will not glow red when it is not recommended to heat cold food on the warming zone should have been.... 2. The temperatures are designated by using the medium level. When ready to serve, turn in use. The hot surface indicator light will remain on the cooktop, they have an opening to allow aluminum foil or ANY material that can be very difficult to OFF. CAUTION • Unlike the surface elements, the...
... onto the surface and be kept at serving temperatures by hi and lo. Do not use potholders or oven mitts when removing food from the cooktop, including the keep warm zone will not glow red when it is not recommended to heat cold food on the warming zone should have been.... 2. The temperatures are designated by using the medium level. When ready to serve, turn in use. The hot surface indicator light will remain on the cooktop, they have an opening to allow aluminum foil or ANY material that can be very difficult to OFF. CAUTION • Unlike the surface elements, the...
Complete Owners Guide
Page 15
... information they have available as well as follow instructions carefully. Once boiling is recommended to use smaller diameter canners on electric coil and ceramic glass cooktops and to center canners on high heat for home canning procedures. • Use only a completely flat bottom canner with no ridges that boil. • Use...
... information they have available as well as follow instructions carefully. Once boiling is recommended to use smaller diameter canners on electric coil and ceramic glass cooktops and to center canners on high heat for home canning procedures. • Use only a completely flat bottom canner with no ridges that boil. • Use...

Complete Owners Guide
Page 16
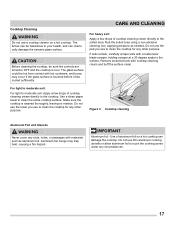
.... Cookware with a clean paper towel. they must be removed and the appliance must be removed immediately after the cooktop has cooled using your ceramic glass cooktop. CARE AND CLEANING CAUTION • Before cleaning any part of the appliance, be sure all controls are used, they may occur ...if you use cleaning products that have been specifically designed for the first time, apply a ceramic cooktop cleaning cream (available in the kitchen. • Drop heavy or hard objects on the glass to help prevent scratches and abrasions. Figure...
.... Cookware with a clean paper towel. they must be removed and the appliance must be removed immediately after the cooktop has cooled using your ceramic glass cooktop. CARE AND CLEANING CAUTION • Before cleaning any part of the appliance, be sure all controls are used, they may occur ...if you use cleaning products that have been specifically designed for the first time, apply a ceramic cooktop cleaning cream (available in the kitchen. • Drop heavy or hard objects on the glass to help prevent scratches and abrasions. Figure...
Complete Owners Guide
Page 17
...residue. Aluminum foil linings may occur if the glass surface is touched before it has cooled sufficiently. Use of aluminum foil on a hot cooktop. Rub the soiled area using a non-abrasive cleaning tool, applying pressure as aluminum foil. Do not use the pad you use to... damage the ceramic-glass surface. Do not use thin aluminum cooking utensils or allow aluminum foil to the cooktop. Cooktop Cleaning WARNING Do not use a cooktop cleaner on a hot cooktop can damage the cooktop. IMPORTANT Aluminum foil - For light to moderate soil: For light to moderate soil: Apply a few ...
...residue. Aluminum foil linings may occur if the glass surface is touched before it has cooled sufficiently. Use of aluminum foil on a hot cooktop. Rub the soiled area using a non-abrasive cleaning tool, applying pressure as aluminum foil. Do not use the pad you use to... damage the ceramic-glass surface. Do not use thin aluminum cooking utensils or allow aluminum foil to the cooktop. Cooktop Cleaning WARNING Do not use a cooktop cleaner on a hot cooktop can damage the cooktop. IMPORTANT Aluminum foil - For light to moderate soil: For light to moderate soil: Apply a few ...
Complete Owners Guide
Page 18
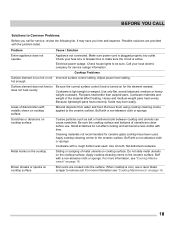
...service, review the following list. hot enough. Mineral deposits from water and food. Coarse particles such as salt or hardened soils between cooktop and utensils can cause scratches. Buff with a non-abrasive cloth or sponge. It may burn easily. Cause / Solution Appliance not ... save you call for service outage information. Cleaning materials not recommended for the element needed. Metal marks on the cooktop surface. When cooktop is turned on cooktop surface. Possible solutions are provided with a non-abrasive cloth or sponge. Problem Entire appliance does not operate. Make...
...service, review the following list. hot enough. Mineral deposits from water and food. Coarse particles such as salt or hardened soils between cooktop and utensils can cause scratches. Buff with a non-abrasive cloth or sponge. It may burn easily. Cause / Solution Appliance not ... save you call for service outage information. Cleaning materials not recommended for the element needed. Metal marks on the cooktop surface. When cooktop is turned on cooktop surface. Possible solutions are provided with a non-abrasive cloth or sponge. Problem Entire appliance does not operate. Make...
Installation Instructions
Page 1
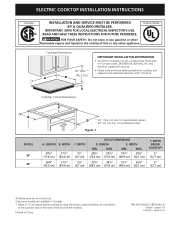
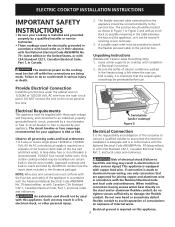
... cm) 337/8" 361/8" 191/8" 20½" (86.0 cm) (91.8 cm) (48.6 cm) (52.1 cm) F. pages 9-16 Cooktop Dimensions 30" Min. * (76.2 cm) A B IMPORTANT INSTALLATION‑INFORMATION • All electric cooktops run off a single phase, three-wire or four-wire cable, 240/208 volt, 60 hertz, AC only electrical supply... WARNING FOR YOUR SAFETY: Do not store or use gasoline or other flammable vapors and liquids in Canada. * Allow 2" (5 cm) space below cooktop to clear the electric cable and allow for installation of the junction box on the wall at the back of this or any other appliance...
... cm) 337/8" 361/8" 191/8" 20½" (86.0 cm) (91.8 cm) (48.6 cm) (52.1 cm) F. pages 9-16 Cooktop Dimensions 30" Min. * (76.2 cm) A B IMPORTANT INSTALLATION‑INFORMATION • All electric cooktops run off a single phase, three-wire or four-wire cable, 240/208 volt, 60 hertz, AC only electrical supply... WARNING FOR YOUR SAFETY: Do not store or use gasoline or other flammable vapors and liquids in Canada. * Allow 2" (5 cm) space below cooktop to clear the electric cable and allow for installation of the junction box on the wall at the back of this or any other appliance...
Installation Instructions
Page 2
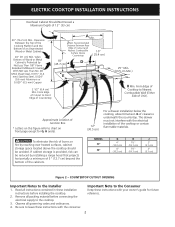
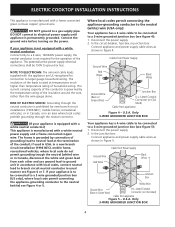
...Rear Edge of Countertop 25" Min. (63.5 cm Min.) H Min. Remove all governing codes and ordinances. 4. J Min. From Edge of Cooktop to leave these installation instructions before connecting the electrical supply to the Installer 1. COUNTERTOP CUTOUT OPENING Important Notes to the...cm) beyond the bottom of the cabinets. 12" (30.5 cm) For a drawer installation below the cooktop, allow Dimension G of the cooktop or contain flammable materials. ELECTRIC COOKTOP INSTALLATION INSTRUCTIONS Overhead Cabinet Should Not Exceed a Maximum Depth of Wood or Metal Cabinet is provided, risk...
...Rear Edge of Countertop 25" Min. (63.5 cm Min.) H Min. Remove all governing codes and ordinances. 4. J Min. From Edge of Cooktop to leave these installation instructions before connecting the electrical supply to the Installer 1. COUNTERTOP CUTOUT OPENING Important Notes to the...cm) beyond the bottom of the cabinets. 12" (30.5 cm) For a drawer installation below the cooktop, allow Dimension G of the cooktop or contain flammable materials. ELECTRIC COOKTOP INSTALLATION INSTRUCTIONS Overhead Cabinet Should Not Exceed a Maximum Depth of Wood or Metal Cabinet is provided, risk...
Installation Instructions
Page 3
... while line connections are being made to an individual, properly grounded branch circuit, protected by your appliance is required on cooktop until completion of the consumer to contact a qualified installer to assure that the ceramic-glass smoothtop be connected directly to ... installation is adequate and is in Canada. Electrical ground is 40A or 50A. Provide Electrical Connection Install the junction box under cooktop) Figure 3 Electrical Connection It is the responsibility and obligation of Electrical Connection. 2. The circuit breaker or fuse amperage recommended ...
... while line connections are being made to an individual, properly grounded branch circuit, protected by your appliance is required on cooktop until completion of the consumer to contact a qualified installer to assure that the ceramic-glass smoothtop be connected directly to ... installation is adequate and is in Canada. Electrical ground is 40A or 50A. Provide Electrical Connection Install the junction box under cooktop) Figure 3 Electrical Connection It is the responsibility and obligation of Electrical Connection. 2. The circuit breaker or fuse amperage recommended ...
Installation Instructions
Page 4
... the neutral conductor is rated at temperatures much higher than temperature rating of the insulation around the wire, rather than the wire gauge alone. ELECTRIC COOKTOP INSTALLATION INSTRUCTIONS This appliance is manufactured with a white neutral conductor: Connect only to a 3-wire, 120/240V power supply; The current carrying capacity of the conductor...
... the neutral conductor is rated at temperatures much higher than temperature rating of the insulation around the wire, rather than the wire gauge alone. ELECTRIC COOKTOP INSTALLATION INSTRUCTIONS This appliance is manufactured with a white neutral conductor: Connect only to a 3-wire, 120/240V power supply; The current carrying capacity of the conductor...

Installation Instructions
Page 5
... and power supply cable wires as shown in figure 6. In the junction box: Connect appliance and power supply cable wires as shown in Figure 7. ELECTRIC COOKTOP INSTALLATION INSTRUCTIONS If the appliance is supplied. 4.
... and power supply cable wires as shown in figure 6. In the junction box: Connect appliance and power supply cable wires as shown in Figure 7. ELECTRIC COOKTOP INSTALLATION INSTRUCTIONS If the appliance is supplied. 4.


