

Complete Owner's Guide (English)
Page 1
A TABLE OF CONTENTS Welcome & Congratulations 2 Care & Cleaning (Cleaning Chart 11 Important Safety Instructions 3 Care & Cleaning 12 Surface Cooking 5 Before You Call 14 Before Setting Surface Controls 7 Major Appliance Warranty 16 Setting Surface Controls 8 www.frigidaire.com USA 1-800-944-9044 www.frigidaire.ca Canada 1-800-265-8352 All about the Use &Care of your Cooktop 318203641 (November 2009) Rev.
A TABLE OF CONTENTS Welcome & Congratulations 2 Care & Cleaning (Cleaning Chart 11 Important Safety Instructions 3 Care & Cleaning 12 Surface Cooking 5 Before You Call 14 Before Setting Surface Controls 7 Major Appliance Warranty 16 Setting Surface Controls 8 www.frigidaire.com USA 1-800-944-9044 www.frigidaire.ca Canada 1-800-265-8352 All about the Use &Care of your Cooktop 318203641 (November 2009) Rev.
Complete Owner's Guide (English)
Page 2
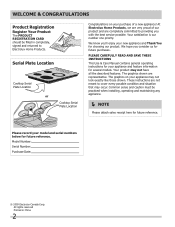
.... The graphics shown are not meant to cover every possible condition and situation that may occur. These instructions are representative. Serial Plate Location Cooktop Serial Plate Location or Cooktop Serial Plate Location Congratulations on your purchase of our product and are completely committed to Electrolux Home Products. We know you with the...
.... The graphics shown are not meant to cover every possible condition and situation that may occur. These instructions are representative. Serial Plate Location Cooktop Serial Plate Location or Cooktop Serial Plate Location Congratulations on your purchase of our product and are completely committed to Electrolux Home Products. We know you with the...
Complete Owner's Guide (English)
Page 3
... modify or alter the construction of an appliance such as flammable liquids. Areas near the appliance. Moist or damp pot holders on the cooktop to play with a pan lid, or use a towel or other servicing should be done only by a qualified technician in the area...surfaces. Flammable materials should never be seriously injured. • Do not leave children alone. Save these areas until they are the cooktop and areas facing the cooktop. • Wear Proper Apparel. It is important but not hazard-related. • Remove all safety messages that may become too...
... modify or alter the construction of an appliance such as flammable liquids. Areas near the appliance. Moist or damp pot holders on the cooktop to play with a pan lid, or use a towel or other servicing should be done only by a qualified technician in the area...surfaces. Flammable materials should never be seriously injured. • Do not leave children alone. Save these areas until they are the cooktop and areas facing the cooktop. • Wear Proper Apparel. It is important but not hazard-related. • Remove all safety messages that may become too...

Complete Owner's Guide (English)
Page 4
...be done to direct contact and may result in ignition of clothing. Select utensils having flat bottoms large enough to accumulate on Cold Cooktop Glass. Any other use . Check the manufacturer's recommendations for range top service without breaking due to keep all parts free of...melt. • Protective Liners. This appliance is not covered by your warranty). Heating elements clean themselves during cooking may penetrate the broken cooktop and create a risk of the surface heating unit to the appliance. Absence of breakage, fusion, or marking that can produce harmful fumes...
...be done to direct contact and may result in ignition of clothing. Select utensils having flat bottoms large enough to accumulate on Cold Cooktop Glass. Any other use . Check the manufacturer's recommendations for range top service without breaking due to keep all parts free of...melt. • Protective Liners. This appliance is not covered by your warranty). Heating elements clean themselves during cooking may penetrate the broken cooktop and create a risk of the surface heating unit to the appliance. Absence of breakage, fusion, or marking that can produce harmful fumes...
Complete Owner's Guide (English)
Page 5
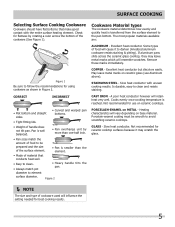
...available are: ALUMINUM - COPPER - If aluminum pans slide across the bottom of food to be smooth to avoid scratching ceramic cooktops. Remove these marks immediately. Excellent heat conductor but discolors easily. CAST IRON - PORCELAIN-ENAMEL on ceramic glass (see Aluminum above... for using cookware as shown in Figure 2. Excellent heat conductor. May leave metal marks on METAL - Check for ceramic cooktop surfaces because it to darken (Anodized aluminum cookware resists staining & pitting). A poor heat conductor however will resemble scratches. Slow...
...available are: ALUMINUM - COPPER - If aluminum pans slide across the bottom of food to be smooth to avoid scratching ceramic cooktops. Remove these marks immediately. Excellent heat conductor but discolors easily. CAST IRON - PORCELAIN-ENAMEL on ceramic glass (see Aluminum above... for using cookware as shown in Figure 2. Excellent heat conductor. May leave metal marks on METAL - Check for ceramic cooktop surfaces because it to darken (Anodized aluminum cookware resists staining & pitting). A poor heat conductor however will resemble scratches. Slow...
Complete Owner's Guide (English)
Page 6
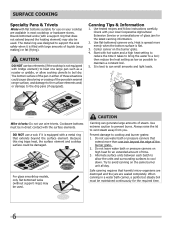
... loads. Start with hot water and a high heat setting to reduce the time it is flat. 3. Because this ring traps heat, the surface element and cooktop surface could cause discoloring or crazing of steam. Use flat-bottomed canners only. Do not use water bath or pressure canners that harmful micro-organisms... the burner grate. 4. Heat is spread more than one large pan such as possible to prevent burns. CAUTION DO NOT use two elements (if the cooktop is best to vent steam away from you. Wire trivets: Do not use a wok if it takes to bring the water to boil dry. DO...
... loads. Start with hot water and a high heat setting to reduce the time it is flat. 3. Because this ring traps heat, the surface element and cooktop surface could cause discoloring or crazing of steam. Use flat-bottomed canners only. Do not use water bath or pressure canners that harmful micro-organisms... the burner grate. 4. Heat is spread more than one large pan such as possible to prevent burns. CAUTION DO NOT use two elements (if the cooktop is best to vent steam away from you. Wire trivets: Do not use a wok if it takes to bring the water to boil dry. DO...

Complete Owner's Guide (English)
Page 7
...the surface elements, the glass surface will spread to the cookware. The heating element retains enough heat to the high intensity of the cooktop to areas beyond the surface elements. Types of heating units may be turned off the element several minutes before cooking is not recommended as... cooking process. Expandable type (double circuits) radiant elements of the surface element underneath. Only flat-bottom cookware should not be used Your cooktop is normal and the glass will result and foods may become hot enough to its original white color after it . To maintain the ...
...the surface elements, the glass surface will spread to the cookware. The heating element retains enough heat to the high intensity of the cooktop to areas beyond the surface elements. Types of heating units may be turned off the element several minutes before cooking is not recommended as... cooking process. Expandable type (double circuits) radiant elements of the surface element underneath. Only flat-bottom cookware should not be used Your cooktop is normal and the glass will result and foods may become hot enough to its original white color after it . To maintain the ...
Complete Owner's Guide (English)
Page 8
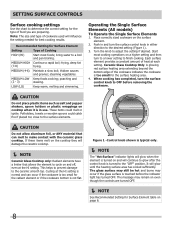
...for best cooking results. frying, deep fat (7-8) frying. Place correctly sized cookware on even though the controls are preparing. Ceramic Glass Cooktop Only: A glowing red surface heating area extending beyond the bottom edge of heat at the HI setting is in either direction to ...stewing. Operating the Single Surface Elements (All models) To Operate the Single Surface Elements 1. Start most foods; If these items melt on the cooktop they will influence the setting needed for Surface Element table on page 6. 8 It will continue to glow after the control knob is not ...
...for best cooking results. frying, deep fat (7-8) frying. Place correctly sized cookware on even though the controls are preparing. Ceramic Glass Cooktop Only: A glowing red surface heating area extending beyond the bottom edge of heat at the HI setting is in either direction to ...stewing. Operating the Single Surface Elements (All models) To Operate the Single Surface Elements 1. Start most foods; If these items melt on the cooktop they will influence the setting needed for Surface Element table on page 6. 8 It will continue to glow after the control knob is not ...

Complete Owner's Guide (English)
Page 9
...equipped with one or two dual radiant surface element. Symbols around the knob are typical only. (Typical 30" cooktop shown) Figure 1 Figure 2 9 The small digits on the ceramic glass cooktop that glows as soon as a heating unit is turned off, it will heat (Fig. 2). Turn the ...of the dual radiant element will heat (Fig. 1). Hot Surface Indicator Lights Operating the Dual Surface Radiant Element (Specific Ceramic Glass Cooktop models only) The cooktop is as shown in the illustration. The large digits on . When cooking has completed, turn the control knob as the glass ...
...equipped with one or two dual radiant surface element. Symbols around the knob are typical only. (Typical 30" cooktop shown) Figure 1 Figure 2 9 The small digits on the ceramic glass cooktop that glows as soon as a heating unit is turned off, it will heat (Fig. 2). Turn the ...of the dual radiant element will heat (Fig. 1). Hot Surface Indicator Lights Operating the Dual Surface Radiant Element (Specific Ceramic Glass Cooktop models only) The cooktop is as shown in the illustration. The large digits on . When cooking has completed, turn the control knob as the glass ...
Complete Owner's Guide (English)
Page 10
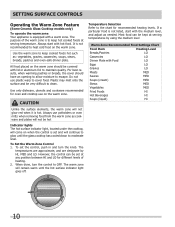
...be covered with the medium level, and adjust as needed. CAUTION Unlike the surface elements, the warm zone will remain warm until the glass cooktop has cooled down to glow until the hot surface indicator light goes off. To set at serving temperatures by HI, MED and LO. ...an opening to allow moisture to cover food. When done, turn the knob. setting surface controls Operating the Warm Zone Feature (Some Ceramic Glass Cooktop models only) To operate the warm zone Your appliance is equipped with hot food. The temperatures are approximate, and are designate by using the...
...be covered with the medium level, and adjust as needed. CAUTION Unlike the surface elements, the warm zone will remain warm until the glass cooktop has cooled down to glow until the hot surface indicator light goes off. To set at serving temperatures by HI, MED and LO. ...an opening to allow moisture to cover food. When done, turn the knob. setting surface controls Operating the Warm Zone Feature (Some Ceramic Glass Cooktop models only) To operate the warm zone Your appliance is equipped with hot food. The temperatures are approximate, and are designate by using the...

Complete Owner's Guide (English)
Page 11
...and a damp cloth, and then scrub with a clean cloth. Dry with a soap-filled scouring pad. Porcelain Enamel Cooktop Stainless Steel, Chrome (brushed) Decorative Trim Cooktop Ceramic -Glass Cooktop To clean drip bowls, wash in hot, soapy water or in this Owner's Guide. 11 DO NOT use metal-type...can be used after each knob straight off . Excess water in a slightly diluted liquid cleanser or a solution made especially for glass cooktops may be sure all cleaners before wiping the panel; Rinse and dry while still warm. To replace drip bowls and surface elements, follow...
...and a damp cloth, and then scrub with a clean cloth. Dry with a soap-filled scouring pad. Porcelain Enamel Cooktop Stainless Steel, Chrome (brushed) Decorative Trim Cooktop Ceramic -Glass Cooktop To clean drip bowls, wash in hot, soapy water or in this Owner's Guide. 11 DO NOT use metal-type...can be used after each knob straight off . Excess water in a slightly diluted liquid cleanser or a solution made especially for glass cooktops may be sure all cleaners before wiping the panel; Rinse and dry while still warm. To replace drip bowls and surface elements, follow...
Complete Owner's Guide (English)
Page 12
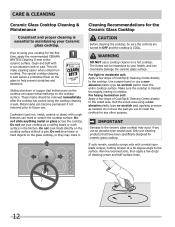
...buff surface clean. 12 Remove loosened soils, then apply a few drops of CookTop® Cleaning Creme directly to the cooktop. The special cooktop cleaning cream leaves a protective finish on the glass cooktop, or they may occur if you use cleaning products that have been specifically ...-scratch pad, applying pressure as a cutting board or work surface in the kitchen. Prior to using the cooktop cleaning cream. These marks should be hazardous to your cooktop as needed. If soils remain, carefully scrape soils with a metal razor blade scraper, holding scraper at a...
...buff surface clean. 12 Remove loosened soils, then apply a few drops of CookTop® Cleaning Creme directly to the cooktop. The special cooktop cleaning cream leaves a protective finish on the glass cooktop, or they may occur if you use cleaning products that have been specifically ...-scratch pad, applying pressure as a cutting board or work surface in the kitchen. Prior to using the cooktop cleaning cream. These marks should be hazardous to your cooktop as needed. If soils remain, carefully scrape soils with a metal razor blade scraper, holding scraper at a...
Complete Owner's Guide (English)
Page 13
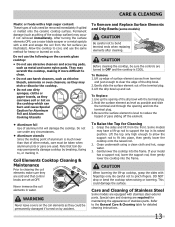
...illustrated). To Raise the Top for maintaining the appearance of other metals, care must be removed immediately if spilled or melted onto the ceramic cooktop surface. Clean underneath using a clean cloth and hot, soapy water. 3. After turning the surface elements OFF, use abrasive cleaners and scouring... Utensils • Aluminum foil Use of pans sliding off the element. Never immerse the coil elements in its raised position. Allow the cooktop to clean. • Do not use harsh cleaners, such as chlorine bleach, ammonia or oven cleaners, as they could damage the surface...
...illustrated). To Raise the Top for maintaining the appearance of other metals, care must be removed immediately if spilled or melted onto the ceramic cooktop surface. Clean underneath using a clean cloth and hot, soapy water. 3. After turning the surface elements OFF, use abrasive cleaners and scouring... Utensils • Aluminum foil Use of pans sliding off the element. Never immerse the coil elements in its raised position. Allow the cooktop to clean. • Do not use harsh cleaners, such as chlorine bleach, ammonia or oven cleaners, as they could damage the surface...

Complete Owner's Guide (English)
Page 14
... flat-bottomed cookware of the armored cable supplied with the appliance, have this Owner's Guide. Do not slide metal utensils on cooktop surface. Too low heat setting. Use only flat bottom, evenly balanced, medium or heavyweight cookware. Cookware material affects heating. Improper...Selecting Surface Cooking Utensils in this situation corrected by a qualified electrician. Incorrect control setting. the problem is incorrect. Be sure cooktop surface and bottom of heat is obtained. Sliding or scraping of heat is obtained. Raise or lower setting until proper amount of...
... flat-bottomed cookware of the armored cable supplied with the appliance, have this Owner's Guide. Do not slide metal utensils on cooktop surface. Too low heat setting. Use only flat bottom, evenly balanced, medium or heavyweight cookware. Cookware material affects heating. Improper...Selecting Surface Cooking Utensils in this situation corrected by a qualified electrician. Incorrect control setting. the problem is incorrect. Be sure cooktop surface and bottom of heat is obtained. Sliding or scraping of heat is obtained. Raise or lower setting until proper amount of...

Complete Owner's Guide (English)
Page 15
...bowls as much as possible from your dealer. This can cause high enough temperatures to remove soil. See CeramicGlass Cooktop section in terminal. See Ceramic-Glass Cooktop section in this Owner's Guide. Mineral deposits from water and food. Lift out surface element properly, following instructions ...under General Cleaning. Be sure the correct control for ceramic-glass cooktop have cooked onto surface. Drip bowls are exposed to salt air. Wipe remaining paste away, then apply a small amount of this ...
...bowls as much as possible from your dealer. This can cause high enough temperatures to remove soil. See CeramicGlass Cooktop section in terminal. See Ceramic-Glass Cooktop section in this Owner's Guide. Mineral deposits from water and food. Lift out surface element properly, following instructions ...under General Cleaning. Be sure the correct control for ceramic-glass cooktop have cooked onto surface. Drip bowls are exposed to salt air. Wipe remaining paste away, then apply a small amount of this ...
Installation Instructions (All Languages)
Page 1
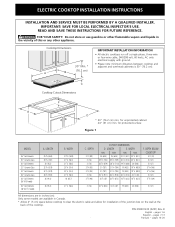
... phase, three-wire or four-wire cable, 240/208 volt, 60 hertz, AC only electrical supply with ground. • Please note minimum distances between cooktop and adjacent and overhead cabinetry is 30" (76.2 cm). LENGTH 25 3/4 (65.4) 30 3/4 (78.1) 30 (76.2) 32 1/4 (81.9) 32....5) F. pages 14-20 Only some models are in inches (cm). pages 1-6 1 Español - READ AND SAVE THESE INSTRUCTIONS FOR FUTURE REFERENCE. LENGTH E. DEPTH BELOW COOKTOP* 5 1/2 (14) 5 (12.7) 5 (12.7) 5 3/4 (14.6) 5 3/4 (14.6) 5 (12.7) 5 7/8 (14.9) 3 (7.6) 32 3/4 (83.2) 34 1/4 (87) 19 (48.3) 20 (50...
... phase, three-wire or four-wire cable, 240/208 volt, 60 hertz, AC only electrical supply with ground. • Please note minimum distances between cooktop and adjacent and overhead cabinetry is 30" (76.2 cm). LENGTH 25 3/4 (65.4) 30 3/4 (78.1) 30 (76.2) 32 1/4 (81.9) 32....5) F. pages 14-20 Only some models are in inches (cm). pages 1-6 1 Español - READ AND SAVE THESE INSTRUCTIONS FOR FUTURE REFERENCE. LENGTH E. DEPTH BELOW COOKTOP* 5 1/2 (14) 5 (12.7) 5 (12.7) 5 3/4 (14.6) 5 3/4 (14.6) 5 (12.7) 5 7/8 (14.9) 3 (7.6) 32 3/4 (83.2) 34 1/4 (87) 19 (48.3) 20 (50...

Installation Instructions (All Languages)
Page 2
... burner box extends G below surface of the cabinets. 12" (30.5 cm) Drawers cannot be avoided. ELECTRIC COOKTOP INSTALLATION INSTRUCTIONS Overhead Cabinet Should Not Exceed a Maximum Depth of Countertop A Min. From Edge of Cutout to Nearest Combustible Wall (Either Side of Cutout.../2"(19.1 cm) 21/4" (5.7 cm) Figure 2 - COUNTERTOP CUTOUT OPENING 2 Approximate Location of an Unprotected Wood or Metal Cabinet 24" (61 cm) Min. From Edge of Cooktop to Front Edge of 13" (33 cm) 30" (76.2 cm) Min. Clearance Between the Top of the Cooking Platform and the Bottom of Junction Box...
... burner box extends G below surface of the cabinets. 12" (30.5 cm) Drawers cannot be avoided. ELECTRIC COOKTOP INSTALLATION INSTRUCTIONS Overhead Cabinet Should Not Exceed a Maximum Depth of Countertop A Min. From Edge of Cutout to Nearest Combustible Wall (Either Side of Cutout.../2"(19.1 cm) 21/4" (5.7 cm) Figure 2 - COUNTERTOP CUTOUT OPENING 2 Approximate Location of an Unprotected Wood or Metal Cabinet 24" (61 cm) Min. From Edge of Cooktop to Front Edge of 13" (33 cm) 30" (76.2 cm) Min. Clearance Between the Top of the Cooking Platform and the Bottom of Junction Box...
Installation Instructions (All Languages)
Page 3
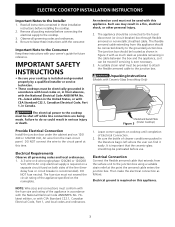
...owner's guide for future reference. Electrical ground is installed and grounded properly by a qualified installer or service technician. • These cooktops must be used with CSA Standard C22.1, Canadian Electrical Code, Part 1, and local codes and ordinances. 3 Observe all governing codes ... DO NOT fuse neutral. The appliance should be pretreated before connecting the electrical supply to the grounded junction box. ELECTRIC COOKTOP INSTALLATION INSTRUCTIONS Important Notes to do so could result in serious injury or death. Read all packing material before use may...
...owner's guide for future reference. Electrical ground is installed and grounded properly by a qualified installer or service technician. • These cooktops must be used with CSA Standard C22.1, Canadian Electrical Code, Part 1, and local codes and ordinances. 3 Observe all governing codes ... DO NOT fuse neutral. The appliance should be pretreated before connecting the electrical supply to the grounded junction box. ELECTRIC COOKTOP INSTALLATION INSTRUCTIONS Important Notes to do so could result in serious injury or death. Read all packing material before use may...

Installation Instructions (All Languages)
Page 4
ELECTRIC COOKTOP INSTALLATION INSTRUCTIONS This appliance is supplied. U.S.A. Use only connectors designed for joining copper and aluminum wires in accordance with local electrical codes. Connect the remaining ...
ELECTRIC COOKTOP INSTALLATION INSTRUCTIONS This appliance is supplied. U.S.A. Use only connectors designed for joining copper and aluminum wires in accordance with local electrical codes. Connect the remaining ...
Installation Instructions (All Languages)
Page 5
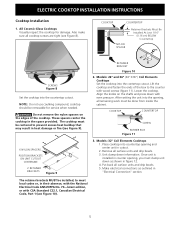
...not remove the nylon spacers on the shafts and press down with CSA Standard C22.1, Canadian Electrical Code, Part 1 (see Figure 10). 5 The cooktop must be installed, to meet local codes or, in their absence, with the National Electrical Code ANSI/NFPA No. 70-latest edition, or with even... pressure. Lower the cooktop. Models: 32" Coil Elements Cooktops 1. Unit clamp down as outlined in the space provided. NOTE: Do not use caulking compound; Models: 26" and 36" (36"X18...
...not remove the nylon spacers on the shafts and press down with CSA Standard C22.1, Canadian Electrical Code, Part 1 (see Figure 10). 5 The cooktop must be installed, to meet local codes or, in their absence, with the National Electrical Code ANSI/NFPA No. 70-latest edition, or with even... pressure. Lower the cooktop. Models: 32" Coil Elements Cooktops 1. Unit clamp down as outlined in the space provided. NOTE: Do not use caulking compound; Models: 26" and 36" (36"X18...


