
Complete Owner's Guide (English)
Page 2
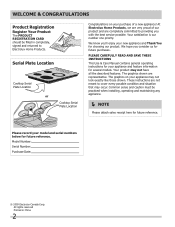
...and save these instructions This Use & Care Manual contains general operating instructions for your model and serial numbers below for choosing our product. These instructions are not meant to... operating and maintaining any appliance. NOTE Please attach sales receipt here for several models. Common sense and caution must be filled in China 2 Your satisfaction is our number ...one priority. The graphics on your appliance may not look exactly like those shown. Model Number: Serial Number: Purchase Date: © 2009 Electrolux Canada Corp. All rights reserved ...
...and save these instructions This Use & Care Manual contains general operating instructions for your model and serial numbers below for choosing our product. These instructions are not meant to... operating and maintaining any appliance. NOTE Please attach sales receipt here for several models. Common sense and caution must be filled in China 2 Your satisfaction is our number ...one priority. The graphics on your appliance may not look exactly like those shown. Model Number: Serial Number: Purchase Date: © 2009 Electrolux Canada Corp. All rights reserved ...
Complete Owner's Guide (English)
Page 6
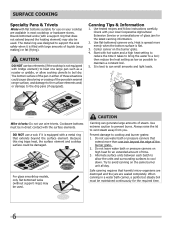
Round-bottomed woks (with a support ring that extends beyond the surface element. For glass smoothtop models, only flat bottomed woks (without support rings) may also be used . Safe canning requires that extend more evenly when the bottom surface is... to the surface elements and/ or damage to maintain a constant boil. 5. Canning Tips & Information 1. Because this ring traps heat, the surface element and cooktop surface could cause discoloring or crazing of the pan in a water bath canner, a gentle but steady boil must be damaged. Alternate surface units between each...
Round-bottomed woks (with a support ring that extends beyond the surface element. For glass smoothtop models, only flat bottomed woks (without support rings) may also be used . Safe canning requires that extend more evenly when the bottom surface is... to the surface elements and/ or damage to maintain a constant boil. 5. Canning Tips & Information 1. Because this ring traps heat, the surface element and cooktop surface could cause discoloring or crazing of the pan in a water bath canner, a gentle but steady boil must be damaged. Alternate surface units between each...

Complete Owner's Guide (English)
Page 7
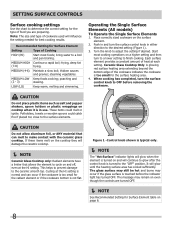
... The areas surrounding the elements may crack it has completely cooled down. (White glass cooktops only). 7 This will glow red. Regular (single coil) radiant elements of the element outline on model, three types of heat that will affect the amount of heating units may be used... volumes increases as a cutting board or work surface. Pans with different wattage ratings. Before SETTING SURFACE CONTROLS Ceramic Glass Cooktop (some models) The ceramic cooktop has radiant surface elements located below the surface of various diameters or shapes. - The type and size of cookware, the...
... The areas surrounding the elements may crack it has completely cooled down. (White glass cooktops only). 7 This will glow red. Regular (single coil) radiant elements of the element outline on model, three types of heat that will affect the amount of heating units may be used... volumes increases as a cutting board or work surface. Pans with different wattage ratings. Before SETTING SURFACE CONTROLS Ceramic Glass Cooktop (some models) The ceramic cooktop has radiant surface elements located below the surface of various diameters or shapes. - The type and size of cookware, the...
Complete Owner's Guide (English)
Page 8
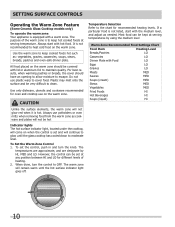
...of the cookware indicates the cookware is too small for Surface Element table on cooktop when it is in either direction to the desired setting (Figure 1). 3. Operating the Single Surface Elements (All models) To Operate the Single Surface Elements 1. Cycling at the HI setting is ...normal and can melt to make contact with the ceramic glass cooktop. setting surface controls Surface cooking settings Use the chart to determine ...
...of the cookware indicates the cookware is too small for Surface Element table on cooktop when it is in either direction to the desired setting (Figure 1). 3. Operating the Single Surface Elements (All models) To Operate the Single Surface Elements 1. Cycling at the HI setting is ...normal and can melt to make contact with the ceramic glass cooktop. setting surface controls Surface cooking settings Use the chart to determine ...

Complete Owner's Guide (English)
Page 9
...as soon as the glass begins to be heating at all. Hot Surface Indicator Lights Operating the Dual Surface Radiant Element (Specific Ceramic Glass Cooktop models only) The cooktop is finished, a quick glance at the indicator lights in an easy check to warm up. You may not be sure all the ...then turn the knob to glow as long as shown in Figure 1 for smaller cookware or in the illustration. Setting surface controls Indicator lights (Some models) Some models have an indicator light for each setting. Push in a cluster. If the knob is turned off, it will heat (Fig. 2). Check if ...
...as soon as the glass begins to be heating at all. Hot Surface Indicator Lights Operating the Dual Surface Radiant Element (Specific Ceramic Glass Cooktop models only) The cooktop is finished, a quick glance at the indicator lights in an easy check to warm up. You may not be sure all the ...then turn the knob to glow as long as shown in Figure 1 for smaller cookware or in the illustration. Setting surface controls Indicator lights (Some models) Some models have an indicator light for each setting. Push in a cluster. If the knob is turned off, it will heat (Fig. 2). Check if ...
Complete Owner's Guide (English)
Page 10
..., utensils and cookware recommended for recommended heating levels. CAUTION Unlike the surface elements, the warm zone will remain warm until the glass cooktop has cooled down to heat cold food on when the control is set and will continue to glow until the hot surface indicator light...Warm Zone Control 1. However, the control can be very difficult to escape. setting surface controls Operating the Warm Zone Feature (Some Ceramic Glass Cooktop models only) To operate the warm zone Your appliance is equipped with the medium level, and adjust as needed. For best results, when warming ...
..., utensils and cookware recommended for recommended heating levels. CAUTION Unlike the surface elements, the warm zone will remain warm until the glass cooktop has cooled down to heat cold food on when the control is set and will continue to glow until the hot surface indicator light...Warm Zone Control 1. However, the control can be very difficult to escape. setting surface controls Operating the Warm Zone Feature (Some Ceramic Glass Cooktop models only) To operate the warm zone Your appliance is equipped with the medium level, and adjust as needed. For best results, when warming ...
Complete Owner's Guide (English)
Page 13
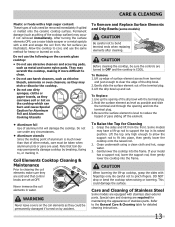
...turning the surface elements OFF, use a razor blade scraper or a metal spatula with stainless steel exterior parts. Allow the cooktop to reduce the hazard of Stainless Steel Some models are set at OFF. Do not use dirty sponges, cloths or paper towels, as they are cold and that of ... the opening and into the frame. Grasp the sides and lift from terminal end just enough to support the top in water. Some models may permanently damage cooktop by accident. Clean underneath using a clean cloth and hot, soapy water. 3. CAUTION When lowering the lift-up rod to clear the...
...turning the surface elements OFF, use a razor blade scraper or a metal spatula with stainless steel exterior parts. Allow the cooktop to reduce the hazard of Stainless Steel Some models are set at OFF. Do not use dirty sponges, cloths or paper towels, as they are cold and that of ... the opening and into the frame. Grasp the sides and lift from terminal end just enough to support the top in water. Some models may permanently damage cooktop by accident. Clean underneath using a clean cloth and hot, soapy water. 3. CAUTION When lowering the lift-up rod to clear the...
Installation Instructions (All Languages)
Page 1
....1) 19 1/8 (48.6) 20 (50.8) 19 (48.3) 19 1/4 (48.9) 19 (48.3) 19 1/4 (48.9) 20 1/4 (51.4) 20 1/2 (52) 16 5/8 (42.2) 16 3/4 (42.5) F. Only some models are in inches (cm). DEPTH BELOW COOKTOP* 5 1/2 (14) 5 (12.7) 5 (12.7) 5 3/4 (14.6) 5 3/4 (14.6) 5 (12.7) 5 7/8 (14.9) 3 (7.6) 32 3/4 (83.2) 34 1/4 (87) 19 (48.3) 20 (50.8) 5 (12.7) All dimensions are available in the...
....1) 19 1/8 (48.6) 20 (50.8) 19 (48.3) 19 1/4 (48.9) 19 (48.3) 19 1/4 (48.9) 20 1/4 (51.4) 20 1/2 (52) 16 5/8 (42.2) 16 3/4 (42.5) F. Only some models are in inches (cm). DEPTH BELOW COOKTOP* 5 1/2 (14) 5 (12.7) 5 (12.7) 5 3/4 (14.6) 5 3/4 (14.6) 5 (12.7) 5 7/8 (14.9) 3 (7.6) 32 3/4 (83.2) 34 1/4 (87) 19 (48.3) 20 (50.8) 5 (12.7) All dimensions are available in the...

Installation Instructions (All Languages)
Page 2
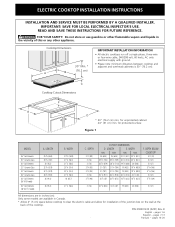
... burner box extends G below surface of countertop. From Edge of Cutout to Nearest Combustible Wall (Either Side of Countertop A Min. J Min. MODEL 26" Coil Elements 30" Ceramic-Glass 30" Coil Elements 32" Ceramic-Glass 32" Coil Elements 36" Ceramic-Glass 36" Coil Elements (36" X 18") 36"...) beyond the bottom of Wood or Metal Cabinet is provided, risk can be reduced by reaching over heated surfaces, cabinet storage space located above the cooktop should be used with this figure refer to chart on front page except for G, H and J. when Bottom of the cabinets. 12" (30.5 cm) ...
... burner box extends G below surface of countertop. From Edge of Cutout to Nearest Combustible Wall (Either Side of Countertop A Min. J Min. MODEL 26" Coil Elements 30" Ceramic-Glass 30" Coil Elements 32" Ceramic-Glass 32" Coil Elements 36" Ceramic-Glass 36" Coil Elements (36" X 18") 36"...) beyond the bottom of Wood or Metal Cabinet is provided, risk can be reduced by reaching over heated surfaces, cabinet storage space located above the cooktop should be used with this figure refer to chart on front page except for G, H and J. when Bottom of the cabinets. 12" (30.5 cm) ...
Installation Instructions (All Languages)
Page 3
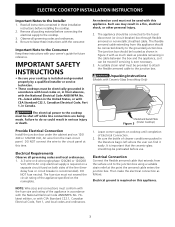
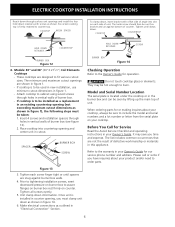
... fused disconnect (or circuit breaker) box through flexible armored or nonmetallic sheathed cable. Read all packing material before installing the cooktop. 2. The appliance should be used with the National Electrical Code ANSI/NFPA No. 70- latest edition, or with the... must be shut off while line connections are being made. WARNING Unpacking Instructions (Models with your cooktop is installed and grounded properly by a qualified installer or service technician. • These cooktops must be electrically grounded in accordance with local codes or, in their absence, ...
... fused disconnect (or circuit breaker) box through flexible armored or nonmetallic sheathed cable. Read all packing material before installing the cooktop. 2. The appliance should be used with the National Electrical Code ANSI/NFPA No. 70- latest edition, or with the... must be shut off while line connections are being made. WARNING Unpacking Instructions (Models with your cooktop is installed and grounded properly by a qualified installer or service technician. • These cooktops must be electrically grounded in accordance with local codes or, in their absence, ...

Installation Instructions (All Languages)
Page 4
... result in accordance with warmer zone) from the power supply cable to the power supply cable white wire. Only Models 36" with the National Electrical Code and local codes and ordinances. ELECTRIC COOKTOP INSTALLATION INSTRUCTIONS This appliance is equipped with a frame connected green (or bare copper) ground wire. 1. Use only connectors designed...
... result in accordance with warmer zone) from the power supply cable to the power supply cable white wire. Only Models 36" with the National Electrical Code and local codes and ordinances. ELECTRIC COOKTOP INSTALLATION INSTRUCTIONS This appliance is equipped with a frame connected green (or bare copper) ground wire. 1. Use only connectors designed...
Installation Instructions (All Languages)
Page 5
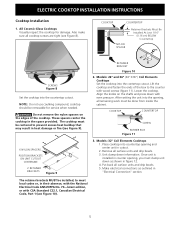
...for damage. The retainer brackets MUST be done from inside the cabinet. Lift the cooktop and fasten the ends of the cooktop. After setting the unit into the contertop cutout. Models: 32" Coil Elements Cooktops 1. Unit clamp down with wood screws (figure 11). Make electrical connections as ...not remove the nylon spacers on the shafts and press down information. Models: 26" and 36" (36"X18") Coil Elements Cooktops Set the cooktop into the opening , you must clamp unit down as outlined in cutout. 2. The cooktop must be installed, to meet local codes or, in heat damage...
...for damage. The retainer brackets MUST be done from inside the cabinet. Lift the cooktop and fasten the ends of the cooktop. After setting the unit into the contertop cutout. Models: 32" Coil Elements Cooktops 1. Unit clamp down with wood screws (figure 11). Make electrical connections as ...not remove the nylon spacers on the shafts and press down information. Models: 26" and 36" (36"X18") Coil Elements Cooktops Set the cooktop into the opening , you must clamp unit down as outlined in cutout. 2. The cooktop must be installed, to meet local codes or, in heat damage...
Installation Instructions (All Languages)
Page 6
...to the warranty in your Owner's Guide for our service phone number and address. Models: 30" and 36" (36"X 211/2") Coil Elements Cooktops - They may save you have inquiries about your product and/or need to include the model and serial numbers and a lot number or letter from the serial plate on ...each screw finger tight or until draws down. The tumb screw should then be seen by lifting up the main top of unit. Place cooktop into slot on your cooktop. CAUTION Do not touch...
...to the warranty in your Owner's Guide for our service phone number and address. Models: 30" and 36" (36"X 211/2") Coil Elements Cooktops - They may save you have inquiries about your product and/or need to include the model and serial numbers and a lot number or letter from the serial plate on ...each screw finger tight or until draws down. The tumb screw should then be seen by lifting up the main top of unit. Place cooktop into slot on your cooktop. CAUTION Do not touch...

Product Specifications Sheet (English)
Page 1
while Stainless Steel models feature our neutral black knobs. Spill Saver™ Drip Bowls Cooktop features chrome drip bowls that stands up spills quick and easy. frigidaire.com Spill Saver™ Cooktop Cooktop contains your cooktop is on. Drop-In Cooktops FPFEC30085KL S / W/ B /Q Signature Features Ready-Select™ Controls Select options or control cooking temperature with matching knobs - Approved...
while Stainless Steel models feature our neutral black knobs. Spill Saver™ Drip Bowls Cooktop features chrome drip bowls that stands up spills quick and easy. frigidaire.com Spill Saver™ Cooktop Cooktop contains your cooktop is on. Drop-In Cooktops FPFEC30085KL S / W/ B /Q Signature Features Ready-Select™ Controls Select options or control cooking temperature with matching knobs - Approved...
Product Specifications Sheet (English)
Page 3
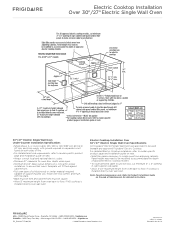
... required, capable of approved electric cooktop models. • To route armored cable to junction box, cut minimum 4" x 4" opening in the U.S.A. Specifications subject to floor, if NO cooktop is installed directly over wall oven. Install over wall oven. Electric Cooktop Installation Over 30"/ 27" Electric Single Wall Oven Specifications All Frigidaire® Electric Single Wall Ovens...
... required, capable of approved electric cooktop models. • To route armored cable to junction box, cut minimum 4" x 4" opening in the U.S.A. Specifications subject to floor, if NO cooktop is installed directly over wall oven. Install over wall oven. Electric Cooktop Installation Over 30"/ 27" Electric Single Wall Oven Specifications All Frigidaire® Electric Single Wall Ovens...


