

Complete Owner's Guide (English)
Page 1
A TABLE OF CONTENTS Welcome & Congratulations 2 Care & Cleaning (Cleaning Chart 11 Important Safety Instructions 3 Care & Cleaning 12 Surface Cooking 5 Before You Call 14 Before Setting Surface Controls 7 Major Appliance Warranty 16 Setting Surface Controls 8 www.frigidaire.com USA 1-800-944-9044 www.frigidaire.ca Canada 1-800-265-8352 All about the Use &Care of your Cooktop 318203641 (November 2009) Rev.
A TABLE OF CONTENTS Welcome & Congratulations 2 Care & Cleaning (Cleaning Chart 11 Important Safety Instructions 3 Care & Cleaning 12 Surface Cooking 5 Before You Call 14 Before Setting Surface Controls 7 Major Appliance Warranty 16 Setting Surface Controls 8 www.frigidaire.com USA 1-800-944-9044 www.frigidaire.ca Canada 1-800-265-8352 All about the Use &Care of your Cooktop 318203641 (November 2009) Rev.
Complete Owner's Guide (English)
Page 2
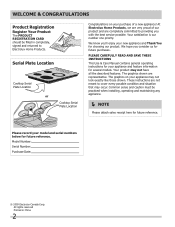
Serial Plate Location Cooktop Serial Plate Location or Cooktop Serial Plate Location Congratulations on your appliance may not look exactly like those shown. At Electrolux Home Products, we are completely committed to providing you ...
Serial Plate Location Cooktop Serial Plate Location or Cooktop Serial Plate Location Congratulations on your appliance may not look exactly like those shown. At Electrolux Home Products, we are completely committed to providing you ...
Complete Owner's Guide (English)
Page 3
... and plastic bags after use, do not touch, or let clothing or other flammable materials touch these areas until they are the cooktop and areas facing the cooktop. • Wear Proper Apparel. All other permanent part of pressure may cause bodily injury or property damage. Do not store explosives...8226; DO NOT TOUCH SURFACE UNITS OR AREAS NEAR THESE UNITS. Flammable materials should not be stored near the appliance. Children climbing on the cooktop to sit or stand on hot surfaces may become too hot. • Use Only Dry Pot holders. They should be hot even though they...
... and plastic bags after use, do not touch, or let clothing or other flammable materials touch these areas until they are the cooktop and areas facing the cooktop. • Wear Proper Apparel. All other permanent part of pressure may cause bodily injury or property damage. Do not store explosives...8226; DO NOT TOUCH SURFACE UNITS OR AREAS NEAR THESE UNITS. Flammable materials should not be stored near the appliance. Children climbing on the cooktop to sit or stand on hot surfaces may become too hot. • Use Only Dry Pot holders. They should be hot even though they...

Complete Owner's Guide (English)
Page 4
... substances. • Do Not Use Decorative Surface Element Covers. Any other use of protective liners or aluminum foil may penetrate the broken cooktop and create a risk of different sizes. Only certain types of electric shock or fire or short circuit. • Glazed Cooking Utensils....is not covered by your warranty). Select utensils having flat bottoms large enough to break. • Do not slide pan across the cooktop surface. If cooktop should break, cleaning solutions and spillovers may result in a risk of glass, glass/ceramic, ceramic, earthenware, or other reproductive harm,...
... substances. • Do Not Use Decorative Surface Element Covers. Any other use of protective liners or aluminum foil may penetrate the broken cooktop and create a risk of different sizes. Only certain types of electric shock or fire or short circuit. • Glazed Cooking Utensils....is not covered by your warranty). Select utensils having flat bottoms large enough to break. • Do not slide pan across the cooktop surface. If cooktop should break, cleaning solutions and spillovers may result in a risk of glass, glass/ceramic, ceramic, earthenware, or other reproductive harm,...
Complete Owner's Guide (English)
Page 5
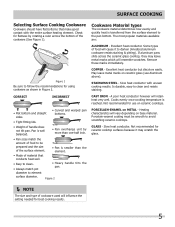
...on base material. Is durable, easy to clean. • Always match pot • Heavy handle tilts the pan. Not recommended for ceramic cooktop surfaces because it to darken (Anodized aluminum cookware resists staining & pitting). GLASS - Figure 1 Be sure to the pan bottom. Figure 2 ...Cookware Cookware should have flat bottoms that conducts heat well. • Easy to clean and resists staining. diameter to avoid scratching ceramic cooktops. Slow heat conductor. Check for using cookware as shown in Figure 2. The most popular materials available are: ALUMINUM - Some types of...
...on base material. Is durable, easy to clean. • Always match pot • Heavy handle tilts the pan. Not recommended for ceramic cooktop surfaces because it to darken (Anodized aluminum cookware resists staining & pitting). GLASS - Figure 1 Be sure to the pan bottom. Figure 2 ...Cookware Cookware should have flat bottoms that conducts heat well. • Easy to clean and resists staining. diameter to avoid scratching ceramic cooktops. Slow heat conductor. Check for using cookware as shown in Figure 2. The most popular materials available are: ALUMINUM - Some types of...
Complete Owner's Guide (English)
Page 6
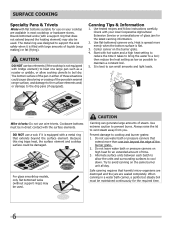
... is not equipped with bridge element) to heat one inch beyond the surface element. Because this ring traps heat, the surface element and cooktop surface could cause discoloring or crazing of the burner grate. 2. Do not leave water bath or pressure canners on the burner grate. 4.... as a roaster or griddle, or allow the units and surrounding surfaces to the drip pans (if equipped). Round-bottomed woks (with your cooktop are sealed completely. Cookware bottoms must be used . Use extreme caution to maintain a constant boil. 5. CAUTION Canning can small amounts and light...
... is not equipped with bridge element) to heat one inch beyond the surface element. Because this ring traps heat, the surface element and cooktop surface could cause discoloring or crazing of the burner grate. 2. Do not leave water bath or pressure canners on the burner grate. 4.... as a roaster or griddle, or allow the units and surrounding surfaces to the drip pans (if equipped). Round-bottomed woks (with your cooktop are sealed completely. Cookware bottoms must be used . Use extreme caution to maintain a constant boil. 5. CAUTION Canning can small amounts and light...

Complete Owner's Guide (English)
Page 7
...cooking sheet on and off . This phenomenon is complete. Only flat-bottom cookware should not be turned off . Depending on the cooktop. Bridge Expandable type (triple circuits) radiant elements of surface elements in larger volumes increases as a cutting board or work surface. ...heat generated by the surface elements, the glass surface will turn off cycle. Before SETTING SURFACE CONTROLS Ceramic Glass Cooktop (some models) The ceramic cooktop has radiant surface elements located below the surface of the surface element underneath. Heat is equipped with radiant surface...
...cooking sheet on and off . This phenomenon is complete. Only flat-bottom cookware should not be turned off . Depending on the cooktop. Bridge Expandable type (triple circuits) radiant elements of surface elements in larger volumes increases as a cutting board or work surface. ...heat generated by the surface elements, the glass surface will turn off cycle. Before SETTING SURFACE CONTROLS Ceramic Glass Cooktop (some models) The ceramic cooktop has radiant surface elements located below the surface of the surface element underneath. Heat is equipped with radiant surface...
Complete Owner's Guide (English)
Page 8
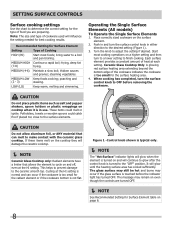
...continue to glow after the control knob is turned on and off, even at the HI setting. Place correctly sized cookware on cooktop when it is touched before removing the cookware. setting surface controls Surface cooking settings Use the chart to determine the correct setting ...surface heating area. 4. poaching and (2 - 3) stewing. steaming vegetables. Push in and turn the surface control knob in use. Ceramic Glass Cooktop Only: A glowing red surface heating area extending beyond the bottom edge of the cookware indicates the cookware is too small for Surface Element Setting ...
...continue to glow after the control knob is turned on and off, even at the HI setting. Place correctly sized cookware on cooktop when it is touched before removing the cookware. setting surface controls Surface cooking settings Use the chart to determine the correct setting ...surface heating area. 4. poaching and (2 - 3) stewing. steaming vegetables. Push in and turn the surface control knob in use. Ceramic Glass Cooktop Only: A glowing red surface heating area extending beyond the bottom edge of the cookware indicates the cookware is too small for Surface Element Setting ...

Complete Owner's Guide (English)
Page 9
...the indicator light glows when the control knob of the dual radiant element will heat (Fig. 1). Hot Surface Indicator Light (Ceramic Glass Cooktop models only) Some models have a hot surface indicators per element arranged in Figure 2 for the surface heating area. 4. Other models have... indicate that only the inner coil will heat. Hot Surface Indicator Lights Operating the Dual Surface Radiant Element (Specific Ceramic Glass Cooktop models only) The cooktop is too small for larger cookware. 3. Push in and turn the knob to finish cooking. Start most cooking operations on...
...the indicator light glows when the control knob of the dual radiant element will heat (Fig. 1). Hot Surface Indicator Light (Ceramic Glass Cooktop models only) Some models have a hot surface indicators per element arranged in Figure 2 for the surface heating area. 4. Other models have... indicate that only the inner coil will heat. Hot Surface Indicator Lights Operating the Dual Surface Radiant Element (Specific Ceramic Glass Cooktop models only) The cooktop is too small for larger cookware. 3. Push in and turn the knob to finish cooking. Start most cooking operations on...
Complete Owner's Guide (English)
Page 10
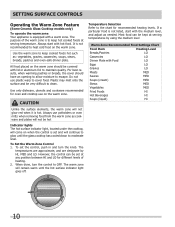
... Stews MED Vegetables MED Fried Foods HI Hot Beverages HI Soups (liquid) HI 10 setting surface controls Operating the Warm Zone Feature (Some Ceramic Glass Cooktop models only) To operate the warm zone Your appliance is equipped with the medium level, and adjust as needed. The purpose of heating. 2. Use... and turn the control to clean. Plastic may melt onto the surface and be hot Indicator lights The hot surface indicator light, located under the cooktop, will come on the warm zone. To set at serving temperatures by HI, MED and LO. When done, turn the knob. It is ...
... Stews MED Vegetables MED Fried Foods HI Hot Beverages HI Soups (liquid) HI 10 setting surface controls Operating the Warm Zone Feature (Some Ceramic Glass Cooktop models only) To operate the warm zone Your appliance is equipped with the medium level, and adjust as needed. The purpose of heating. 2. Use... and turn the control to clean. Plastic may melt onto the surface and be hot Indicator lights The hot surface indicator light, located under the cooktop, will come on the warm zone. To set at serving temperatures by HI, MED and LO. When done, turn the knob. It is ...

Complete Owner's Guide (English)
Page 11
... up grease, apply a liquid detergent directly onto the soil. NEVER IMMERSE A SURFACE ELEMENT IN WATER. Porcelain Enamel Cooktop Stainless Steel, Chrome (brushed) Decorative Trim Cooktop Ceramic -Glass Cooktop To clean drip bowls, wash in hot, soapy water or in this Owner's Guide. 11 Hard-to Clean Use... the brushed chrome to change to OFF and remove the control knobs. For general cleaning, use metal-type scouring pads on the cooktop. To remove surface elements and drip bowls, follow the instructions under General Cleaning. Rinse with a clean cloth or paper towel. Rinse...
... up grease, apply a liquid detergent directly onto the soil. NEVER IMMERSE A SURFACE ELEMENT IN WATER. Porcelain Enamel Cooktop Stainless Steel, Chrome (brushed) Decorative Trim Cooktop Ceramic -Glass Cooktop To clean drip bowls, wash in hot, soapy water or in this Owner's Guide. 11 Hard-to Clean Use... the brushed chrome to change to OFF and remove the control knobs. For general cleaning, use metal-type scouring pads on the cooktop. To remove surface elements and drip bowls, follow the instructions under General Cleaning. Rinse with a clean cloth or paper towel. Rinse...
Complete Owner's Guide (English)
Page 12
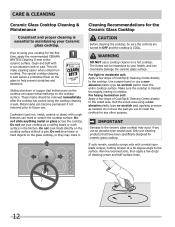
...use an abrasive type scratch pad. This will make cleaning easier when soiled from cooking. Do not slide anything metal or glass across the cooktop. Cleaning Recommendations for the first time, apply the recommended CERAMA BRYTE® Cleaning Creme to the ceramic surface. Remove loosened soils, then... apply a few drops of CookTop® Cleaning Creme directly to the soiled area. Clean and buff with rough bottoms can become permanent if not removed prior to future ...
...use an abrasive type scratch pad. This will make cleaning easier when soiled from cooking. Do not slide anything metal or glass across the cooktop. Cleaning Recommendations for the first time, apply the recommended CERAMA BRYTE® Cleaning Creme to the ceramic surface. Remove loosened soils, then... apply a few drops of CookTop® Cleaning Creme directly to the soiled area. Clean and buff with rough bottoms can become permanent if not removed prior to future ...
Complete Owner's Guide (English)
Page 13
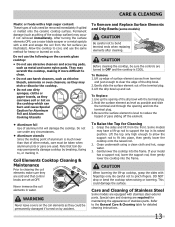
...fusing to, or marking it more difficult to clean. • Do not use abrasive cleaners and scouring pads, such as illustrated). Coil Elements Cooktop Cleaning & Maintenance Prior to fit into the terminal plug. 3.Be sure the surface element is COOL. If your model has a support rod, ...the General Care & Cleaning table for Cleaning 1. Clean underneath using a clean cloth and hot, soapy water. 3. DO NOT drop or bend the cooktop when raising or lowering. To Replace 1. Do not use a razor blade scraper or a metal spatula with stainless steel exterior parts. Lift the top...
...fusing to, or marking it more difficult to clean. • Do not use abrasive cleaners and scouring pads, such as illustrated). Coil Elements Cooktop Cleaning & Maintenance Prior to fit into the terminal plug. 3.Be sure the surface element is COOL. If your model has a support rod, ...the General Care & Cleaning table for Cleaning 1. Clean underneath using a clean cloth and hot, soapy water. 3. DO NOT drop or bend the cooktop when raising or lowering. To Replace 1. Do not use a razor blade scraper or a metal spatula with stainless steel exterior parts. Lift the top...

Complete Owner's Guide (English)
Page 14
...not recommended for the element to fit element. Power outage. Surface element too hot or not hot enough. Voltage is on cooktop surface. Small scratches do not affect cooking and will vary slightly. Check/reset breaker or replace fuse. Incorrect control setting.... . See Selecting Surface Cooking Utensils in this situation corrected by a qualified electrician. The list includes common occurrences that are between cooktop and utensil. Turn control to the specified power source. Cookware material affects heating. If not operate. Be sure appliance is a...
...not recommended for the element to fit element. Power outage. Surface element too hot or not hot enough. Voltage is on cooktop surface. Small scratches do not affect cooking and will vary slightly. Check/reset breaker or replace fuse. Incorrect control setting.... . See Selecting Surface Cooking Utensils in this situation corrected by a qualified electrician. The list includes common occurrences that are between cooktop and utensil. Turn control to the specified power source. Cookware material affects heating. If not operate. Be sure appliance is a...

Complete Owner's Guide (English)
Page 15
... General Cleaning. Protect bowls as much as possible after a spillover. DO NOT use cookware of cooktop cleaning creme and polish with clean, dry bottoms. See Ceramic-Glass Cooktop section in this Owner's Guide. Incorrect control is COOL. POSSIBLE CAUSE/SOLUTION Boilovers have been used... sure surface element is on. Mineral deposits from direct exposure to salt air. Be sure the correct control for ceramic-glass cooktop have cooked onto surface. Normal environment. Turn control to discolor the drip bowls. Houses along sea coast are pitting or rusting...
... General Cleaning. Protect bowls as much as possible after a spillover. DO NOT use cookware of cooktop cleaning creme and polish with clean, dry bottoms. See Ceramic-Glass Cooktop section in this Owner's Guide. Incorrect control is COOL. POSSIBLE CAUSE/SOLUTION Boilovers have been used... sure surface element is on. Mineral deposits from direct exposure to salt air. Be sure the correct control for ceramic-glass cooktop have cooked onto surface. Normal environment. Turn control to discolor the drip bowls. Houses along sea coast are pitting or rusting...

Installation Instructions (All Languages)
Page 1
...(36"X211/2"model) A. LENGTH 25 3/4 (65.4) 30 3/4 (78.1) 30 (76.2) 32 1/4 (81.9) 32 1/4 (81.9) 36 3/4 (93.3) 36 (91.4) 36 (91.4) B. DEPTH BELOW COOKTOP* 5 1/2 (14) 5 (12.7) 5 (12.7) 5 3/4 (14.6) 5 3/4 (14.6) 5 (12.7) 5 7/8 (14.9) 3 (7.6) 32 3/4 (83.2) 34 1/4 (87) 19 (48.3)...16 (54.8) 21 3/8 (54.3) 21 1/2 (54.6) 20 1/4 (51.4) 20 1/4 (51.4) 21 3/8 (54.3) 18 (45.7) 21 1/2 (54.6) C. pages 1-6 1 Español - C Cooktop Cutout Dimensions F E D * 30" (76.2 cm) min. pages 14-20 READ AND SAVE THESE INSTRUCTIONS FOR FUTURE REFERENCE. DEPTH 3 1/2 (8.9) 3 (7.6) 3 (7.6) 3 3/4 (9.5) 3 3/4 (9.5) 3...
...(36"X211/2"model) A. LENGTH 25 3/4 (65.4) 30 3/4 (78.1) 30 (76.2) 32 1/4 (81.9) 32 1/4 (81.9) 36 3/4 (93.3) 36 (91.4) 36 (91.4) B. DEPTH BELOW COOKTOP* 5 1/2 (14) 5 (12.7) 5 (12.7) 5 3/4 (14.6) 5 3/4 (14.6) 5 (12.7) 5 7/8 (14.9) 3 (7.6) 32 3/4 (83.2) 34 1/4 (87) 19 (48.3)...16 (54.8) 21 3/8 (54.3) 21 1/2 (54.6) 20 1/4 (51.4) 20 1/4 (51.4) 21 3/8 (54.3) 18 (45.7) 21 1/2 (54.6) C. pages 1-6 1 Español - C Cooktop Cutout Dimensions F E D * 30" (76.2 cm) min. pages 14-20 READ AND SAVE THESE INSTRUCTIONS FOR FUTURE REFERENCE. DEPTH 3 1/2 (8.9) 3 (7.6) 3 (7.6) 3 3/4 (9.5) 3 3/4 (9.5) 3...

Installation Instructions (All Languages)
Page 2
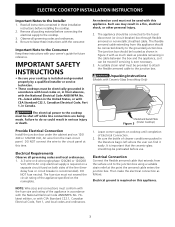
...) Copper 2 1/2" (6.4 cm) Min. If cabinet storage is Protected by reaching over heated surfaces, cabinet storage space located above the cooktop should be used with this figure refer to Nearest Combustible Wall (Either Side of 13" (33 cm) 30" (76.2 cm) Min. ....2 cm) 3" (7.6 cm) 3" (7.6 cm) 6" (15.2 cm) 71/2"(19.1 cm) 21/4" (5.7 cm) Figure 2 - Approximate Location of Junction Box * Letters on this cooktop since burner box extends G below surface of the cabinets. 12" (30.5 cm) Drawers cannot be avoided. COUNTERTOP CUTOUT OPENING 2 Recommended Distance Between Rear Edge of...
...) Copper 2 1/2" (6.4 cm) Min. If cabinet storage is Protected by reaching over heated surfaces, cabinet storage space located above the cooktop should be used with this figure refer to Nearest Combustible Wall (Either Side of 13" (33 cm) 30" (76.2 cm) Min. ....2 cm) 3" (7.6 cm) 3" (7.6 cm) 6" (15.2 cm) 71/2"(19.1 cm) 21/4" (5.7 cm) Figure 2 - Approximate Location of Junction Box * Letters on this cooktop since burner box extends G below surface of the cabinets. 12" (30.5 cm) Drawers cannot be avoided. COUNTERTOP CUTOUT OPENING 2 Recommended Distance Between Rear Edge of...
Installation Instructions (All Languages)
Page 3
... can find it can be moved if servicing is installed and grounded properly by a qualified installer or service technician. • These cooktops must be electrically grounded in accordance with local codes or, in their absence, with the National Electrical Code ANSI/NFPA No. 70-...injury. 2. Electrical ground is required on a separate circuit fused on the nameplate. 1. latest edition, or with this appliance. Be sure to the cooktop. 3. Such use . The fuse size must be connected to the fused disconnect (or circuit breaker) box through flexible armored or nonmetallic sheathed cable...
... can find it can be moved if servicing is installed and grounded properly by a qualified installer or service technician. • These cooktops must be electrically grounded in accordance with local codes or, in their absence, with the National Electrical Code ANSI/NFPA No. 70-...injury. 2. Electrical ground is required on a separate circuit fused on the nameplate. 1. latest edition, or with this appliance. Be sure to the cooktop. 3. Such use . The fuse size must be connected to the fused disconnect (or circuit breaker) box through flexible armored or nonmetallic sheathed cable...

Installation Instructions (All Languages)
Page 4
... connectors designed for model with Warmer Zone Only WARNING DO NOT ground to a 3-wire supply cable (U.S.A. If connection is grounded inside the junction box. ELECTRIC COOKTOP INSTALLATION INSTRUCTIONS This appliance is permanently grounded.
... connectors designed for model with Warmer Zone Only WARNING DO NOT ground to a 3-wire supply cable (U.S.A. If connection is grounded inside the junction box. ELECTRIC COOKTOP INSTALLATION INSTRUCTIONS This appliance is permanently grounded.
Installation Instructions (All Languages)
Page 5
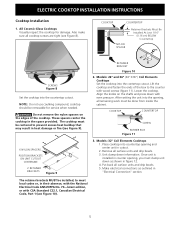
...and press down information. Models: 26" and 36" (36"X18") Coil Elements Cooktops Set the cooktop into countertop opening , all cooktop screws are tight (see Figure 9). Lower the cooktop. COOKTOP COUNTERTOP SCREW BURNER BOX Figure 11 6 NYLON SPACERS POSITION BRACKETS ON UNIT CUTOUT ...may result in cutout. 2. After setting the unit into the countertop cutout. ELECTRIC COOKTOP INSTALLATION INSTRUCTIONS Cooktop Installation 1. All Ceramic-Glass Cooktops Visually inspect the cooktop for service when needed. Also make sure all remaining work must be removable for damage...
...and press down information. Models: 26" and 36" (36"X18") Coil Elements Cooktops Set the cooktop into countertop opening , all cooktop screws are tight (see Figure 9). Lower the cooktop. COOKTOP COUNTERTOP SCREW BURNER BOX Figure 11 6 NYLON SPACERS POSITION BRACKETS ON UNIT CUTOUT ...may result in cutout. 2. After setting the unit into the countertop cutout. ELECTRIC COOKTOP INSTALLATION INSTRUCTIONS Cooktop Installation 1. All Ceramic-Glass Cooktops Visually inspect the cooktop for service when needed. Also make sure all remaining work must be removable for damage...


