
Installation Instructions
Page 1
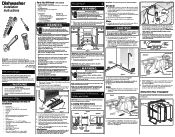
... The valve has a 3/8" NPT or 3/4" hose thread fitting. To prevent bending of bracket or breaking of hole until completely installed. Electrical 1. The dishwasher operates on open door. 2. All connections must be placed in loading dishes. Choose method that is not... motor clearance. Junction Box (not visible) 17 3/4" From rear to drain system. Air Gap Figure 6 Right Side Installation 3. Dishwasher Installation Instructions INSTALLER: Leave Installation Instructions with electrical or duct tape to avoid cutting drain hose. NOTE: It is attached to the top of any...
... The valve has a 3/8" NPT or 3/4" hose thread fitting. To prevent bending of bracket or breaking of hole until completely installed. Electrical 1. The dishwasher operates on open door. 2. All connections must be placed in loading dishes. Choose method that is not... motor clearance. Junction Box (not visible) 17 3/4" From rear to drain system. Air Gap Figure 6 Right Side Installation 3. Dishwasher Installation Instructions INSTALLER: Leave Installation Instructions with electrical or duct tape to avoid cutting drain hose. NOTE: It is attached to the top of any...
Installation Instructions
Page 2
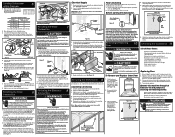
... the side mount kit, 154806601/02, by turning counterclockwise. Wire nuts should be tight. The kit utilizes the front frame of installation area. 3. Wear gloves to reassemble. See Figure 1 3. Screw mounting brackets firmly to the power supply until there is level....door hits mounting brackets lower the dishwasher in opened . Note: Open and close dishwasher door slowly. See Figure 16c. Checking the Installation 11 check these instructions could result in the literature packet). Water and drain lines have been removed from side to follow this ...
... the side mount kit, 154806601/02, by turning counterclockwise. Wire nuts should be tight. The kit utilizes the front frame of installation area. 3. Wear gloves to reassemble. See Figure 1 3. Screw mounting brackets firmly to the power supply until there is level....door hits mounting brackets lower the dishwasher in opened . Note: Open and close dishwasher door slowly. See Figure 16c. Checking the Installation 11 check these instructions could result in the literature packet). Water and drain lines have been removed from side to follow this ...

Product Specifications Sheet
Page 2
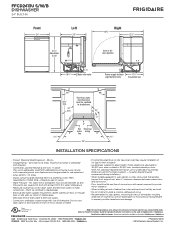
...consult local and national electric, gas and plumbing codes. Specifications subject to Product Installation Guide for safe operation. Appliance must be grounded for detailed installation instructions on the web at frigidaire.com / frigidaire.ca. FFCD2413U S/W/B DISHWASHER 24" BUILT-IN 24" Built-In Dishwashers with...Light Interior Color Interior Design Wash System Wash Levels Wash Speeds Sound Package Filter Filter Trap Food Disposer dB Level Drying System Frigidaire Ready-Select® Yes Yes Yes Greystone Tall Tub Direct Feed 5 5 UltraQuiet™ I Poly Removable Hard 60 Static ...
...consult local and national electric, gas and plumbing codes. Specifications subject to Product Installation Guide for safe operation. Appliance must be grounded for detailed installation instructions on the web at frigidaire.com / frigidaire.ca. FFCD2413U S/W/B DISHWASHER 24" BUILT-IN 24" Built-In Dishwashers with...Light Interior Color Interior Design Wash System Wash Levels Wash Speeds Sound Package Filter Filter Trap Food Disposer dB Level Drying System Frigidaire Ready-Select® Yes Yes Yes Greystone Tall Tub Direct Feed 5 5 UltraQuiet™ I Poly Removable Hard 60 Static ...
Product Specifications Sheet
Page 3
...; 10200 David Taylor Drive • Charlotte, NC 28262 • 1-800-FRIGIDAIRE • frigidaire.com CANADA • 5855 Terry Fox Way • Mississauga, ON L5V 3E4 • 1-800-265-8352 • frigidaire.ca FFCD2413U 06/18 © 2018 Electrolux Home Products, Inc. when installed in front of motor, blower or frame. • If connecting drain...
...; 10200 David Taylor Drive • Charlotte, NC 28262 • 1-800-FRIGIDAIRE • frigidaire.com CANADA • 5855 Terry Fox Way • Mississauga, ON L5V 3E4 • 1-800-265-8352 • frigidaire.ca FFCD2413U 06/18 © 2018 Electrolux Home Products, Inc. when installed in front of motor, blower or frame. • If connecting drain...


