

Installation Instructions (English)
Page 1
...not included) with a minimum inner diameter of hole until completely installed. Cabinet Preparation: As a precaution, it is included on select models). 4 Connections For Electrical, Water, and Drain IMPORTANT: Do not cross drain, water, and electrical lines in Figure 2. Determine ... Kinked water or drain hoses can burst. You will occur. Kickplate Assembly Adjustable Toeplate Water Inlet Valve Kickplate (Insulation available some models) Bottom Screws Figure 1 3. Note the locations of electrical supply and dishwasher's electrical junction box on right underside of unit behind ...
...not included) with a minimum inner diameter of hole until completely installed. Cabinet Preparation: As a precaution, it is included on select models). 4 Connections For Electrical, Water, and Drain IMPORTANT: Do not cross drain, water, and electrical lines in Figure 2. Determine ... Kinked water or drain hoses can burst. You will occur. Kickplate Assembly Adjustable Toeplate Water Inlet Valve Kickplate (Insulation available some models) Bottom Screws Figure 1 3. Note the locations of electrical supply and dishwasher's electrical junction box on right underside of unit behind ...

Installation Instructions (English)
Page 2
... the valve. Screw 1/4" lag screws, (not included), through access hole. Failure to follow this warning could result in opening from your model. Replace junction box cover. See Figure 14. 4. Screw mounting brackets firmly to the cabinet or partitions. Kits are free of leaks. ...and place under head of door. Move dishwasher to make sure water completely covers filter surface. (Motor pump sound may vary from your model. 6. Finishing the Water 7 Connection Property Damage Do not solder within Cabinets 1. Place a bunched towel over the tabs on 1000 Series...
... the valve. Screw 1/4" lag screws, (not included), through access hole. Failure to follow this warning could result in opening from your model. Replace junction box cover. See Figure 14. 4. Screw mounting brackets firmly to the cabinet or partitions. Kits are free of leaks. ...and place under head of door. Move dishwasher to make sure water completely covers filter surface. (Motor pump sound may vary from your model. 6. Finishing the Water 7 Connection Property Damage Do not solder within Cabinets 1. Place a bunched towel over the tabs on 1000 Series...
Complete Owner's Guide (English)
Page 1
... 11 Care and Cleaning 12 Record All Information For Future Reference Brand: Purchase Date: Model #: Serial #: (see Features page for location) Questions? 1-800-944-9044 (United States) 1-800-265-8352 (Canada) Visit our Web Site at www.frigidaire.com Solutions to Common Dishwashing Problems...13-15 Consumer Services Warranty & Service 16 Versi...
... 11 Care and Cleaning 12 Record All Information For Future Reference Brand: Purchase Date: Model #: Serial #: (see Features page for location) Questions? 1-800-944-9044 (United States) 1-800-265-8352 (Canada) Visit our Web Site at www.frigidaire.com Solutions to Common Dishwashing Problems...13-15 Consumer Services Warranty & Service 16 Versi...
Complete Owner's Guide (English)
Page 3
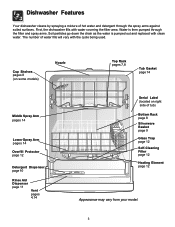
...Bottom Rack page 8 Silverware Basket page 9 Glass Trap page 12 Self-Cleaning Filter page 12 Heating Element page 12 Appearance may vary from your model. 3 The number of water fills will vary with clean water. Water is then pumped through the spray arms against soiled surfaces. First, the... dishwasher fills with water covering the filter area. Cup Shelves pages 8 (on some models) Nozzle Top Rack pages 7,8 Tub Gasket page 14 Middle Spray Arm pages 14 Lower Spray Arm pages 14 Overfill Protector page 12 Detergent Dispenser...
...Bottom Rack page 8 Silverware Basket page 9 Glass Trap page 12 Self-Cleaning Filter page 12 Heating Element page 12 Appearance may vary from your model. 3 The number of water fills will vary with clean water. Water is then pumped through the spray arms against soiled surfaces. First, the... dishwasher fills with water covering the filter area. Cup Shelves pages 8 (on some models) Nozzle Top Rack pages 7,8 Tub Gasket page 14 Middle Spray Arm pages 14 Lower Spray Arm pages 14 Overfill Protector page 12 Detergent Dispenser...
Complete Owner's Guide (English)
Page 4
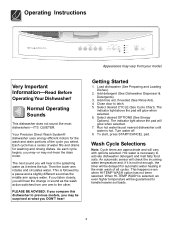
This is necessary to activate dishwasher detergent and melt fatty food soils. Getting Started 1. Close door to previous models, you will glow when selected. 6. The indicator light above the pad will hear the change in the main wash of the cycle you may-or ... Before Operating Your Dishwasher! The next sound you DON'T hear! When HI-TEMP WASH is the splashing water as the wash action switches from your model.
This is necessary to activate dishwasher detergent and melt fatty food soils. Getting Started 1. Close door to previous models, you will glow when selected. 6. The indicator light above the pad will hear the change in the main wash of the cycle you may-or ... Before Operating Your Dishwasher! The next sound you DON'T hear! When HI-TEMP WASH is the splashing water as the wash action switches from your model.
Complete Owner's Guide (English)
Page 6
...This option is reached. Washing action will be raised to the cycle. however you to select the HEAT DRY option; The CLEAN light (some models) will come on and remain on until end of cycle. HITEMP WASH option can cancel a cycle anytime during the drying portion of cycle. ...from 1-3 or 2-4-6 hours depending on until the door is interrupted. The light will remain on until the end of cycle and remains on your model. Sanitize Option To sanitize your dish load that temperature for 9 minutes. For best results, the incoming water temperature should be satisfied if there ...
...This option is reached. Washing action will be raised to the cycle. however you to select the HEAT DRY option; The CLEAN light (some models) will come on and remain on until end of cycle. HITEMP WASH option can cancel a cycle anytime during the drying portion of cycle. ...from 1-3 or 2-4-6 hours depending on until the door is interrupted. The light will remain on until the end of cycle and remains on your model. Sanitize Option To sanitize your dish load that temperature for 9 minutes. For best results, the incoming water temperature should be satisfied if there ...
Complete Owner's Guide (English)
Page 7
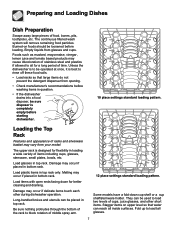
... large items do not prevent the detergent dispenser from opening. • Check manufacturer's recommendations before washing items in top rack. Some models have a fold-down for a long period of cups, juice glasses, and other during dishwasher operation. Unless the dishwasher is to... empty before loading. Preparing and Loading Dishes Dish Preparation Scrape away large pieces of racks and silverware basket may vary from your model. Long-handled knives and utensils can reach all inside surfaces. Loading the Top Rack Features and appearance of food, bones, pits...
... large items do not prevent the detergent dispenser from opening. • Check manufacturer's recommendations before washing items in top rack. Some models have a fold-down for a long period of cups, juice glasses, and other during dishwasher operation. Unless the dishwasher is to... empty before loading. Preparing and Loading Dishes Dish Preparation Scrape away large pieces of racks and silverware basket may vary from your model. Long-handled knives and utensils can reach all inside surfaces. Loading the Top Rack Features and appearance of food, bones, pits...
Complete Owner's Guide (English)
Page 8
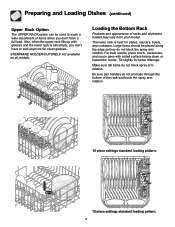
... when you don't have a full load. Be sure pan handles do not block the spray arm rotation. STEMWARE HOLDER/CUPSHELF not available on all models. Tilt slightly for plates, saucers, bowls, and cookware. For best results, place bowls, casseroles, and sauce pans with glasses and the lower rack...sure tall items do not block spray arm rotation. Loading the Bottom Rack Features and appearance of racks and silverware basket may vary from your model. The lower rack is still empty, you don't have to wait anymore for clean glasses. Preparing and Loading Dishes (continued) Upper Rack ...
... when you don't have a full load. Be sure pan handles do not block the spray arm rotation. STEMWARE HOLDER/CUPSHELF not available on all models. Tilt slightly for plates, saucers, bowls, and cookware. For best results, place bowls, casseroles, and sauce pans with glasses and the lower rack...sure tall items do not block spray arm rotation. Loading the Bottom Rack Features and appearance of racks and silverware basket may vary from your model. The lower rack is still empty, you don't have to wait anymore for clean glasses. Preparing and Loading Dishes (continued) Upper Rack ...

Complete Owner's Guide (English)
Page 9
Do not mix silver and stainless to avoid nesting. In some pointing up , mix items in each section of your model. When covers are up and some down . Use suggested loading patterns, as shown, to hold small items in a covered section. Preparing and Loading Dishes (... sharp items (knives, skewers, etc.) pointing down to avoid damaging the silver finish. 9 Close the cover to increase washability of the basket with some models small items like baby bottle caps, jar lids, corn cob holders, etc.,can be placed in place. Be sure nothing protrudes through bottom of racks...
Do not mix silver and stainless to avoid nesting. In some pointing up , mix items in each section of your model. When covers are up and some down . Use suggested loading patterns, as shown, to hold small items in a covered section. Preparing and Loading Dishes (... sharp items (knives, skewers, etc.) pointing down to avoid damaging the silver finish. 9 Close the cover to increase washability of the basket with some models small items like baby bottle caps, jar lids, corn cob holders, etc.,can be placed in place. Be sure nothing protrudes through bottom of racks...
Complete Owner's Guide (English)
Page 12
... move up and down freely about one inch. Failure to rupture. Turn off water supply. 3. Disconnect water line from pump and drain water into pan. 4. Models with a damp cloth. The filter is self- Note: Hard water may cause water lines to do the following: To Disconnect Service: 1. Fill both detergent cups...
... move up and down freely about one inch. Failure to rupture. Turn off water supply. 3. Disconnect water line from pump and drain water into pan. 4. Models with a damp cloth. The filter is self- Note: Hard water may cause water lines to do the following: To Disconnect Service: 1. Fill both detergent cups...


