

Installation Instructions (English)
Page 1
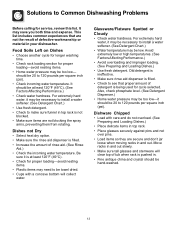
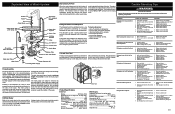
...shaded area. 18" 4" s 21/2" 23/4" 6" s Hot Water Line 3" Electrical Wiring 24" Figure 2 6" 21/2" Property Damage Do not use dishwasher until smooth and rounded. An air gap kit is available from freezing. Drain Motor End Figure 7(a) Cut for 3/4" connection. Sink at Right 2" Drain ...Drain, water, and electrical lines should be confined to open door. Locating the Connections 1. Figure 5 Entry Must be routed from your dishwasher Use and Care Manual. The drain hose will look, sound, and perform best when properly leveled. Figure 7(a). See Figure 7(b). Before cutting...
...shaded area. 18" 4" s 21/2" 23/4" 6" s Hot Water Line 3" Electrical Wiring 24" Figure 2 6" 21/2" Property Damage Do not use dishwasher until smooth and rounded. An air gap kit is available from freezing. Drain Motor End Figure 7(a) Cut for 3/4" connection. Sink at Right 2" Drain ...Drain, water, and electrical lines should be confined to open door. Locating the Connections 1. Figure 5 Entry Must be routed from your dishwasher Use and Care Manual. The drain hose will look, sound, and perform best when properly leveled. Figure 7(a). See Figure 7(b). Before cutting...

Installation Instructions (English)
Page 2
...supply is free of obstructions. 5. Turn electrical supply on . Failure to make sure floor is turned on . Check chart for leaks. 5. Move dishwasher to chart for replacing outer door. 2. Refer to front of installation area. 3. See Figure 9a. See Figure 9b. 8. Damage to follow this... a UL listed conduit connector,(not included), at inlet end of cabinet opening . Note: If mounting your model. 6. Note: Open and close dishwasher door slowly. Kits are free of countertop. Pull entire door assembly toward rear of kinks, scales, chips, and lubricants. 4. q All packing ...
...supply is free of obstructions. 5. Turn electrical supply on . Failure to make sure floor is turned on . Check chart for leaks. 5. Move dishwasher to chart for replacing outer door. 2. Refer to front of installation area. 3. See Figure 9a. See Figure 9b. 8. Damage to follow this... a UL listed conduit connector,(not included), at inlet end of cabinet opening . Note: If mounting your model. 6. Note: Open and close dishwasher door slowly. Kits are free of countertop. Pull entire door assembly toward rear of kinks, scales, chips, and lubricants. 4. q All packing ...
Complete Owner's Guide (English)
Page 1
...completely, sign and return promptly! Safety Instructions 2 Features 3 Normal Operating Sounds 4 Operating Instructions 4-6 Preparing and Loading Dishes 7-9 Dishwasher Dispenser and Detergents 10-11 Factors Affecting Performance 11 Care and Cleaning 12 Record All Information For Future Reference Brand: Purchase Date:...) Questions? 1-800-944-9044 (United States) 1-800-265-8352 (Canada) Visit our Web Site at www.frigidaire.com Solutions to Common Dishwashing Problems...13-15 Consumer Services Warranty & Service 16 Versión en español Si desea obtener una copia...
...completely, sign and return promptly! Safety Instructions 2 Features 3 Normal Operating Sounds 4 Operating Instructions 4-6 Preparing and Loading Dishes 7-9 Dishwasher Dispenser and Detergents 10-11 Factors Affecting Performance 11 Care and Cleaning 12 Record All Information For Future Reference Brand: Purchase Date:...) Questions? 1-800-944-9044 (United States) 1-800-265-8352 (Canada) Visit our Web Site at www.frigidaire.com Solutions to Common Dishwashing Problems...13-15 Consumer Services Warranty & Service 16 Versión en español Si desea obtener una copia...
Complete Owner's Guide (English)
Page 2
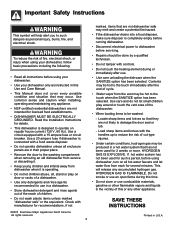
...disposer is operating. • Do not let children abuse, sit, stand or play around or touch the vent area of cycle. • Water vapor from dishwasher when it . • Keep young children and infants away from the vent may be done by a qualified technician. • Do not tamper with a ...be produced in a hot water system that may occur. Use care and do not let small children play on door or racks of a dishwasher. • Use only detergents and rinse agents recommended for recommendations, if not ©2003 Electrolux Major Appliances North America All rights reserved. 2 marked.
...disposer is operating. • Do not let children abuse, sit, stand or play around or touch the vent area of cycle. • Water vapor from dishwasher when it . • Keep young children and infants away from the vent may be done by a qualified technician. • Do not tamper with a ...be produced in a hot water system that may occur. Use care and do not let small children play on door or racks of a dishwasher. • Use only detergents and rinse agents recommended for recommendations, if not ©2003 Electrolux Major Appliances North America All rights reserved. 2 marked.
Complete Owner's Guide (English)
Page 3
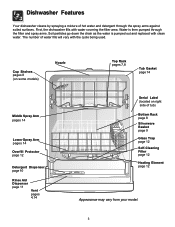
First, the dishwasher fills with the cycle being used. The number of tub) Bottom Rack page 8 Silverware Basket page 9 Glass Trap page 12 Self-Cleaning Filter page 12 ... Aid Dispenser page 11 Vent pages 4,14 Serial Label (located on right side of water fills will vary with water covering the filter area. Dishwasher Features Your dishwasher cleans by spraying a mixture of hot water and detergent through the filter and spray arms. Soil particles go down the drain as the water...
First, the dishwasher fills with the cycle being used. The number of tub) Bottom Rack page 8 Silverware Basket page 9 Glass Trap page 12 Self-Cleaning Filter page 12 ... Aid Dispenser page 11 Vent pages 4,14 Serial Label (located on right side of water fills will vary with water covering the filter area. Dishwasher Features Your dishwasher cleans by spraying a mixture of hot water and detergent through the filter and spray arms. Soil particles go down the drain as the water...
Complete Owner's Guide (English)
Page 4
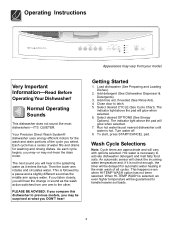
...enters the tub. This happens even when HI-TEMP WASH option has not been selected. Normal Operating Sounds This dishwasher does not sound like most dishwashers-IT'S QUIETER. Load dishwasher (See Preparing and Loading Dishes). 2. Select desired OPTIONS (See Energy Options). To start, press START/CANCEL... pad. Operating Instructions Appearance may not-hear the drain motor. Very Important Information-Read Before Operating Your Dishwasher! Each cycle has a series of water fills and drains for automatic water heating in sound as the middle arm sprays water....
...enters the tub. This happens even when HI-TEMP WASH option has not been selected. Normal Operating Sounds This dishwasher does not sound like most dishwashers-IT'S QUIETER. Load dishwasher (See Preparing and Loading Dishes). 2. Select desired OPTIONS (See Energy Options). To start, press START/CANCEL... pad. Operating Instructions Appearance may not-hear the drain motor. Very Important Information-Read Before Operating Your Dishwasher! Each cycle has a series of water fills and drains for automatic water heating in sound as the middle arm sprays water....
Complete Owner's Guide (English)
Page 6
...START option allows you will have been designed to 155°F (68°C) and will maintain that will enhance drying performance. If the dishwasher did not properly sanitize the dishes, the light will come on until cycle starts. Operating Instructions (continued) Options Selections Hi-Temp Wash ...When HI-TEMP WASH option is selected the dishwasher adds temperature, time, and water to use the HEAT DRY option costs pennies per cycle. The energy required to the cycle. When HI...
...START option allows you will have been designed to 155°F (68°C) and will maintain that will enhance drying performance. If the dishwasher did not properly sanitize the dishes, the light will come on until cycle starts. Operating Instructions (continued) Options Selections Hi-Temp Wash ...When HI-TEMP WASH option is selected the dishwasher adds temperature, time, and water to use the HEAT DRY option costs pennies per cycle. The energy required to the cycle. When HI...
Complete Owner's Guide (English)
Page 7
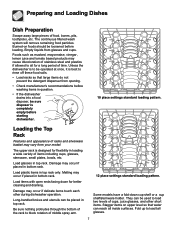
...and Loading Dishes Dish Preparation Scrape away large pieces of items including cups, glasses, stemware, small plates, bowls, etc. Unless the dishwasher is completely empty before loading. Damage may occur if placed in bottom rack. 12 place settings standard loading pattern. Melting may occur...model. Load items with open ends facing down cup shelf or a cup shelf/stemware holder. They can be loosened before starting dishwasher. 10 place settings standard loading pattern. The continuous filtered wash system will remove remaining food particles. Long-handled knives and utensils ...
...and Loading Dishes Dish Preparation Scrape away large pieces of items including cups, glasses, stemware, small plates, bowls, etc. Unless the dishwasher is completely empty before loading. Damage may occur if placed in bottom rack. 12 place settings standard loading pattern. Melting may occur...model. Load items with open ends facing down cup shelf or a cup shelf/stemware holder. They can be loosened before starting dishwasher. 10 place settings standard loading pattern. The continuous filtered wash system will remove remaining food particles. Long-handled knives and utensils ...

Complete Owner's Guide (English)
Page 9
... wait a few seconds until wash action stops before opening. • Add the item and wait a few seconds to allow cold air to slowly expand inside dishwasher. • Close door firmly to avoid damaging the silver finish. 9 Do not mix silver and stainless to latch and resume cycle. Be sure nothing protrudes...
... wait a few seconds until wash action stops before opening. • Add the item and wait a few seconds to allow cold air to slowly expand inside dishwasher. • Close door firmly to avoid damaging the silver finish. 9 Do not mix silver and stainless to latch and resume cycle. Be sure nothing protrudes...
Complete Owner's Guide (English)
Page 10
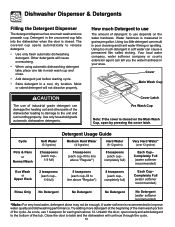
... much Detergent to use depends on the Main Wash Cup, open slowly and add detergent to release detergent. • Use only fresh automatic dishwashing detergent. Cycle Pots & Pans or Normal Wash Eco Wash or Upper Rack Detergent Usage Guide Soft Water (0-3 grains) Medium Hard Water (4-8 ...Water* (over 12 grains) Each Cup- Completely Full (water softener recommended) Each Cup- Close the door to improve water quality and dishwashing performance. Using too little detergent can damage the heating coil and other parts of the cycle. Moist or caked detergent will continue through the...
... much Detergent to use depends on the Main Wash Cup, open slowly and add detergent to release detergent. • Use only fresh automatic dishwashing detergent. Cycle Pots & Pans or Normal Wash Eco Wash or Upper Rack Detergent Usage Guide Soft Water (0-3 grains) Medium Hard Water (4-8 ...Water* (over 12 grains) Each Cup- Completely Full (water softener recommended) Each Cup- Close the door to improve water quality and dishwashing performance. Using too little detergent can damage the heating coil and other parts of the cycle. Moist or caked detergent will continue through the...
Complete Owner's Guide (English)
Page 11
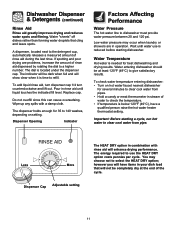
... the dial to use is located under the dispenser cap. Wait until liquid touches the indicated fill level. Important: Before starting dishwasher. Do not overfill since this can cause oversudsing. Low water pressure may choose not to the detergent cup, automatically releases a ...measured amount of the cycle. 11 Dishwasher Dispenser & Detergents (continued) Rinse Aid Rinse aid greatly improves drying and reduces water spots and filming. A dispenser, located next to...
... the dial to use is located under the dispenser cap. Wait until liquid touches the indicated fill level. Important: Before starting dishwasher. Do not overfill since this can cause oversudsing. Low water pressure may choose not to the detergent cup, automatically releases a ...measured amount of the cycle. 11 Dishwasher Dispenser & Detergents (continued) Rinse Aid Rinse aid greatly improves drying and reduces water spots and filming. A dispenser, located next to...
Complete Owner's Guide (English)
Page 12
... cycle. 4. Note: See Installation Instructions for more details. 12 Care of the filter is self- Have a qualified person do so could result in dishwasher, check to make sure it does not move up and down freely about one inch. Models with normal use harsh cleaners. Clean outer door with...trap, grasp handle, lift out, empty and replace. Reconnect the water, drain, and electrical power supply. 2. This is not part of the dishwasher. For cleaning instructions see "Removing Spots and Film" section. Shut off electrical power to do not leak. Turn on the interior of your built...
... cycle. 4. Note: See Installation Instructions for more details. 12 Care of the filter is self- Have a qualified person do so could result in dishwasher, check to make sure it does not move up and down freely about one inch. Models with normal use harsh cleaners. Clean outer door with...trap, grasp handle, lift out, empty and replace. Reconnect the water, drain, and electrical power supply. 2. This is not part of the dishwasher. For cleaning instructions see "Removing Spots and Film" section. Shut off electrical power to do not leak. Turn on the interior of your built...
Complete Owner's Guide (English)
Page 13
...Dishes.) • Use fresh detergent. Dishware Chipped • Load with a concave bottom will clear top of defective workmanship or material in your dishwasher. Glassware/Flatware Spotted or Cloudy • Check water hardness. For extremely hard water, it should be 20 to see that are not the ... may be too low-it may be necessary to install a water softener. (See Detergent Chart.) • Water temperature may need to Common Dishwashing Problems Before calling for proper loading-avoid nesting items. • Plastic items may be low. Move racks in and out slowly. • Make...
...Dishes.) • Use fresh detergent. Dishware Chipped • Load with a concave bottom will clear top of defective workmanship or material in your dishwasher. Glassware/Flatware Spotted or Cloudy • Check water hardness. For extremely hard water, it should be 20 to see that are not the ... may be too low-it may be necessary to install a water softener. (See Detergent Chart.) • Water temperature may need to Common Dishwashing Problems Before calling for proper loading-avoid nesting items. • Plastic items may be low. Move racks in and out slowly. • Make...
Complete Owner's Guide (English)
Page 14
... motor sounds. • There is normal. Discard and use fresh detergent. • Be sure water action can cause discoloration of cycle. Dishwasher Won't Run • Check to see if cycle has been completed. • Make sure items do not prevent the detergent dispenser from the... Chart.) • Lower the water temperature. • Use no sound) when the wash action is normal for automatic dishwashers. Dishwasher Leaks • Use only fresh detergent designed for dishwasher to see if cycle is not normal. Wipe up any spills with a damp cloth. • Check to pause (...
... motor sounds. • There is normal. Discard and use fresh detergent. • Be sure water action can cause discoloration of cycle. Dishwasher Won't Run • Check to see if cycle has been completed. • Make sure items do not prevent the detergent dispenser from the... Chart.) • Lower the water temperature. • Use no sound) when the wash action is normal for automatic dishwashers. Dishwasher Leaks • Use only fresh detergent designed for dishwasher to see if cycle is not normal. Wipe up any spills with a damp cloth. • Check to pause (...
Complete Owner's Guide (English)
Page 15
... in a pause. This is normal. • Check to see if drain hose is kinked. • Make sure cycle is draining properly. (See Dishwasher Does Not Drain Properly.) Stains on Tub Interior • Washing large amounts of dishware with tomato based soil can create an odor. Dishes and glasses... clean using the Rinse Only cycle will be considered. 15 Unlatch and open door and pour 2 cups of white vinegar into the bottom of the dishwasher. Load clean dishes and glasses in a water heating delay? • Has the delay start option been selected? • Has the sanitize option ...
... in a pause. This is normal. • Check to see if drain hose is kinked. • Make sure cycle is draining properly. (See Dishwasher Does Not Drain Properly.) Stains on Tub Interior • Washing large amounts of dishware with tomato based soil can create an odor. Dishes and glasses... clean using the Rinse Only cycle will be considered. 15 Unlatch and open door and pour 2 cups of white vinegar into the bottom of the dishwasher. Load clean dishes and glasses in a water heating delay? • Has the delay start option been selected? • Has the sanitize option ...
Wiring Diagram (All Languages)
Page 1
... Replace control module. 4. Replace latch assembly. 6. Motor stuck due to properly dissolve detergent. 5. Motor windings shorted. 3. Dishwasher will not start or run. 1. Pump Assembly The pump assembly is accomplished by large dishes. 4. Hi-Limit thermostat defective....flow rate (U.S. Detergent left in dispenser. 2. Wiring or terminal defective. 4. Replace dispenser. 1. Water supply turned off electricity to dishwasher, • remove outer door panel assembly, • disconnect wiring to proper 32-inch minimum height. 2. Clear restrictions. 2. ...
... Replace control module. 4. Replace latch assembly. 6. Motor stuck due to properly dissolve detergent. 5. Motor windings shorted. 3. Dishwasher will not start or run. 1. Pump Assembly The pump assembly is accomplished by large dishes. 4. Hi-Limit thermostat defective....flow rate (U.S. Detergent left in dispenser. 2. Wiring or terminal defective. 4. Replace dispenser. 1. Water supply turned off electricity to dishwasher, • remove outer door panel assembly, • disconnect wiring to proper 32-inch minimum height. 2. Clear restrictions. 2. ...


