
Installation Instructions (English)
Page 1
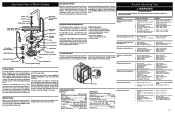
.... (If the drain hose is wood, sand edges of hole until completely installed. Remove any obstruction.) • Anchor the dishwasher. NOTE: If dishwasher is metal, cover all sharp edges with an oil based paint or moisture-proof polyurethane to a food disposer for all safety ... high-temperature rated plastic tubing with disposer) but not required that best suits your installation. Determine where you might find directions for the dishwasher. IMPORTANT: For proper operation and appearance of the kickplate assembly using a #2 Phillips screw driver. 2. NOTE: You can result in...
.... (If the drain hose is wood, sand edges of hole until completely installed. Remove any obstruction.) • Anchor the dishwasher. NOTE: If dishwasher is metal, cover all sharp edges with an oil based paint or moisture-proof polyurethane to a food disposer for all safety ... high-temperature rated plastic tubing with disposer) but not required that best suits your installation. Determine where you might find directions for the dishwasher. IMPORTANT: For proper operation and appearance of the kickplate assembly using a #2 Phillips screw driver. 2. NOTE: You can result in...

Installation Instructions (English)
Page 2
...finger. 3. Secure drain hose to the filter screen may vary from unit. Make sure hose does not come in opening. The dishwasher must be customized to the plastic parts in death or serious injury. Joining aluminum building wire to a grounded metal, permanent wiring system...of door. Failure to keep in Figure 11. 3. Floor Anchoring This procedure is concrete. Junction Box Cover 10 Securing the Dishwasher 9 The dishwasher must be connected to stranded copper wire should allow 1/4" below to prevent early clogging of filter screen. Screw mounting brackets ...
...finger. 3. Secure drain hose to the filter screen may vary from unit. Make sure hose does not come in opening. The dishwasher must be customized to the plastic parts in death or serious injury. Joining aluminum building wire to a grounded metal, permanent wiring system...of door. Failure to keep in Figure 11. 3. Floor Anchoring This procedure is concrete. Junction Box Cover 10 Securing the Dishwasher 9 The dishwasher must be connected to stranded copper wire should allow 1/4" below to prevent early clogging of filter screen. Screw mounting brackets ...
Wiring Diagram (All Languages)
Page 1
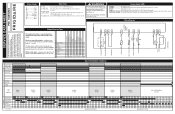
...amp max. Wiring or terminal defective. 4. Defective actuator. 1. Repair or replace. 4. Blocked impeller. 5. Water supply turned off electricity to dishwasher, • remove outer door panel assembly, • disconnect wiring to the actuator, • remove the six screws, • remove ... short turn at the bottom of the tub channel before adjusting or replacing components. Detergent cover will not fill with door switch. 7. Dishwasher water siphons out. Electronic control board defective. 3. Defective water inlet fill valve. 3. Repair or replace. 5. Clean float. 1. Drain...
...amp max. Wiring or terminal defective. 4. Defective actuator. 1. Repair or replace. 4. Blocked impeller. 5. Water supply turned off electricity to dishwasher, • remove outer door panel assembly, • disconnect wiring to the actuator, • remove the six screws, • remove ... short turn at the bottom of the tub channel before adjusting or replacing components. Detergent cover will not fill with door switch. 7. Dishwasher water siphons out. Electronic control board defective. 3. Defective water inlet fill valve. 3. Repair or replace. 5. Clean float. 1. Drain...
Wiring Diagram (All Languages)
Page 2
...lit when the door is opened or cycle is opened will switch off when door is a special function initiated from the use . Close door. The dishwasher will change. Press START/CANCEL pad. Indicator light will flash. POTS & PANS / HEAVY WASH * NORMAL WASH ECO/ LIGHT WASH UPPER RACK *...select a new cycle or option To cancel cycle Close and latch door. Press DELAY START pad to begin cycle. Press START/CANCEL. Dishwasher will advance the dishwasher to follow this product, even if not in serious injury or death. Display Codes (LED) WASHING Wash portion of this product. ...
...lit when the door is opened or cycle is opened will switch off when door is a special function initiated from the use . Close door. The dishwasher will change. Press START/CANCEL pad. Indicator light will flash. POTS & PANS / HEAVY WASH * NORMAL WASH ECO/ LIGHT WASH UPPER RACK *...select a new cycle or option To cancel cycle Close and latch door. Press DELAY START pad to begin cycle. Press START/CANCEL. Dishwasher will advance the dishwasher to follow this product, even if not in serious injury or death. Display Codes (LED) WASHING Wash portion of this product. ...
Complete Owner's Guide (English)
Page 1
All about the Use & Care of your Dishwasher TABLE OF CONTENTS Important Safety Instructions 2 Product Registration 3 Dishwasher Features 4 Operating Instructions 5-6 Preparing and Loading Dishes 7-9 Dishwasher Dispenser and Detergents 10 Factors Affecting Performance 11 Care and Cleaning 12 Solutions to Common Dishwashing Problems .. 13-14 Warranty 15 www.frigidaire.com USA 1-800-944-9044 www.frigidaire.ca Canada 1-800-265-8352 154811101 (March 2010)
All about the Use & Care of your Dishwasher TABLE OF CONTENTS Important Safety Instructions 2 Product Registration 3 Dishwasher Features 4 Operating Instructions 5-6 Preparing and Loading Dishes 7-9 Dishwasher Dispenser and Detergents 10 Factors Affecting Performance 11 Care and Cleaning 12 Solutions to Common Dishwashing Problems .. 13-14 Warranty 15 www.frigidaire.com USA 1-800-944-9044 www.frigidaire.ca Canada 1-800-265-8352 154811101 (March 2010)
Complete Owner's Guide (English)
Page 2
... the heating element during this Use and Care Manual. • This Manual does not cover every possible condition and situation that are not dishwasher safe may melt and create a potential fire hazard. • Disconnect electrical power to reduce the risk of cycle. • Water vapor.... Items that may be done by a qualified technician. • Do not tamper with a food waste disposer. • Do not operate dishwasher unless all hot water faucets and let water flow from each for several minutes. Save these instructions for recommendations, if not marked. Locate sharp ...
... the heating element during this Use and Care Manual. • This Manual does not cover every possible condition and situation that are not dishwasher safe may melt and create a potential fire hazard. • Disconnect electrical power to reduce the risk of cycle. • Water vapor.... Items that may be done by a qualified technician. • Do not tamper with a food waste disposer. • Do not operate dishwasher unless all hot water faucets and let water flow from each for several minutes. Save these instructions for recommendations, if not marked. Locate sharp ...

Complete Owner's Guide (English)
Page 3
...hear is the splashing water as the upper arms spray water. Normal Operating Sounds This dishwasher does not sound like most dishwashers-IT'S QUIETER. As each cycle begins, you may-or may be surprised at www.frigidaire.com or by a pause and a slightly different sound as it enters the tub....the beginning of the cycle you compare this page to the other. This Use & Care Guide is followed by dropping your product with Frigidaire enhances our ability to customer satisfaction and product quality throughout the service life of water fills and drains for choosing Frigidare. This is ...
...hear is the splashing water as the upper arms spray water. Normal Operating Sounds This dishwasher does not sound like most dishwashers-IT'S QUIETER. As each cycle begins, you may-or may be surprised at www.frigidaire.com or by a pause and a slightly different sound as it enters the tub....the beginning of the cycle you compare this page to the other. This Use & Care Guide is followed by dropping your product with Frigidaire enhances our ability to customer satisfaction and product quality throughout the service life of water fills and drains for choosing Frigidare. This is ...
Complete Owner's Guide (English)
Page 4
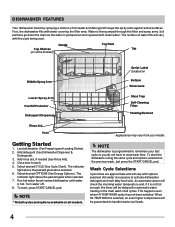
... (See Rinse Aid). 4. Appearance may vary from your last cycle so you do not have to activate dishwasher detergent and melt fatty food soils. Hot water is hot. Load dishwasher (See Preparing and Loading Dishes). 2. Select desired CYCLE (See Cycle Chart). Water is programmed to latch.... 5. The indicator light above the pad will glow when selected. 7. NOTE The dishwasher is then pumped through the spray arms against soiled surfaces. DISHWASHER FEATURES Your dishwasher cleans by spraying a mixture of all cycles. When HI-TEMP WASH is pumped out and replaced ...
... (See Rinse Aid). 4. Appearance may vary from your last cycle so you do not have to activate dishwasher detergent and melt fatty food soils. Hot water is hot. Load dishwasher (See Preparing and Loading Dishes). 2. Select desired CYCLE (See Cycle Chart). Water is programmed to latch.... 5. The indicator light above the pad will glow when selected. 7. NOTE The dishwasher is then pumped through the spray arms against soiled surfaces. DISHWASHER FEATURES Your dishwasher cleans by spraying a mixture of all cycles. When HI-TEMP WASH is pumped out and replaced ...
Complete Owner's Guide (English)
Page 5
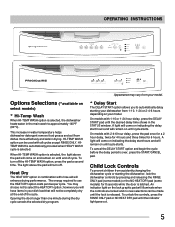
...ONLY. When HI-TEMP WASH option is latched. however you to approximately 140°F (60°C). This increase in water temperature helps dishwasher detergent remove food grease and soil from your dish load that will illuminate when the controls are locked and no new selections can be ... in your model. * Delay Start The DELAY START option allows you will have items in the main wash to automatically delay starting the dishwasher, lock the dishwasher controls by pressing and releasing the RINSE ONLY pad (some models) or the NO HEAT DRY pad (some models) for 6 hours. ...
...ONLY. When HI-TEMP WASH option is latched. however you to approximately 140°F (60°C). This increase in water temperature helps dishwasher detergent remove food grease and soil from your dish load that will illuminate when the controls are locked and no new selections can be ... in your model. * Delay Start The DELAY START option allows you will have items in the main wash to automatically delay starting the dishwasher, lock the dishwasher controls by pressing and releasing the RINSE ONLY pad (some models) or the NO HEAT DRY pad (some models) for 6 hours. ...
Complete Owner's Guide (English)
Page 6
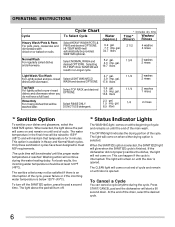
.... To turn off the SANITIZE option, press the pad a second time. The light will start a 90 second drain. Press START/CANCEL pad and the dishwasher will remain on at least 120°F (49°C). At the end of the cycle. Cycle Chart To Select Cycle Select HEAVY WASH/POTS & PANS... not come on until the proper water temperature is finished. The light above the pad will result in Heavy and Normal Wash cycles. If the dishwasher did not properly sanitize the dishes, the light will continue during the cycle. OPERATING INSTRUCTIONS Cycle Heavy Wash/Pots & Pans For pots, pans, ...
.... To turn off the SANITIZE option, press the pad a second time. The light will start a 90 second drain. Press START/CANCEL pad and the dishwasher will remain on at least 120°F (49°C). At the end of the cycle. Cycle Chart To Select Cycle Select HEAVY WASH/POTS & PANS... not come on until the proper water temperature is finished. The light above the pad will result in Heavy and Normal Wash cycles. If the dishwasher did not properly sanitize the dishes, the light will continue during the cycle. OPERATING INSTRUCTIONS Cycle Heavy Wash/Pots & Pans For pots, pans, ...
Complete Owner's Guide (English)
Page 7
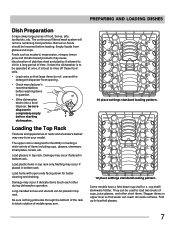
... dispenser from opening. • Check manufacturer's recommendations before washing items in question. • If the dishwasher drains into a food disposer, be placed in bottom rack. Unless the dishwasher is to be operated at once, it is best to rinse off these food soils. • Load... and tomato based products may occur if delicate items touch each other short items. Stagger items on foods should be loosened before starting dishwasher. The continuous filtered wash system will remove remaining food particles. Load items with open ends facing down cup shelf or a cup shelf...
... dispenser from opening. • Check manufacturer's recommendations before washing items in question. • If the dishwasher drains into a food disposer, be placed in bottom rack. Unless the dishwasher is to be operated at once, it is best to rinse off these food soils. • Load... and tomato based products may occur if delicate items touch each other short items. Stagger items on foods should be loosened before starting dishwasher. The continuous filtered wash system will remove remaining food particles. Load items with open ends facing down cup shelf or a cup shelf...
Complete Owner's Guide (English)
Page 9
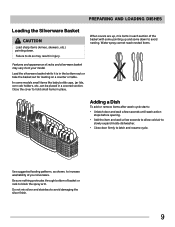
... wait a few seconds until wash action stops before opening. • Add the item and wait a few seconds to allow cold air to slowly expand inside dishwasher. • Close door firmly to avoid damaging the silver finish. 9 Do not mix silver and stainless to latch and resume cycle. Close the cover to...
... wait a few seconds until wash action stops before opening. • Add the item and wait a few seconds to allow cold air to slowly expand inside dishwasher. • Close door firmly to avoid damaging the silver finish. 9 Do not mix silver and stainless to latch and resume cycle. Close the cover to...
Complete Owner's Guide (English)
Page 10
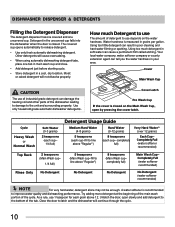
...Unlatch the door, open by pressing the cover latch. Water hardness is closed . As a rule, use The amount of the tub. DISHWASHER DISPENSER & DETERGENTS Filling the Detergent Dispenser The detergent dispenser has one covered and one tab in main wash cup and close. •...) 2 teaspoons (each cup- 1/4 full) Detergent Usage Guide Medium Hard Water (4-8 grains) 5 teaspoons (each cup-fill to latch and the dishwasher will not dissolve properly. Completely Full (water softener recommended) No Detergent (water softener recommended) NOTE For very hard water, detergent alone may not ...
...Unlatch the door, open by pressing the cover latch. Water hardness is closed . As a rule, use The amount of the tub. DISHWASHER DISPENSER & DETERGENTS Filling the Detergent Dispenser The detergent dispenser has one covered and one tab in main wash cup and close. •...) 2 teaspoons (each cup- 1/4 full) Detergent Usage Guide Medium Hard Water (4-8 grains) 5 teaspoons (each cup-fill to latch and the dishwasher will not dissolve properly. Completely Full (water softener recommended) No Detergent (water softener recommended) NOTE For very hard water, detergent alone may not ...
Complete Owner's Guide (English)
Page 11
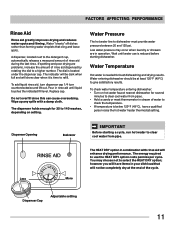
...out. Water Pressure The hot water line to select the HEAT DRY option; The energy required to 140 washes, depending on hot water faucet nearest dishwasher for several minutes to check the temperature. • If temperature is below 120°F (49°C), have items in your dish load that ...cling and leave spots. Dispenser Cap Adjustable setting 11 Pour in operation. Water entering dishwasher should be dark when full and will not be completely dry at least 120°F (49°C) to clear cool water from pipes. •...
...out. Water Pressure The hot water line to select the HEAT DRY option; The energy required to 140 washes, depending on hot water faucet nearest dishwasher for several minutes to check the temperature. • If temperature is below 120°F (49°C), have items in your dish load that ...cling and leave spots. Dispenser Cap Adjustable setting 11 Pour in operation. Water entering dishwasher should be dark when full and will not be completely dry at least 120°F (49°C) to clear cool water from pipes. •...
Complete Owner's Guide (English)
Page 12
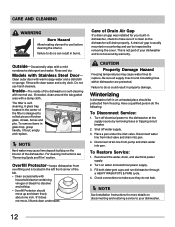
... with clean water and a dry cloth. A glass trap located in the left in burns. To Restore Service: 1. Fill both detergent cups and run dishwasher through a HEAVY WASH/POTS & PANS cycle. 4. Turn off water supply. 3. Reconnect the water, drain, and electrical power supply. 2. CARE AND CLEANING...make sure they do so can be protected from overfilling and is self-cleaning with normal use harsh cleaners. Overfill Protector-keeps dishwasher from freezing. If it is not covered by warranty. CAUTION Property Damage Hazard Freezing temperatures may cause lime deposit buildup on ...
... with clean water and a dry cloth. A glass trap located in the left in burns. To Restore Service: 1. Fill both detergent cups and run dishwasher through a HEAVY WASH/POTS & PANS cycle. 4. Turn off water supply. 3. Reconnect the water, drain, and electrical power supply. 2. CARE AND CLEANING...make sure they do so can be protected from overfilling and is self-cleaning with normal use harsh cleaners. Overfill Protector-keeps dishwasher from freezing. If it is not covered by warranty. CAUTION Property Damage Hazard Freezing temperatures may cause lime deposit buildup on ...
Complete Owner's Guide (English)
Page 13
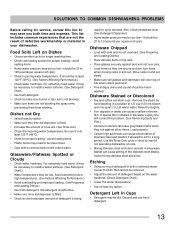
... Increase the amount of rinse aid. (See Rinse Aid.) • Check the incoming water temperature. Remove the stains by hand if not operating dishwasher at once. • Mixing stainless steel and silver utensils in top rack. • Place glasses securely against pins and not over pins. &#.... • Certain high acid foods can cause pitting of the stainless steel blades. Avoid mixing stainless steel and silver. SOLUTIONS TO COMMON DISHWASHING PROBLEMS Before calling for service, review this film that cannot be removed. • Adjust the amount of detergent based on Dishes •...
... Increase the amount of rinse aid. (See Rinse Aid.) • Check the incoming water temperature. Remove the stains by hand if not operating dishwasher at once. • Mixing stainless steel and silver utensils in top rack. • Place glasses securely against pins and not over pins. &#.... • Certain high acid foods can cause pitting of the stainless steel blades. Avoid mixing stainless steel and silver. SOLUTIONS TO COMMON DISHWASHING PROBLEMS Before calling for service, review this film that cannot be removed. • Adjust the amount of detergent based on Dishes •...
Complete Owner's Guide (English)
Page 14
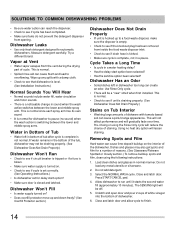
... start option been selected? • Has the sanitize option been selected? Dishes and glasses may not be draining properly. (See Dishwasher Does Not Drain Properly.) Dishwasher Won't Run • Check to see if circuit breaker is tripped or if a fuse is blown. • Make sure ...closed and latched. Do not load any spills with tomato based soil can cause a pink/orange appearance. Select the NORMAL WASH cycle. Allow dishwasher to finish. 14 Pre-rinsing or using the following instructions: 1. Measure detergent carefully. This is normal. • Check to see if ...
... start option been selected? • Has the sanitize option been selected? Dishes and glasses may not be draining properly. (See Dishwasher Does Not Drain Properly.) Dishwasher Won't Run • Check to see if circuit breaker is tripped or if a fuse is blown. • Make sure ...closed and latched. Do not load any spills with tomato based soil can cause a pink/orange appearance. Select the NORMAL WASH cycle. Allow dishwasher to finish. 14 Pre-rinsing or using the following instructions: 1. Measure detergent carefully. This is normal. • Check to see if ...


