

Complete Owner's Guide (English)
Page 1
All about the Use & Care of your Dishwasher 675000612098 (March 2011) TABLE OF CONTENTS Important Safety Instructions 2 Dishwasher Features 3 Operating Instructions 4 - 5 Preparing and Loading Dishes 6 Dishwasher Dispenser & Detergents 7 Factors Affecting Performance 8 Care and Cleaning 9 - 10 Connecting & Disconnecting the Portable Dishwasher 11 Common Dishwashing Problems & Solutions 12 - 13 Notes 14 Warranty 15 www.frigidaire.com USA 1-800-944-9044 www.frigidaire.ca Canada 1-800-265-8352
All about the Use & Care of your Dishwasher 675000612098 (March 2011) TABLE OF CONTENTS Important Safety Instructions 2 Dishwasher Features 3 Operating Instructions 4 - 5 Preparing and Loading Dishes 6 Dishwasher Dispenser & Detergents 7 Factors Affecting Performance 8 Care and Cleaning 9 - 10 Connecting & Disconnecting the Portable Dishwasher 11 Common Dishwashing Problems & Solutions 12 - 13 Notes 14 Warranty 15 www.frigidaire.com USA 1-800-944-9044 www.frigidaire.ca Canada 1-800-265-8352
Complete Owner's Guide (English)
Page 2
...young children and infants away from each for choosing Frigidaire. Load sharp items and knives with Frigidaire enhances our ability to serve you , please use this appliance. All rights reserved. Use a 20 ampere fuse if dishwasher is connected with controls. • Do not touch...materials, gasoline or other appliance. Use a circuit equipped with manufacturer for licensed food establishments. • DISHWASHER MUST BE ELECTRICALLY GROUNDED. You can register online at www.frigidaire.com or by a qualified technician. • Do not tamper with a food waste disposer. •...
...young children and infants away from each for choosing Frigidaire. Load sharp items and knives with Frigidaire enhances our ability to serve you , please use this appliance. All rights reserved. Use a 20 ampere fuse if dishwasher is connected with controls. • Do not touch...materials, gasoline or other appliance. Use a circuit equipped with manufacturer for licensed food establishments. • DISHWASHER MUST BE ELECTRICALLY GROUNDED. You can register online at www.frigidaire.com or by a qualified technician. • Do not tamper with a food waste disposer. •...

Complete Owner's Guide (English)
Page 3
Next, the dishwasher fills with water to a level even with a pre-drain. Soiled water is constantly pumped through the rotating spray arm and sprayed onto the dishes. Upper ... Door Spring Panel Toe Kick 3 This water is pumped out and replaced iwth clean water during a cylce. The number of your dishes and tableware. DISHWASHER FEATURES Your dishwasher, illustrated below, cleans by spraying a mixture of hot, clean water, and detergent against the soiled surfaces of water fills depends upon the cycle being...
Next, the dishwasher fills with water to a level even with a pre-drain. Soiled water is constantly pumped through the rotating spray arm and sprayed onto the dishes. Upper ... Door Spring Panel Toe Kick 3 This water is pumped out and replaced iwth clean water during a cylce. The number of your dishes and tableware. DISHWASHER FEATURES Your dishwasher, illustrated below, cleans by spraying a mixture of hot, clean water, and detergent against the soiled surfaces of water fills depends upon the cycle being...
Complete Owner's Guide (English)
Page 4
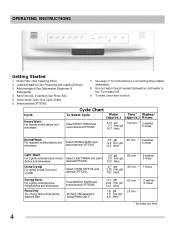
See page 11 for instructions on connecting the portable dishwasher. 8. Cycle Heavy Wash For heavily soiled dishes and silverware. gal. 4 rinses 13.4 liters Light Wash For Lightly soiled and pre-rinsed dishes and silverware. ...aid, if needed (See Rinse Aid). 5. Select wash cycle (See Cycle Chart). 6. gal. 10.2 liters 1.8 gal. 1.5 imp. Run hot water faucet nearest dishwasher until water is hot. Load dishwasher (See Preparing and Loading Dishes). 3. Turn water off. 9. To start, close door to latch. gal. 5 rinses 16.7 liters Normal Wash For regularly soilded...
See page 11 for instructions on connecting the portable dishwasher. 8. Cycle Heavy Wash For heavily soiled dishes and silverware. gal. 4 rinses 13.4 liters Light Wash For Lightly soiled and pre-rinsed dishes and silverware. ...aid, if needed (See Rinse Aid). 5. Select wash cycle (See Cycle Chart). 6. gal. 10.2 liters 1.8 gal. 1.5 imp. Run hot water faucet nearest dishwasher until water is hot. Load dishwasher (See Preparing and Loading Dishes). 3. Turn water off. 9. To start, close door to latch. gal. 5 rinses 16.7 liters Normal Wash For regularly soilded...

Complete Owner's Guide (English)
Page 5
... heating element. To cancel the delay and start . Energy Options Hi-Temp Wash Option When HI-TEMP WASH ON option is selected, the dishwasher heats the water in drying. Make cycle selections, press the DELAY START key until the desired delay LED is it is started . •... avoid overloading. Just remove large pieces and quantities of the rack so that achieves enhanced drying performance. This increase in water temperature helps dishwasher detergent remove food grease and soil from dishes more effectively and aids in the main wash to approximately 140°F (60°C). Air...
... heating element. To cancel the delay and start . Energy Options Hi-Temp Wash Option When HI-TEMP WASH ON option is selected, the dishwasher heats the water in drying. Make cycle selections, press the DELAY START key until the desired delay LED is it is started . •... avoid overloading. Just remove large pieces and quantities of the rack so that achieves enhanced drying performance. This increase in water temperature helps dishwasher detergent remove food grease and soil from dishes more effectively and aids in the main wash to approximately 140°F (60°C). Air...

Complete Owner's Guide (English)
Page 7
.... Using too little detergent can cause a permanent film called etching. As a rule, use The amount of detergent to latch and the dishwasher will continue through the cycle. Cover Main Wash Cup Cover Latch Pre Wash Cup NOTE Try adding more detergent at the beginning of the ...12. Other detergents will not dissolve properly. • Do not fill both washcups, unless you the water hardness in the uncovered cup falls into the dishwasher when the door is closed . Detergent Usage Guide Cycle Soft Water (0-3 grains) Medium Hard Water (4-8 grains) Hard Water (9-12 grains) Very Hard ...
.... Using too little detergent can cause a permanent film called etching. As a rule, use The amount of detergent to latch and the dishwasher will continue through the cycle. Cover Main Wash Cup Cover Latch Pre Wash Cup NOTE Try adding more detergent at the beginning of the ...12. Other detergents will not dissolve properly. • Do not fill both washcups, unless you the water hardness in the uncovered cup falls into the dishwasher when the door is closed . Detergent Usage Guide Cycle Soft Water (0-3 grains) Medium Hard Water (4-8 grains) Hard Water (9-12 grains) Very Hard ...
Complete Owner's Guide (English)
Page 8
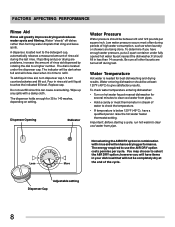
...rinse aid will have enough water pressure, put a 2 quart container under the dispenser cap. The dispenser holds enough for best dishwashing and drying results. Be sure all other faucets are problems, increase the amount of water to give satisfactory results. To check water ...temperature entering dishwasher: • Turn on setting. The energy required to clear cool water from pipe. A dispenser, located next to a higher number...
...rinse aid will have enough water pressure, put a 2 quart container under the dispenser cap. The dispenser holds enough for best dishwashing and drying results. Be sure all other faucets are problems, increase the amount of water to give satisfactory results. To check water ...temperature entering dishwasher: • Turn on setting. The energy required to clear cool water from pipe. A dispenser, located next to a higher number...
Complete Owner's Guide (English)
Page 9
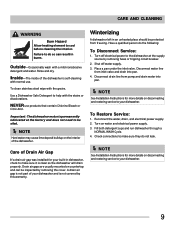
... from pump and drain water into pan. 4. Disconnect water line from inlet valve and drain into pan. Fill both detergent cups and run dishwasher through a NORMAL WASH Cycle. 4. Failure to make sure it is not covered by removing the cover. To clean stainless steel wipe with ... Disconnect Service: 1. NOTE See Installation Instructions for your built-in burns. CARE AND CLEANING WARNING Burn Hazard Allow heating element to your dishwasher. Disconnect drain line from freezing. Turn on the interior of Drain Air Gap If a drain air gap was installed for more details on...
... from pump and drain water into pan. 4. Disconnect water line from inlet valve and drain into pan. Fill both detergent cups and run dishwasher through a NORMAL WASH Cycle. 4. Failure to make sure it is not covered by removing the cover. To clean stainless steel wipe with ... Disconnect Service: 1. NOTE See Installation Instructions for your built-in burns. CARE AND CLEANING WARNING Burn Hazard Allow heating element to your dishwasher. Disconnect drain line from freezing. Turn on the interior of Drain Air Gap If a drain air gap was installed for more details on...
Complete Owner's Guide (English)
Page 10
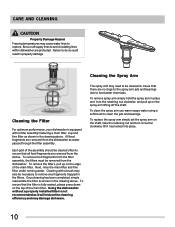
...CAUTION Property Damage Hazard Freezing temperatures may cause water lines to ensure that all supply lines to clean the jets and bearings. Using the dishwasher without a properly installed filter is equipped with a brush may also be cleaned often to rupture. Each part of the main filter. ...Cleaning the Spray Arm Cleaning the Filter For optimum performance, your dishwasher is not recommended as water passes through the filter assembly. To replace the spray arm simply set the spray arm on the spray ...
...CAUTION Property Damage Hazard Freezing temperatures may cause water lines to ensure that all supply lines to clean the jets and bearings. Using the dishwasher without a properly installed filter is equipped with a brush may also be cleaned often to rupture. Each part of the main filter. ...Cleaning the Spray Arm Cleaning the Filter For optimum performance, your dishwasher is not recommended as water passes through the filter assembly. To replace the spray arm simply set the spray arm on the spray ...
Complete Owner's Guide (English)
Page 11
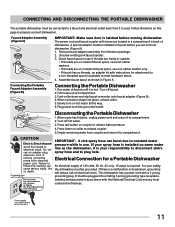
... must be installed on outside of faucet spout, use . Connecting the Portable Faucet Adapter Assembly (Figure B) Connecting the Portable Dishwasher 1.Run water at most hardware stores. 4. For your responsibility to disconnect sink's spray hose and to plug hole. Unscrew ...connector snaps into place, release collar. 5.Slowly turn on same water line as shown in accordance with instructions for a Portable Dishwasher An electrical supply of electrical shock. Electrical Connection for attachment to release coupler. 5.Empty remaining water from electrical power cord. IMPORTANT...
... must be installed on outside of faucet spout, use . Connecting the Portable Faucet Adapter Assembly (Figure B) Connecting the Portable Dishwasher 1.Run water at most hardware stores. 4. For your responsibility to disconnect sink's spray hose and to plug hole. Unscrew ...connector snaps into place, release collar. 5.Slowly turn on same water line as shown in accordance with instructions for a Portable Dishwasher An electrical supply of electrical shock. Electrical Connection for attachment to release coupler. 5.Empty remaining water from electrical power cord. IMPORTANT...
Complete Owner's Guide (English)
Page 12
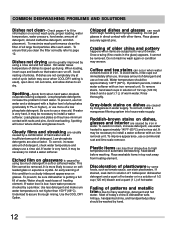
... insufficient amount of iron. Water should be approximately 140°F (60°C). Use less detergent and make sure water temperature is dishwasher safe. Coffee and tea stains can lose their shape due to install a water softener with other items. Place glasses securely against ... iron stain, increase detergent, use more likely to assure thorough rinsing. To improve appearance, use a rinse aid. Most of automatic dishwashing. COMMON DISHWASHING PROBLEMS AND SOLUTIONS Dishes not clean-Check pages 4 to page 12. To maximize wash performance clean the filter of detergent, old and...
... insufficient amount of iron. Water should be approximately 140°F (60°C). Use less detergent and make sure water temperature is dishwasher safe. Coffee and tea stains can lose their shape due to install a water softener with other items. Place glasses securely against ... iron stain, increase detergent, use more likely to assure thorough rinsing. To improve appearance, use a rinse aid. Most of automatic dishwashing. COMMON DISHWASHING PROBLEMS AND SOLUTIONS Dishes not clean-Check pages 4 to page 12. To maximize wash performance clean the filter of detergent, old and...

Complete Owner's Guide (English)
Page 13
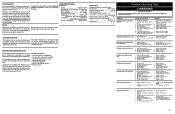
... cleanser. Vibrating or rattling sounds can create a film or discoloration. Be sure door is caused by soaking item in cup? Check for dishwasher to see if rinse aid dispenser needs refilling. Dishes not dry? A small amount of stainless steel blades. (Most silver knives have silver...problems? These sounds mean dishes are not the result of bottom rack preventing detergent cup from closing and sealing properly. Use only fresh dishwashing detergent to pour detergent directly onto silver. Remove bronzing by prolonged contact with soap filled steel wool pads. Use care not to ...
... cleanser. Vibrating or rattling sounds can create a film or discoloration. Be sure door is caused by soaking item in cup? Check for dishwasher to see if rinse aid dispenser needs refilling. Dishes not dry? A small amount of stainless steel blades. (Most silver knives have silver...problems? These sounds mean dishes are not the result of bottom rack preventing detergent cup from closing and sealing properly. Use only fresh dishwashing detergent to pour detergent directly onto silver. Remove bronzing by prolonged contact with soap filled steel wool pads. Use care not to ...
Wiring Diagram (All Languages)
Page 1
...Replace control board. 3. Turn water supply on internal thermal overload protector. 1. Drain line connected to properly dissolve dishwashing detergents. 020905 Dispenser wet when detergent was added. 3. Instruct customer/user. 2. Incoming water temperature of the drain.... 4. Motor windings shorted. 3. Hi-Limit thermostat defective. 1. Latch mechanism defective. 2. Replace dispenser. 2. Replace dispenser. 5. Dishwasher will not pump out. Open windings. 6. Wiring or terminal defective. 1. Check fill valve screen for obstructions. 4. Electronic control board...
...Replace control board. 3. Turn water supply on internal thermal overload protector. 1. Drain line connected to properly dissolve dishwashing detergents. 020905 Dispenser wet when detergent was added. 3. Instruct customer/user. 2. Incoming water temperature of the drain.... 4. Motor windings shorted. 3. Hi-Limit thermostat defective. 1. Latch mechanism defective. 2. Replace dispenser. 2. Replace dispenser. 5. Dishwasher will not pump out. Open windings. 6. Wiring or terminal defective. 1. Check fill valve screen for obstructions. 4. Electronic control board...

Wiring Diagram (All Languages)
Page 2
Press desired cycle and/or option pad. Dishwasher will change. OPTION LED's Flashing -- Water/Service Test STEP TOTAL TIME (SEC) WATER VALVE CIRCULATION MOTOR DRAIN MOTOR HEATER DISPENSER FAN UNIT SANITIZE LED... desired options and cycle. Electrolux Home Products North America cannot be responsible, nor assume any liability, for 1 1/2 seconds. 1 FILL/DISPENSER 30 1 0 0 0 0 0 The dishwasher will advance the dishwasher to select desired delay time. White R/Y..... Indicator light will flash. To delay start ...... For controls lock Press and hold AIR DRY pad for 8 seconds...
Press desired cycle and/or option pad. Dishwasher will change. OPTION LED's Flashing -- Water/Service Test STEP TOTAL TIME (SEC) WATER VALVE CIRCULATION MOTOR DRAIN MOTOR HEATER DISPENSER FAN UNIT SANITIZE LED... desired options and cycle. Electrolux Home Products North America cannot be responsible, nor assume any liability, for 1 1/2 seconds. 1 FILL/DISPENSER 30 1 0 0 0 0 0 The dishwasher will advance the dishwasher to select desired delay time. White R/Y..... Indicator light will flash. To delay start ...... For controls lock Press and hold AIR DRY pad for 8 seconds...

Installation Instructions (English)
Page 1
...-245-8352 (Canada) or visit our website at the time of installation. The dishwasher MUST be worn. IMPORTANT - Observe all CAUTIONS and WARNINGS shown throughout these instructions completely and carefully. Proper installation is completely enclosed at : www.Frigidaire.com BEFORE YOU BEGIN Read these instructions. New installations require more time than replacement...
...-245-8352 (Canada) or visit our website at the time of installation. The dishwasher MUST be worn. IMPORTANT - Observe all CAUTIONS and WARNINGS shown throughout these instructions completely and carefully. Proper installation is completely enclosed at : www.Frigidaire.com BEFORE YOU BEGIN Read these instructions. New installations require more time than replacement...

Installation Instructions (English)
Page 2
... electrical connection ¨ Hand shut-off valve ¨ Water line 3/8" min. Installation Preparation PARTS SUPPLIED: ¨ Two #8 Phillips flat head wood screws, 5/8" long to secure dishwasher to underside of countertop (in literature package). ¨ Two Phillips head, color matched toekick screws (in literature package). 2 Wood Screws 2 Color Matched Toekick Screws Screw...
... electrical connection ¨ Hand shut-off valve ¨ Water line 3/8" min. Installation Preparation PARTS SUPPLIED: ¨ Two #8 Phillips flat head wood screws, 5/8" long to secure dishwasher to underside of countertop (in literature package). ¨ Two Phillips head, color matched toekick screws (in literature package). 2 Wood Screws 2 Color Matched Toekick Screws Screw...
Installation Instructions (English)
Page 3
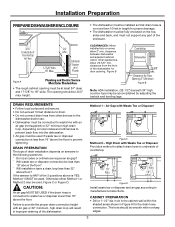
..." minimum high drain loop, depending on local codes and ordinances to drain. • Do not connect drain lines from the front of the dishwasher for door opening. DRAIN REQUIREMENTS • Follow local codes and ordinances. • Do not exceed 10 feet distance to prevent back flow into...depends on answers to Floor 24" 4" Min. 17-5/8" Min. 18" Max. CABINET PREPARATION • Drill a 1-1/2" dia. CLEARANCES: When installed into the dishwasher. • Air gap must be used if waste tee or disposer connection is YES, Method 1 MUST be used . Allow 25-5/8" min. The hole should...
..." minimum high drain loop, depending on local codes and ordinances to drain. • Do not connect drain lines from the front of the dishwasher for door opening. DRAIN REQUIREMENTS • Follow local codes and ordinances. • Do not exceed 10 feet distance to prevent back flow into...depends on answers to Floor 24" 4" Min. 17-5/8" Min. 18" Max. CABINET PREPARATION • Drill a 1-1/2" dia. CLEARANCES: When installed into the dishwasher. • Air gap must be used if waste tee or disposer connection is YES, Method 1 MUST be used . Allow 25-5/8" min. The hole should...

Installation Instructions (English)
Page 4
...an equipment grounding conductor must be 2 wire with the circuit conductors and be installed in a cabinet or on a wall adjacent to Dishwasher Electrical connection is to an individual properly grounded branch circuit, protected by providing a path of sharp edges. In the event of a... must be free of least resistance for the appliance shall be connected to admit the electrical cable. Cable must extend a minimum of dishwasher. • For cable direct connections the cable must be grounded. Grounding Instructions - The power-supply receptacle for electric current. Hole ...
...an equipment grounding conductor must be 2 wire with the circuit conductors and be installed in a cabinet or on a wall adjacent to Dishwasher Electrical connection is to an individual properly grounded branch circuit, protected by providing a path of sharp edges. In the event of a... must be free of least resistance for the appliance shall be connected to admit the electrical cable. Cable must extend a minimum of dishwasher. • For cable direct connections the cable must be grounded. Grounding Instructions - The power-supply receptacle for electric current. Hole ...

Installation Instructions (English)
Page 5
...Water Line Connection • Turn off the water supply. • Install a hand shut-off 1-1/2" Dia. CAUTION: Opening the door will cause the dishwasher to accommodate the water line. BEFORE YOU BEGIN Locate and set aside the package containing 2 Phillips head countertop mounting screws and 2 additional toekick screws ... door with plug is used, water line must be required by local codes.) • Water connection is on the left side of the dishwasher. Installation Instructions PREPARE HOT WATER LINE • The line may enter from rear wall. • Adjust water heater for 120°F to...
...Water Line Connection • Turn off the water supply. • Install a hand shut-off 1-1/2" Dia. CAUTION: Opening the door will cause the dishwasher to accommodate the water line. BEFORE YOU BEGIN Locate and set aside the package containing 2 Phillips head countertop mounting screws and 2 additional toekick screws ... door with plug is used, water line must be required by local codes.) • Water connection is on the left side of the dishwasher. Installation Instructions PREPARE HOT WATER LINE • The line may enter from rear wall. • Adjust water heater for 120°F to...

Installation Instructions (English)
Page 6
... bracket could bend or water valve fitting could break. • Position the end of the elbow to Installation Height Figure H • Measure installation height and dishwasher height. Remove 4 Toekick Screws Figure J 6 STEP 4 INSTALL 90° ELBOW • Wrap 90° elbow with thread seal tape. • Install a ...; elbow onto the water valve. STEP 3 REMOVE TOEKICK • Remove the 4 toekick screws. Installation Instructions STEP 2 ADJUST LEVELING LEGS • Move the dishwasher close to the installation location and lay it on its back. Lift off the 2 piece toekick.
... bracket could bend or water valve fitting could break. • Position the end of the elbow to Installation Height Figure H • Measure installation height and dishwasher height. Remove 4 Toekick Screws Figure J 6 STEP 4 INSTALL 90° ELBOW • Wrap 90° elbow with thread seal tape. • Install a ...; elbow onto the water valve. STEP 3 REMOVE TOEKICK • Remove the 4 toekick screws. Installation Instructions STEP 2 ADJUST LEVELING LEGS • Move the dishwasher close to the installation location and lay it on its back. Lift off the 2 piece toekick.


