Owners Guide
Page 2
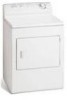
...included. • Clear the room, building or area of an overheated situation (electric dryers only). To reduce the risk of the dryer. Failure to the rubber or plastic parts of fire, electrical shock, or injury to cover completely before using this or any service or cleaning...Safety Instructions SAVE THESE INSTRUCTIONS Read all warnings on or near dryer at any type spray cleanser when cleaning dryer interior. Do not operate the dryer if the lint screen is unpacked. Fire hazard, ELECTRIC DRYER overheating and damage to light any accumulation of aerosol into the ...
...included. • Clear the room, building or area of an overheated situation (electric dryers only). To reduce the risk of the dryer. Failure to the rubber or plastic parts of fire, electrical shock, or injury to cover completely before using this or any service or cleaning...Safety Instructions SAVE THESE INSTRUCTIONS Read all warnings on or near dryer at any type spray cleanser when cleaning dryer interior. Do not operate the dryer if the lint screen is unpacked. Fire hazard, ELECTRIC DRYER overheating and damage to light any accumulation of aerosol into the ...
Owners Guide
Page 3
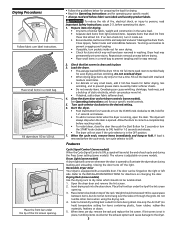
To reduce the risk of fire, electrical shock, or injury to OFF. Close zippers, fasten hooks and Velcro®-like materials, feathers or down. 5. Items need room to ON, hold for 1-2 seconds and release. • To add or remove items when the dryer is opened . See Operating Instructions card...screen opening . 3. When the cycle ends, remove items immediately and hang or fold. Open the dryer door and remove the lint screen. 2. Place the front bar under the lip of static electricity, which should not exceed 10 lbs. Weight should not be hinged on some models). Leave space ...
To reduce the risk of fire, electrical shock, or injury to OFF. Close zippers, fasten hooks and Velcro®-like materials, feathers or down. 5. Items need room to ON, hold for 1-2 seconds and release. • To add or remove items when the dryer is opened . See Operating Instructions card...screen opening . 3. When the cycle ends, remove items immediately and hang or fold. Open the dryer door and remove the lint screen. 2. Place the front bar under the lip of static electricity, which should not exceed 10 lbs. Weight should not be hinged on some models). Leave space ...
Owners Guide
Page 4
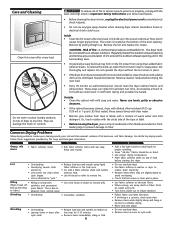
.... • Rub fabric softener stains with mild soap and water. This is clean and in washer or dryer to electricity. • Or, add a fabric softener sheet and tumble reduce static electricity. • Lint screen not clean when without the lint screen in 1 quart (.95 liter) water]. ...straight up , wash the lint screen in Important Safety Instructions and those listed below. • Before cleaning the dryer interior, unplug the electrical power cord to avoid electrical shock hazards. • Do not use harsh, gritty or abrasive cleansers. • If the cabinet becomes stained,...
.... • Rub fabric softener stains with mild soap and water. This is clean and in washer or dryer to electricity. • Or, add a fabric softener sheet and tumble reduce static electricity. • Lint screen not clean when without the lint screen in 1 quart (.95 liter) water]. ...straight up , wash the lint screen in Important Safety Instructions and those listed below. • Before cleaning the dryer interior, unplug the electrical power cord to avoid electrical shock hazards. • Do not use harsh, gritty or abrasive cleansers. • If the cabinet becomes stained,...
Owners Guide
Page 5
... will be clogged or restricted. Check to the dryer. Dryer does not have no more than drying on a separate circuit. Dryer should heat when utility service is connected to See INSTALLATION INSTRUCTIONS. Exhaust duct requirements have not been followed. Electric dryer is restored. Use a dehumidifier near the dryer. Permanently attached items such as cycle ends. Always...
... will be clogged or restricted. Check to the dryer. Dryer does not have no more than drying on a separate circuit. Dryer should heat when utility service is connected to See INSTALLATION INSTRUCTIONS. Exhaust duct requirements have not been followed. Electric dryer is restored. Use a dehumidifier near the dryer. Permanently attached items such as cycle ends. Always...
Installation Instructions
Page 2
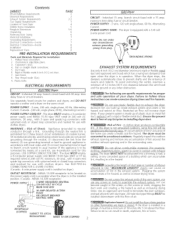
...) duct, 7. Phillips head screwdriver. 2. Contents SUBJECT PA GE Prednsta%Son Require,remits 2 Electrical Requirements 2 Exhaust System Requirements 2-3 Gas Supply Requirements 3 Location of "four Dryer 4 Mobile Home Installation 5 Roughdn Dimensions 5-6 Unpacking 6 Reversing Door Swing 6 Electrical Insta%8on 7 Grounding Requirements 7 Electrical Connections--3-wire 7 Electrical Connections--4-wire 8 Installation 8 Replacement Parts 8 PREdNSTALLATION REQUIREMENTS Tools and Materials Required for washers...
...) duct, 7. Phillips head screwdriver. 2. Contents SUBJECT PA GE Prednsta%Son Require,remits 2 Electrical Requirements 2 Exhaust System Requirements 2-3 Gas Supply Requirements 3 Location of "four Dryer 4 Mobile Home Installation 5 Roughdn Dimensions 5-6 Unpacking 6 Reversing Door Swing 6 Electrical Insta%8on 7 Grounding Requirements 7 Electrical Connections--3-wire 7 Electrical Connections--4-wire 8 Installation 8 Replacement Parts 8 PREdNSTALLATION REQUIREMENTS Tools and Materials Required for washers...
Installation Instructions
Page 3
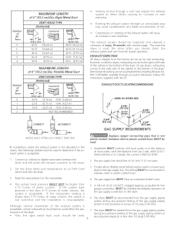
... (10.2 cm) 30 ft (9,14 m) (6,35 cm) 18 ft (5,49 m) 22 ft (6,71 m) 14 ft (4,27 m) 14 ft (4,27 m) 10 ft (3,05 m) NOT RECOMMENDED Venting vertical through system to down ) and start the dryer 3, Read the measurement on electric dryers, exhausting can be to the right or left side of the cabinet or the bottom...
... (10.2 cm) 30 ft (9,14 m) (6,35 cm) 18 ft (5,49 m) 22 ft (6,71 m) 14 ft (4,27 m) 14 ft (4,27 m) 10 ft (3,05 m) NOT RECOMMENDED Venting vertical through system to down ) and start the dryer 3, Read the measurement on electric dryers, exhausting can be to the right or left side of the cabinet or the bottom...
Installation Instructions
Page 7
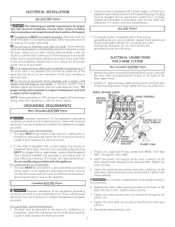
... cord_ If the strain relief is not attached, the cord can be pulled out of the dryer and can be cut or remove the grounding prong from the plug_ ELECTRICAL CONNECTIONS FOR 3-WIRE SYSTEM I Non-Canadian ELECTRIC Dryer 1 1, Remove the screws securing the terminal block access cover and the strain relief mounting bracket located...
... cord_ If the strain relief is not attached, the cord can be pulled out of the dryer and can be cut or remove the grounding prong from the plug_ ELECTRICAL CONNECTIONS FOR 3-WIRE SYSTEM I Non-Canadian ELECTRIC Dryer 1 1, Remove the screws securing the terminal block access cover and the strain relief mounting bracket located...
Installation Instructions
Page 8
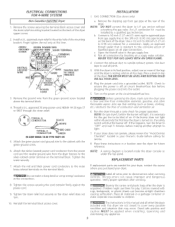
... 4-WIRE SYSTEM Non -Canadian ELECTRIC Dryer 1 1 Remove the screws securing the terminal block access cover and the strain relief mounting bracket located on the back of the legs until the dryer is resting solid on all four legs. Attach the red and black power cord conductors to the outer...mounting bracket, Finger tighten the nut only at the connections 8. Connect a 1/2 inch (I 27 cm) lD semi-rigid or approved pipe from gas supply line to 0.96 cm) reducer for proper operation NOTE: On gas dryers, before the burner will shut the burner offl If this time, NEUTRAL WIRE 3. Thread a...
... 4-WIRE SYSTEM Non -Canadian ELECTRIC Dryer 1 1 Remove the screws securing the terminal block access cover and the strain relief mounting bracket located on the back of the legs until the dryer is resting solid on all four legs. Attach the red and black power cord conductors to the outer...mounting bracket, Finger tighten the nut only at the connections 8. Connect a 1/2 inch (I 27 cm) lD semi-rigid or approved pipe from gas supply line to 0.96 cm) reducer for proper operation NOTE: On gas dryers, before the burner will shut the burner offl If this time, NEUTRAL WIRE 3. Thread a...


