
Complete Owner's Guide (English)
Page 2
... accumulation of lint build-up in these items on or near the dryer. included. • Clear the room, building or area of an overheated situation (electric dryers only). Installation and service must be removed. Use the dryer only as bras, galoshes, bath mats, rugs, bibs, baby pants..., plastic bags and pillows that could result in the surrounding area. Avoid fire hazard or electrical shock. Do not use of...
... accumulation of lint build-up in these items on or near the dryer. included. • Clear the room, building or area of an overheated situation (electric dryers only). Installation and service must be removed. Use the dryer only as bras, galoshes, bath mats, rugs, bibs, baby pants..., plastic bags and pillows that could result in the surrounding area. Avoid fire hazard or electrical shock. Do not use of...
Complete Owner's Guide (English)
Page 3
... The door can produce more lint. • If desired, add a dryer fabric softener sheet. 4. Open the dryer door and remove the lint screen. 2. Place the front bar under the lip of fire, electrical shock, or injury to persons, read and follow fabric care labels and ...shrinkage, harshness, and a build-up of static electricity, which may permanently set dryer controls (some models. Reversible Dryer Door Your dryer is clean and in place, tumbling items could enter the exhaust system and cause damage to the INSTALLATION INSTRUCTIONS for even drying and less wrinkling. Leave space...
... The door can produce more lint. • If desired, add a dryer fabric softener sheet. 4. Open the dryer door and remove the lint screen. 2. Place the front bar under the lip of fire, electrical shock, or injury to persons, read and follow fabric care labels and ...shrinkage, harshness, and a build-up of static electricity, which may permanently set dryer controls (some models. Reversible Dryer Door Your dryer is clean and in place, tumbling items could enter the exhaust system and cause damage to the INSTALLATION INSTRUCTIONS for even drying and less wrinkling. Leave space...

Complete Owner's Guide (English)
Page 5
... not covered by the warranty. 5 Electric dryer is open (gas models). Use a dehumidifier near the dryer. Follow fabric care label instructions. Always remove foreign objects from pockets before drying to prevent scratching and damage to See INSTALLATION INSTRUCTIONS. Drum damage caused by foreign ...objects or permanently attached items is restored. Dryer runs but the heater will be 20% longer than two 90° bends ...
... not covered by the warranty. 5 Electric dryer is open (gas models). Use a dehumidifier near the dryer. Follow fabric care label instructions. Always remove foreign objects from pockets before drying to prevent scratching and damage to See INSTALLATION INSTRUCTIONS. Drum damage caused by foreign ...objects or permanently attached items is restored. Dryer runs but the heater will be 20% longer than two 90° bends ...
Complete Owner's Guide (English)
Page 6
...parts obtained from its original owner to change or add to correct the installation of parts other appropriate payment record to be defective in materials or workmanship when such appliance is installed, used in the USA and Canada. Service calls which are subject to... etc. 13. Product features or specifications as abuse, misuse, inadequate power supply, accidents, fires, or acts of appliance or home incurred during installation, including but not limited to, any refrigerator or freezer failures. 6. Rust on the interior or exterior of Electrolux Home Products, Inc. use your...
...parts obtained from its original owner to change or add to correct the installation of parts other appropriate payment record to be defective in materials or workmanship when such appliance is installed, used in the USA and Canada. Service calls which are subject to... etc. 13. Product features or specifications as abuse, misuse, inadequate power supply, accidents, fires, or acts of appliance or home incurred during installation, including but not limited to, any refrigerator or freezer failures. 6. Rust on the interior or exterior of Electrolux Home Products, Inc. use your...
Installation Instructions (All Languages)
Page 1
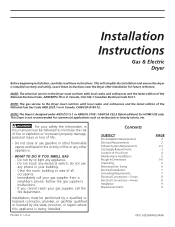
... of Your Dryer Mobile Home Installation Rough-In Dimensions Unpacking Reversing Door Swing Electrical Installation Grounding Requirements Electrical Connections-3-wire Electrical Connections-4-wire Installation Replacement Parts PAGE 2 2 2-3 3 4 5 5-6 6 6 7 7 8 8 9 9 P/N 134296400B (0404) CAN/CSA C22.2 (latest editions) for future reference. Printed in Canada, CAN/CGA B149.12. Installation Instructions Gas & Electric Dryer Before beginning installation, carefully read these instructions near the Dryer after installation for HOME...
... of Your Dryer Mobile Home Installation Rough-In Dimensions Unpacking Reversing Door Swing Electrical Installation Grounding Requirements Electrical Connections-3-wire Electrical Connections-4-wire Installation Replacement Parts PAGE 2 2 2-3 3 4 5 5-6 6 6 7 7 8 8 9 9 P/N 134296400B (0404) CAN/CSA C22.2 (latest editions) for future reference. Printed in Canada, CAN/CGA B149.12. Installation Instructions Gas & Electric Dryer Before beginning installation, carefully read these instructions near the Dryer after installation for HOME...
Installation Instructions (All Languages)
Page 2
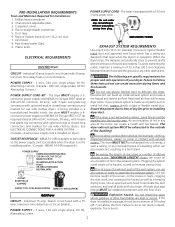
... specific requirements for use with a 120 volt 3-wire power cord. PRE-INSTALLATION REQUIREMENTS Tools and Materials Required for example: clothing, draperies/curtains, paper) to come in the screen, on dryer.) OUTLET RECEPTACLE - Phillips head screwdriver. 2. Channel-lock adjustable pliers. 3. ELECTRICAL REQUIREMENTS ELECTRIC Dryer CIRCUIT - Individual 30 amp. NEMA 10-30R receptacle to be exhausted into...
... specific requirements for use with a 120 volt 3-wire power cord. PRE-INSTALLATION REQUIREMENTS Tools and Materials Required for example: clothing, draperies/curtains, paper) to come in the screen, on dryer.) OUTLET RECEPTACLE - Phillips head screwdriver. 2. Channel-lock adjustable pliers. 3. ELECTRICAL REQUIREMENTS ELECTRIC Dryer CIRCUIT - Individual 30 amp. NEMA 10-30R receptacle to be exhausted into...
Installation Instructions (All Languages)
Page 3
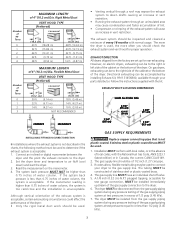
...27 m) 14 ft. (4.27 m) 10 ft. (3.05 m) NOT RECOMMENDED CORRECT INCORRECT • Venting vertical through your dryer to the dryer. 2. EXHAUST DUCT LOCATING DIMENSIONS SAME AS OTHER SIDE 3 3/4" (9.5 cm) 5 7/8" (15 cm) 13 1/2" (34 cm) 4 3/8" (11 cm) 3 3/4" (9.5 cm(9).5 cm) INSTALL MALE FITTINGS IN CORRECT DIRECTION In installations...start the dryer. 3. Read the measurement on electric dryers, exhausting can be used . 1. GAS SUPPLY REQUIREMENTS Replace copper connecting pipe that is unacceptable. Stainless steel or plastic-coated brass MUST be installed immediately ...
...27 m) 14 ft. (4.27 m) 10 ft. (3.05 m) NOT RECOMMENDED CORRECT INCORRECT • Venting vertical through your dryer to the dryer. 2. EXHAUST DUCT LOCATING DIMENSIONS SAME AS OTHER SIDE 3 3/4" (9.5 cm) 5 7/8" (15 cm) 13 1/2" (34 cm) 4 3/8" (11 cm) 3 3/4" (9.5 cm(9).5 cm) INSTALL MALE FITTINGS IN CORRECT DIRECTION In installations...start the dryer. 3. Read the measurement on electric dryers, exhausting can be used . 1. GAS SUPPLY REQUIREMENTS Replace copper connecting pipe that is unacceptable. Stainless steel or plastic-coated brass MUST be installed immediately ...
Installation Instructions (All Languages)
Page 4
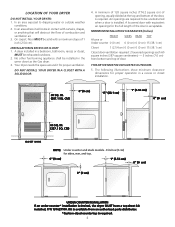
... top. 0" (0 cm) 1" (2.54 cm) 0" (0 cm) 0" (0 cm) UNDER COUNTER INSTALLATION If an under counter* installation is required. 4 On carpet. A dryer installed in the same closet as the Gas dryer. 3. Your dryer needs the space around it will obstruct the flow of 1 inch (2.54 cm). MINIMUM...) - 3 inches (7.6 cm) from an authorized parts distributor. *Custom-sized countertop is desired, the dryer MUST have a top sheet kit installed, P/N 131629100. THIS DRYER MUST BE EXHAUSTED OUTDOORS. 5. Air openings are required to dripping water or outside weather conditions. 2. A...
... top. 0" (0 cm) 1" (2.54 cm) 0" (0 cm) 0" (0 cm) UNDER COUNTER INSTALLATION If an under counter* installation is required. 4 On carpet. A dryer installed in the same closet as the Gas dryer. 3. Your dryer needs the space around it will obstruct the flow of 1 inch (2.54 cm). MINIMUM...) - 3 inches (7.6 cm) from an authorized parts distributor. *Custom-sized countertop is desired, the dryer MUST have a top sheet kit installed, P/N 131629100. THIS DRYER MUST BE EXHAUSTED OUTDOORS. 5. Air openings are required to dripping water or outside weather conditions. 2. A...
Installation Instructions (All Languages)
Page 5
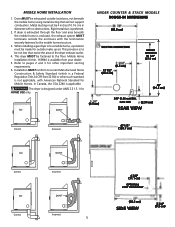
.... This provision is available from your dealer. 5. UNDER COUNTER & STACK MODELS ROUGH-IN DIMENSIONS (68.3 cm) ELECTRIC CONNECTION (6.5 cm) 13 1/2" (34.4 cm) UNDER COUNTER 34 5/8" (87.9 cm) (9.5 cm) 36" (91.5 cm) 3/8" (0.96 cm) DIA. When installing a gas dryer into a mobile home, a provision must be exhausted outside the enclosure with no obstructions. Mobile Home...
.... This provision is available from your dealer. 5. UNDER COUNTER & STACK MODELS ROUGH-IN DIMENSIONS (68.3 cm) ELECTRIC CONNECTION (6.5 cm) 13 1/2" (34.4 cm) UNDER COUNTER 34 5/8" (87.9 cm) (9.5 cm) 36" (91.5 cm) 3/8" (0.96 cm) DIA. When installing a gas dryer into a mobile home, a provision must be exhausted outside the enclosure with no obstructions. Mobile Home...

Installation Instructions (All Languages)
Page 6
... (110.7 cm) 36" (91.5 cm) FOAM SHIPPING PACKING (9.5 cm) 3/8" (0.96 cm) DIA. Rotate the door 180° and reinstall the door hinges to the dryer front panel (see below). Install the four hinge hole plugs in the open screw holes on the right side of the cabinet. Open the...plastic knife to pick up or move the dryer. Remove the four screws that secure the door hinges to the dryer front panel with the four screws. 4. To change the direction of the two hinges first. TOP CONSOLE MODELS ROUGH-IN DIMENSIONS (68.3 cm) ELECTRIC CONNECTION UNPACKING 1. To prevent damage, do not...
... (110.7 cm) 36" (91.5 cm) FOAM SHIPPING PACKING (9.5 cm) 3/8" (0.96 cm) DIA. Rotate the door 180° and reinstall the door hinges to the dryer front panel (see below). Install the four hinge hole plugs in the open screw holes on the right side of the cabinet. Open the...plastic knife to pick up or move the dryer. Remove the four screws that secure the door hinges to the dryer front panel with the four screws. 4. To change the direction of the two hinges first. TOP CONSOLE MODELS ROUGH-IN DIMENSIONS (68.3 cm) ELECTRIC CONNECTION UNPACKING 1. To prevent damage, do not...

Installation Instructions (All Languages)
Page 7
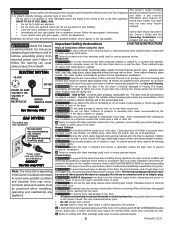
... cord. call a licensed electrician. A U.L. DANGER Improper connection of the equipment grounding conductor can cause electrical shorts. If your protection against the power cord. 8. ELECTRICAL INSTALLATION Canadian ELECTRIC Dryer ALL ELECTRIC Dryers The following are specific requirements for proper and safe electrical installation of your dryer is equipped with a power supply cord having an equipment-grounding conductor and a grounding plug, the...
... cord. call a licensed electrician. A U.L. DANGER Improper connection of the equipment grounding conductor can cause electrical shorts. If your protection against the power cord. 8. ELECTRICAL INSTALLATION Canadian ELECTRIC Dryer ALL ELECTRIC Dryers The following are specific requirements for proper and safe electrical installation of your dryer is equipped with a power supply cord having an equipment-grounding conductor and a grounding plug, the...
Installation Instructions (All Languages)
Page 8
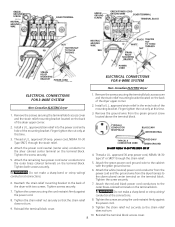
... CORD RED 240V GREEN GROUND 30 AMP NEMA 14-30 TYPE SRDT OR ST 4. Finger tighten the nut only at the connections. 8. approved 30 amp. Install a U.L. Do not make a sharp bend or crimp wiring/ conductor at this time. 3. Tighten the screws securing the cord restraint firmly against the power cord. ... NEUTRAL GROUND WIRE RED BLACK TIGHTEN NUT WHITE TO THESE THREADS NUT STRAIN RELIEF MOUNTING BRACKET STRAIN RELIEF MOUNTING BRACKET POWER CORD POWER CORD ELECTRICAL CONNECTIONS FOR 4-WIRE SYSTEM Non-Canadian ELECTRIC Dryer ELECTRICAL CONNECTIONS FOR 3-WIRE SYSTEM Non-Canadian...
... CORD RED 240V GREEN GROUND 30 AMP NEMA 14-30 TYPE SRDT OR ST 4. Finger tighten the nut only at the connections. 8. approved 30 amp. Install a U.L. Do not make a sharp bend or crimp wiring/ conductor at this time. 3. Tighten the screws securing the cord restraint firmly against the power cord. ... NEUTRAL GROUND WIRE RED BLACK TIGHTEN NUT WHITE TO THESE THREADS NUT STRAIN RELIEF MOUNTING BRACKET STRAIN RELIEF MOUNTING BRACKET POWER CORD POWER CORD ELECTRICAL CONNECTIONS FOR 4-WIRE SYSTEM Non-Canadian ELECTRIC Dryer ELECTRICAL CONNECTIONS FOR 3-WIRE SYSTEM Non-Canadian...
Installation Instructions (All Languages)
Page 9
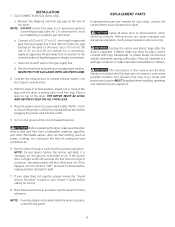
... its final position, adjust one or more of the legs until the dryer is off . NOTE: DO NOT connect the dryer to disconnection when servicing controls. conversion kit must be applied when installing, operating and maintaining any appliance. Use a 1/2 inch to 3/8 inch (1.27 cm to 0.96 cm) reducer for the gas line to the...
... its final position, adjust one or more of the legs until the dryer is off . NOTE: DO NOT connect the dryer to disconnection when servicing controls. conversion kit must be applied when installing, operating and maintaining any appliance. Use a 1/2 inch to 3/8 inch (1.27 cm to 0.96 cm) reducer for the gas line to the...
Operating Instructions (Operating Instructions)
Page 1
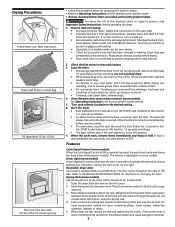
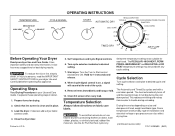
... only. Check that lint screen is on fabric care labels. Close the dryer door. Remove items immediately and hang or fold. 10. Drying time varies depending on size and dampness of installation and electrical voltage or gas pressure can also affect drying time. (continued, reverse side...) P/N 134383600 (0401) Operating Steps Read Drying Procedures in your dryer Use and Care Guide before operating this appliance. Turn ...
... only. Check that lint screen is on fabric care labels. Close the dryer door. Remove items immediately and hang or fold. 10. Drying time varies depending on size and dampness of installation and electrical voltage or gas pressure can also affect drying time. (continued, reverse side...) P/N 134383600 (0401) Operating Steps Read Drying Procedures in your dryer Use and Care Guide before operating this appliance. Turn ...


