Use and Care Manual
Page 19
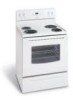
... a level on the oven bottom. Appliance must first be purchased from oven vent - Heavy & medium-weight pans heat evenly. Call your local electric company for example F11) - Oven control beeps & displays ...Adjust leveling legs at base of day is started. Contact builder or installer to make range appear not level. Wipe up & grease not draining. Regular cleaning is sagging or sloping...Self-Cleaning cycle is not set properly for service, review the following list. Cut fatty edges to damage the oven gasket. Be sure the correct control is not level ...
... a level on the oven bottom. Appliance must first be purchased from oven vent - Heavy & medium-weight pans heat evenly. Call your local electric company for example F11) - Oven control beeps & displays ...Adjust leveling legs at base of day is started. Contact builder or installer to make range appear not level. Wipe up & grease not draining. Regular cleaning is sagging or sloping...Self-Cleaning cycle is not set properly for service, review the following list. Cut fatty edges to damage the oven gasket. Be sure the correct control is not level ...

Installation Instructions
Page 3
....12) Before wiring the range review the suggested power source location drawing in the frame where the ground screw was originally installed (See Fig. 12). 5. Electrical failure or loss of a power supply cord. See Steps 4a. Fig. 11 3. ELECTRICAL CONNECTION TO RANGE. The Rear Access Cover must... strain relief and install (Also see Figs. 9, 10 & 11). 2. Make sure all screws are loosened or removed. 3. 30" ELECTRIC RANGE INSTALLATION INSTRUCTIONS (For 3 or 4 Wire, 60 Hz. Cut and discard the copper ground strap & plate. Insert the end connectors for 3-Wire connections....
....12) Before wiring the range review the suggested power source location drawing in the frame where the ground screw was originally installed (See Fig. 12). 5. Electrical failure or loss of a power supply cord. See Steps 4a. Fig. 11 3. ELECTRICAL CONNECTION TO RANGE. The Rear Access Cover must... strain relief and install (Also see Figs. 9, 10 & 11). 2. Make sure all screws are loosened or removed. 3. 30" ELECTRIC RANGE INSTALLATION INSTRUCTIONS (For 3 or 4 Wire, 60 Hz. Cut and discard the copper ground strap & plate. Insert the end connectors for 3-Wire connections....

Installation Instructions
Page 4
...range, review the suggested power source location drawings in Figs. 1, 2 & 3 before moving range into final location. Tighten all connections are loosened or removed. Wire Permanent Connections) Make sure all 3 wire leads to the terminal block (Follow wire locations shown in Fig. 15. CAREFULLY SLIDE RANGE... range Warmer or storage drawer. 30" ELECTRIC RANGE INSTALLATION INSTRUCTIONS (For 3 or 4 Wire, 60 Hz. POWER CORD CONNECTIONS (3-Wire Connection Instructions . Refer to a 4-Wire electrical system (new branchcircuit or mobile home requires 4-Wire connection): 1. (3 & 4 - Electrical ...
...range, review the suggested power source location drawings in Figs. 1, 2 & 3 before moving range into final location. Tighten all connections are loosened or removed. Wire Permanent Connections) Make sure all 3 wire leads to the terminal block (Follow wire locations shown in Fig. 15. CAREFULLY SLIDE RANGE... range Warmer or storage drawer. 30" ELECTRIC RANGE INSTALLATION INSTRUCTIONS (For 3 or 4 Wire, 60 Hz. POWER CORD CONNECTIONS (3-Wire Connection Instructions . Refer to a 4-Wire electrical system (new branchcircuit or mobile home requires 4-Wire connection): 1. (3 & 4 - Electrical ...
