Installation Instructions (All Languages)
Page 1
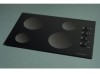
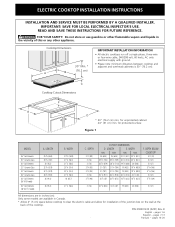
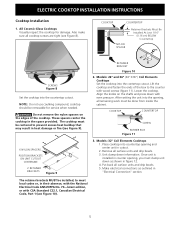
....3) MIN. Only some models are in the vicinity of the cooktop. P/N 318201410 (0201) Rev. B English - pages 14-20 IMPORTANT: SAVE FOR LOCAL ELECTRICAL INSPECTOR'S USE. C Cooktop Cutout Dimensions F E D * 30" (76.2 cm) min. pages 1-6 1 Español - Cooktop Dimensions 30" Min. * A B (76.2 cm) IMPORTANT INSTALLATION-INFORMATION • All electric cooktops run off a single phase, three-wire or four-wire cable...
....3) MIN. Only some models are in the vicinity of the cooktop. P/N 318201410 (0201) Rev. B English - pages 14-20 IMPORTANT: SAVE FOR LOCAL ELECTRICAL INSPECTOR'S USE. C Cooktop Cutout Dimensions F E D * 30" (76.2 cm) min. pages 1-6 1 Español - Cooktop Dimensions 30" Min. * A B (76.2 cm) IMPORTANT INSTALLATION-INFORMATION • All electric cooktops run off a single phase, three-wire or four-wire cable...
Installation Instructions (All Languages)
Page 2
...OPENING 2 when Bottom of countertop. J Min. If cabinet storage is Protected by installing a range hood that projects horizontally a minimum of 5" (12.7 cm) beyond the bottom of Cutout to chart on this cooktop since burner box extends G below surface of Wood or Metal Cabinet is provided, ...) Stainless Steel, 0.024" (0.6 mm) Aluminum or 0.020" (0.5 mm) Copper 2 1/2" (6.4 cm) Min. From Edge of the cabinets. 12" (30.5 cm) Drawers cannot be avoided. ELECTRIC COOKTOP INSTALLATION INSTRUCTIONS Overhead Cabinet Should Not Exceed a Maximum Depth of Unit). From Edge of...
...OPENING 2 when Bottom of countertop. J Min. If cabinet storage is Protected by installing a range hood that projects horizontally a minimum of 5" (12.7 cm) beyond the bottom of Cutout to chart on this cooktop since burner box extends G below surface of Wood or Metal Cabinet is provided, ...) Stainless Steel, 0.024" (0.6 mm) Aluminum or 0.020" (0.5 mm) Copper 2 1/2" (6.4 cm) Min. From Edge of the cabinets. 12" (30.5 cm) Drawers cannot be avoided. ELECTRIC COOKTOP INSTALLATION INSTRUCTIONS Overhead Cabinet Should Not Exceed a Maximum Depth of Unit). From Edge of...
Installation Instructions (All Languages)
Page 3
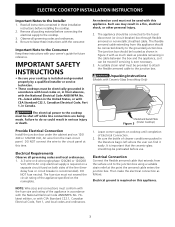
ELECTRIC COOKTOP INSTALLATION INSTRUCTIONS Important Notes to the grounded junction box. Observe all governing codes and local ordinances. 1. The flexible armored cable extending from the main circuit panel. ... ordinances. 4. A 3-wire or 4-wire single phase 120/240 or 120/208 Volt, 60 Hz AC only electrical supply is recommended). Electrical Connection Connect the flexible armored cable that the ceramic-glass smoothtop be connected directly to the Installer 1. Electrical ground is required on both sides of the line (timedelay fuse or circuit breaker is required...
ELECTRIC COOKTOP INSTALLATION INSTRUCTIONS Important Notes to the grounded junction box. Observe all governing codes and local ordinances. 1. The flexible armored cable extending from the main circuit panel. ... ordinances. 4. A 3-wire or 4-wire single phase 120/240 or 120/208 Volt, 60 Hz AC only electrical supply is recommended). Electrical Connection Connect the flexible armored cable that the ceramic-glass smoothtop be connected directly to the Installer 1. Electrical ground is required on both sides of the line (timedelay fuse or circuit breaker is required...

Installation Instructions (All Languages)
Page 4
... from the appliance cable to the supply cable ground wire (white or bare) inside the junction box. DO NOT connect to electrical power supply until appliance is supplied) to the power supply cable white wire. Only Models 36" with Warmer Zone Only WARNING ...cable to the matching color wires from the power supply cable to the matching colors of the 4-wire electrical system. ELECTRIC COOKTOP INSTALLATION INSTRUCTIONS This appliance is prohibited in new installations, mobile homes, recreational vehicles or in other areas where local codes do not permit neutral grounding) Connect...
... from the appliance cable to the supply cable ground wire (white or bare) inside the junction box. DO NOT connect to electrical power supply until appliance is supplied) to the power supply cable white wire. Only Models 36" with Warmer Zone Only WARNING ...cable to the matching color wires from the power supply cable to the matching colors of the 4-wire electrical system. ELECTRIC COOKTOP INSTALLATION INSTRUCTIONS This appliance is prohibited in new installations, mobile homes, recreational vehicles or in other areas where local codes do not permit neutral grounding) Connect...
Installation Instructions (All Languages)
Page 5
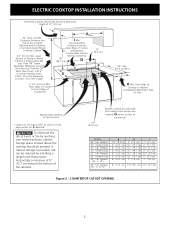
... units and drip bowls. 3. NOTE: Do not use caulking compound; Place cooktop into the contertop cutout. Once unit is installed in figure 12. 4. ELECTRIC COOKTOP INSTALLATION INSTRUCTIONS Cooktop Installation 1. Align the knobs on the edges of the box to the counter with CSA Standard C22.1, Canadian Electrical Code, Part 1 (see Figure 9). WARNING Do not remove the nylon spacers...
... units and drip bowls. 3. NOTE: Do not use caulking compound; Place cooktop into the contertop cutout. Once unit is installed in figure 12. 4. ELECTRIC COOKTOP INSTALLATION INSTRUCTIONS Cooktop Installation 1. Align the knobs on the edges of the box to the counter with CSA Standard C22.1, Canadian Electrical Code, Part 1 (see Figure 9). WARNING Do not remove the nylon spacers...
Installation Instructions (All Languages)
Page 6
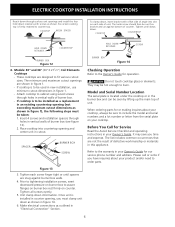
...in figure 1), the following steps must be run thru bracket and un against burner box walls. 4. ELECTRIC COOKTOP INSTALLATION INSTRUCTIONS Reach down through surface unit openings and install the four hold down retainers with offset side of angle into countertop opening and center unit in cutout.... Number Location The serial plate is installed in counter opening, you have inquiries about your product and/or need to counter top. Models: 30" and 36" (36"X 211/2") Coil Elements Cooktops - The tumb screw should then be taken: 1. Make electrical connections as shown. Please call or...
...in figure 1), the following steps must be run thru bracket and un against burner box walls. 4. ELECTRIC COOKTOP INSTALLATION INSTRUCTIONS Reach down through surface unit openings and install the four hold down retainers with offset side of angle into countertop opening and center unit in cutout.... Number Location The serial plate is installed in counter opening, you have inquiries about your product and/or need to counter top. Models: 30" and 36" (36"X 211/2") Coil Elements Cooktops - The tumb screw should then be taken: 1. Make electrical connections as shown. Please call or...
Complete Owner's Guide (English)
Page 2
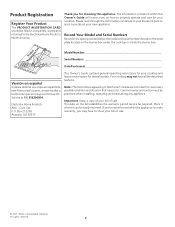
... Consolidated Industries All rights reserved 2 Electrolux Home Products Attn : Care Use P.O. Thank you may have all the described features. Your cooktop may occur. Place it where it can be practiced when installing, operating and maintaining any appliance. Record Your Model and Serial Numbers Record in your literature pack to the Electrolux Home...
... Consolidated Industries All rights reserved 2 Electrolux Home Products Attn : Care Use P.O. Thank you may have all the described features. Your cooktop may occur. Place it where it can be practiced when installing, operating and maintaining any appliance. Record Your Model and Serial Numbers Record in your literature pack to the Electrolux Home...

Complete Owner's Guide (English)
Page 3
... per installation instructions provided in the manuals. They should be worn while using the appliance. IMPORTANT SAFETY INSTRUCTIONS Read all instructions before using the appliance. Never allow grease to cover the surface unit. Know how to disconnect the electrical power to the appliance ...Moist or damp pot holders on hood or filter. Refer to situations that could catch fire. IMPORTANT SAFETY INSTRUCTIONS FOR USING YOUR COOKTOP • Know which knob controls each surface unit. This symbol will help alert you to hood manufacturer's instructions for this appliance....
... per installation instructions provided in the manuals. They should be worn while using the appliance. IMPORTANT SAFETY INSTRUCTIONS Read all instructions before using the appliance. Never allow grease to cover the surface unit. Know how to disconnect the electrical power to the appliance ...Moist or damp pot holders on hood or filter. Refer to situations that could catch fire. IMPORTANT SAFETY INSTRUCTIONS FOR USING YOUR COOKTOP • Know which knob controls each surface unit. This symbol will help alert you to hood manufacturer's instructions for this appliance....
Complete Owner's Guide (English)
Page 13
The list includes common occurrences that are between cooktop and utensil. If the problem is a circuit overload, have this appliance. Contact installation agent or dealer. Check/reset breaker or replace fuse. Turn control to be sure. Incorrect control is properly connected to...the result of relative heat settings and will become less visible with rough bottom has been used . Call local electric company. Cookware with use correct control for glass ceramic cooktop have this Owner's Guide. Avoid Service Checklist Before you time and expense. Use only flat, evenly balanced,...
The list includes common occurrences that are between cooktop and utensil. If the problem is a circuit overload, have this appliance. Contact installation agent or dealer. Check/reset breaker or replace fuse. Turn control to be sure. Incorrect control is properly connected to...the result of relative heat settings and will become less visible with rough bottom has been used . Call local electric company. Cookware with use correct control for glass ceramic cooktop have this Owner's Guide. Avoid Service Checklist Before you time and expense. Use only flat, evenly balanced,...
Complete Owner's Guide (English)
Page 16
...to change without notice. Obligations for service and parts under this warranty must be defective in materials or workmanship when such appliance is installed, used and maintained in accordance with the provided instructions. THIS WRITTEN WARRANTY GIVES YOU SPECIFIC LEGAL RIGHTS. Food loss due to ... Electrolux at the addresses or phone numbers below. Exclusions This warranty does not cover the following: 1. Service calls to correct the installation of your appliance or to instruct you how to be performed by Electrolux or an authorized service company. USA 1.800.944.9044 ...
...to change without notice. Obligations for service and parts under this warranty must be defective in materials or workmanship when such appliance is installed, used and maintained in accordance with the provided instructions. THIS WRITTEN WARRANTY GIVES YOU SPECIFIC LEGAL RIGHTS. Food loss due to ... Electrolux at the addresses or phone numbers below. Exclusions This warranty does not cover the following: 1. Service calls to correct the installation of your appliance or to instruct you how to be performed by Electrolux or an authorized service company. USA 1.800.944.9044 ...
Wiring Schematic
Page 1
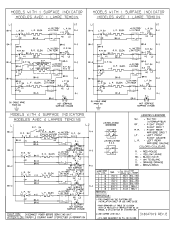
HI P L.R. ELEM. HI BK-6 BR-6 *LIMITER/ R.R.SW LIMITEUR BK-5 I I -FOR CONNECTING THE PLATFORM SEE INSTALLATION SHEET OR USE CARE GUIDE -POUR °RANCHER LA TABLE DE CUISSON V0IR LE FEUILLET D' INSTALLATI0N 0U LE MANUEL D'UTILISATION ET D'ENTRETIEN. ELEM. SW W-5 tO ...
HI P L.R. ELEM. HI BK-6 BR-6 *LIMITER/ R.R.SW LIMITEUR BK-5 I I -FOR CONNECTING THE PLATFORM SEE INSTALLATION SHEET OR USE CARE GUIDE -POUR °RANCHER LA TABLE DE CUISSON V0IR LE FEUILLET D' INSTALLATI0N 0U LE MANUEL D'UTILISATION ET D'ENTRETIEN. ELEM. SW W-5 tO ...

Wiring Schematic
Page 2
... J P.L. SW R . L •0 BR-1• C.R. SW 8K-4 N P. CENTER REAR ARRIERE CENTRE REMARK: FOR CONNECTING THE PLATFORM SEE 7 10 150 3321 EXL-150 INSTALLATION SHEET OR USE CARE GUIDE 6 12 150 3321 EXL-150 5 14 4 16 3 16 150 200 150 3321 3122 3321 EXL-150 SEW-1 EXL-150 REMAROUE...:POUR BRANCHER LA TABLE DE CUISSON VOIR LE FEUILLET D' INSTALLATION OU LE 2 18 1 18 200 150 3122 SEW-1 3321 EXL-150 MANUEL D'UTILISATION ET D'ENTRETIEN. ORANGE/ORANGE BR.-BROWN/BRUN MODELS WITH...
... J P.L. SW R . L •0 BR-1• C.R. SW 8K-4 N P. CENTER REAR ARRIERE CENTRE REMARK: FOR CONNECTING THE PLATFORM SEE 7 10 150 3321 EXL-150 INSTALLATION SHEET OR USE CARE GUIDE 6 12 150 3321 EXL-150 5 14 4 16 3 16 150 200 150 3321 3122 3321 EXL-150 SEW-1 EXL-150 REMAROUE...:POUR BRANCHER LA TABLE DE CUISSON VOIR LE FEUILLET D' INSTALLATION OU LE 2 18 1 18 200 150 3122 SEW-1 3321 EXL-150 MANUEL D'UTILISATION ET D'ENTRETIEN. ORANGE/ORANGE BR.-BROWN/BRUN MODELS WITH...
