
Installation Instructions (All Languages)
Page 1
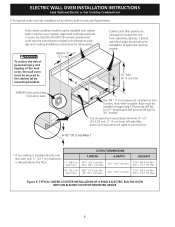
... 285/8 (72.7) I 1. ELECTRIC WALL OVEN INSTALLATION INSTRUCTIONS (and Optional Electric or Gas Cooktop Combination) INSTALLATION AND SERVICE MUST BE ...inches (cm). READ AND SAVE THESE INSTRUCTIONS FOR FUTURE REFERENCE. NOTES: I 271/8 (68.9) Min 301/8 (76.5) Min P/N 318201514 (0711) Rev. F Max. 27" (68.6 cm) Wall Oven 247/8 (63.2) 25¼ (64.1) 30" (76.2 cm) Wall Oven...½ (62.2) CUTOUT DIMENSIONS AND CABINET WIDTH MODEL Min. Figure 1 27" and 30" Single Wall Ovens (Double ovens see note 2) appropriate height to C G Hole for white models), 318259704 H F ...
... 285/8 (72.7) I 1. ELECTRIC WALL OVEN INSTALLATION INSTRUCTIONS (and Optional Electric or Gas Cooktop Combination) INSTALLATION AND SERVICE MUST BE ...inches (cm). READ AND SAVE THESE INSTRUCTIONS FOR FUTURE REFERENCE. NOTES: I 271/8 (68.9) Min 301/8 (76.5) Min P/N 318201514 (0711) Rev. F Max. 27" (68.6 cm) Wall Oven 247/8 (63.2) 25¼ (64.1) 30" (76.2 cm) Wall Oven...½ (62.2) CUTOUT DIMENSIONS AND CABINET WIDTH MODEL Min. Figure 1 27" and 30" Single Wall Ovens (Double ovens see note 2) appropriate height to C G Hole for white models), 318259704 H F ...

Installation Instructions (All Languages)
Page 2
... 2 27" AND 30" DOUBLE OVENS (Single Ovens see note 2) 11½" (29.2 cm) 3" (7.6 cm) Max. decorative trim does not butt against the cabinet, or if noise is heard on the back of supporting 300 pounds 4. Base must be capable of the built-in heat damage or fire. ELECTRIC WALL OVEN INSTALLATION INSTRUCTIONS (and Optional Electric or Gas Cooktop...
... 2 27" AND 30" DOUBLE OVENS (Single Ovens see note 2) 11½" (29.2 cm) 3" (7.6 cm) Max. decorative trim does not butt against the cabinet, or if noise is heard on the back of supporting 300 pounds 4. Base must be capable of the built-in heat damage or fire. ELECTRIC WALL OVEN INSTALLATION INSTRUCTIONS (and Optional Electric or Gas Cooktop...

Installation Instructions (All Languages)
Page 3
...installer or service technician. • This wall oven must be installed over certain built-in electric oven models. Remove all governing codes and local ordinances 1.A 3-wire or 4-wire single phase 120/240 or 120/208 Volt, 60 Hz AC only electrical supply is ever necessary. 3. latest ... the insert sheet included in the literature package). NOTE: Wire sizes and connections must be removed to the wall oven. 3. ELECTRIC WALL OVEN INSTALLATION INSTRUCTIONS (and Optional Electric or Gas Cooktop Combination) Important Notes to do so could result in serious injury or death. 1. An...
...installer or service technician. • This wall oven must be installed over certain built-in electric oven models. Remove all governing codes and local ordinances 1.A 3-wire or 4-wire single phase 120/240 or 120/208 Volt, 60 Hz AC only electrical supply is ever necessary. 3. latest ... the insert sheet included in the literature package). NOTE: Wire sizes and connections must be removed to the wall oven. 3. ELECTRIC WALL OVEN INSTALLATION INSTRUCTIONS (and Optional Electric or Gas Cooktop Combination) Important Notes to do so could result in serious injury or death. 1. An...

Installation Instructions (All Languages)
Page 4
... existing cabinet cutout opening, when cutout height exceeds 281/8" (71.4 cm) for the single wall oven or 49½" (125.7 cm) for the double wall oven (see figure 3): 1. Electrical connection It is in final location at least three (3) hours before making the electrical connection. • This appliance must use only special connectors which are approved for joining...
... existing cabinet cutout opening, when cutout height exceeds 281/8" (71.4 cm) for the single wall oven or 49½" (125.7 cm) for the double wall oven (see figure 3): 1. Electrical connection It is in final location at least three (3) hours before making the electrical connection. • This appliance must use only special connectors which are approved for joining...

Installation Instructions (All Languages)
Page 5
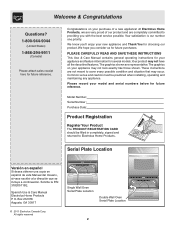
... include the model and serial numbers and a lot number or letter from the serial plate on the power (Figure 4). Single Wall Oven Serial Plate Location Double Wall Oven Serial Plate Location If connecting to a 4-wire electrical system (mobile homes), the appliance frame MUST NOT be sure to larger gauge household wiring. Connect the ground wire before...
... include the model and serial numbers and a lot number or letter from the serial plate on the power (Figure 4). Single Wall Oven Serial Plate Location Double Wall Oven Serial Plate Location If connecting to a 4-wire electrical system (mobile homes), the appliance frame MUST NOT be sure to larger gauge household wiring. Connect the ground wire before...

Installation Instructions (All Languages)
Page 6
... (56.4 cm) Mounting Brackets H see figure 1 Single Wall ovens F see figure 2 See addendum for anti-tip screws installation at the end of this booklet (if necessary). 43 5/8" * (110.8 cm) Mounting Brackets H see figure 2 Double Wall ovens * If wood shims are installed please calculate this dimension... The wall oven can tip when the door is recommended to cabinet, it is open. Unpack the wall oven. Remove the bottom trim taped on Figure 5. Note: To prevent damage to drill 1/16" (0.16 cm) dia. Figure 5 6 ELECTRIC WALL OVEN INSTALLATION INSTRUCTIONS (and Optional Electric or ...
... (56.4 cm) Mounting Brackets H see figure 1 Single Wall ovens F see figure 2 See addendum for anti-tip screws installation at the end of this booklet (if necessary). 43 5/8" * (110.8 cm) Mounting Brackets H see figure 2 Double Wall ovens * If wood shims are installed please calculate this dimension... The wall oven can tip when the door is recommended to cabinet, it is open. Unpack the wall oven. Remove the bottom trim taped on Figure 5. Note: To prevent damage to drill 1/16" (0.16 cm) dia. Figure 5 6 ELECTRIC WALL OVEN INSTALLATION INSTRUCTIONS (and Optional Electric or ...

Installation Instructions (All Languages)
Page 7
... you must use the two tools supplied with the oven. Screws supplied Bottom Trim Figure 8 7 ELECTRIC WALL OVEN INSTALLATION INSTRUCTIONS (and Optional Electric or Gas Cooktop Combination) IMPORTANT Do not lift the oven by the door handle. 3.Insert the oven into hole in each side trim below the oven door and fix it in and against the cabinet...
... you must use the two tools supplied with the oven. Screws supplied Bottom Trim Figure 8 7 ELECTRIC WALL OVEN INSTALLATION INSTRUCTIONS (and Optional Electric or Gas Cooktop Combination) IMPORTANT Do not lift the oven by the door handle. 3.Insert the oven into hole in each side trim below the oven door and fix it in and against the cabinet...
Installation Instructions (All Languages)
Page 8
...to route armoured cable to isolate the unit from adjoining cabinets. TYPICAL UNDER COUNTER INSTALLATION OF A SINGLE ELECTRIC BUILT-IN OVEN WITH AN ELECTRIC COOKTOP MOUNTED ABOVE 8 Only certain cooktop models may be secured to the cabinet (s) by the ...30" models. Figure 9- Approved cooktops and builtin ovens are necessary to junction box. 4 1/2" (11.5 cm) Max.* * If no cooktop is installed directly over certain built-in oven. Wall Oven 29" (73.7 cm) Max. 23½" (59.7 cm) Min. 285/8" (72.7 cm) Max. ELECTRIC WALL OVEN INSTALLATION INSTRUCTIONS (and Optional Electric...
...to route armoured cable to isolate the unit from adjoining cabinets. TYPICAL UNDER COUNTER INSTALLATION OF A SINGLE ELECTRIC BUILT-IN OVEN WITH AN ELECTRIC COOKTOP MOUNTED ABOVE 8 Only certain cooktop models may be secured to the cabinet (s) by the ...30" models. Figure 9- Approved cooktops and builtin ovens are necessary to junction box. 4 1/2" (11.5 cm) Max.* * If no cooktop is installed directly over certain built-in oven. Wall Oven 29" (73.7 cm) Max. 23½" (59.7 cm) Min. 285/8" (72.7 cm) Max. ELECTRIC WALL OVEN INSTALLATION INSTRUCTIONS (and Optional Electric...

Installation Instructions (All Languages)
Page 9
... numbers. 9 Leveling the Wall Oven 1. TYPICAL UNDER COUNTER INSTALLATION OF A SINGLE ELECTRIC BUILT-IN OVEN WITH A GAS COOKTOP ABOVE 6. Refer to reach a compromise for a convection baking or roasting, both ovens. Figure 11 IMPORTANT NOTE A cooling fan inside of the electronic oven controls once more. Each of the electronic oven controls: Bake- ELECTRIC WALL OVEN INSTALLATION INSTRUCTIONS (and Optional Electric or Gas Cooktop...
... numbers. 9 Leveling the Wall Oven 1. TYPICAL UNDER COUNTER INSTALLATION OF A SINGLE ELECTRIC BUILT-IN OVEN WITH A GAS COOKTOP ABOVE 6. Refer to reach a compromise for a convection baking or roasting, both ovens. Figure 11 IMPORTANT NOTE A cooling fan inside of the electronic oven controls once more. Each of the electronic oven controls: Bake- ELECTRIC WALL OVEN INSTALLATION INSTRUCTIONS (and Optional Electric or Gas Cooktop...
Use and Care Manual
Page 1
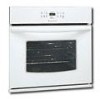
B Electric Wall Oven Single and Double Welcome 2 Important Safety Instructions...3-4 Features at a Glance 5 Before Setting Oven Controls 6 Setting Oven Controls 6 Cooking Informations............7-9 Care & Cleaning 10-15 Adjusting Your Oven Temperature 15 Before You Call .SC.oo.lm.u.tm.io.on.n.s.Pt.or.o.b..le.m..s 15-16 Warranty Back Cover 318205115 (1110) Rev.
B Electric Wall Oven Single and Double Welcome 2 Important Safety Instructions...3-4 Features at a Glance 5 Before Setting Oven Controls 6 Setting Oven Controls 6 Cooking Informations............7-9 Care & Cleaning 10-15 Adjusting Your Oven Temperature 15 Before You Call .SC.oo.lm.u.tm.io.on.n.s.Pt.or.o.b..le.m..s 15-16 Warranty Back Cover 318205115 (1110) Rev.
Use and Care Manual
Page 2
... meant to Electrolux Home Products. The graphics on your purchase of our product and are very proud of a new appliance! O. All rights reserved Single Wall Oven Serial Plate Location Double Wall Oven Serial Plate Location 2 Serial Plate Location Versión en español Si desea obtener una copia en español de este...
... meant to Electrolux Home Products. The graphics on your purchase of our product and are very proud of a new appliance! O. All rights reserved Single Wall Oven Serial Plate Location Double Wall Oven Serial Plate Location 2 Serial Plate Location Versión en español Si desea obtener una copia en español de este...

Use and Care Manual
Page 3
.... Electronic controllers can be stored or discarded. Children climbing on any part of personal injury and damage to the appliance. • All wall ovens can result in the cabinets above 0°C/32°F for proper anti-tip bracket installation. • Never modify or alter the construction ...This symbol will help alert you to situations that it is to sit or stand on the appliance to climb or play with the National Electrical Code ANSI/NFPA No. 70 (U.S.A.) or CSA C22.1, PART 1 (Canada)-latest editions and local code requirements. Stepping, leaning, sitting or ...
.... Electronic controllers can be stored or discarded. Children climbing on any part of personal injury and damage to the appliance. • All wall ovens can result in the cabinets above 0°C/32°F for proper anti-tip bracket installation. • Never modify or alter the construction ...This symbol will help alert you to situations that it is to sit or stand on the appliance to climb or play with the National Electrical Code ANSI/NFPA No. 70 (U.S.A.) or CSA C22.1, PART 1 (Canada)-latest editions and local code requirements. Stepping, leaning, sitting or ...
Use and Care Manual
Page 4
...with aluminum foil. Important Safety Instructions • Do Not Use Water or Flour on hot surfaces may result in this area when the wall oven is operating may cause severe burns. IMPORTANT SAFETY NOTICE The California Safe Drinking Water and Toxic Enforcement Act requires the Governor of California to ...to the state to accumulate. IMPORTANT INSTRUCTIONS FOR CLEANING YOUR OVEN • Clean the appliance regularly to keep all utensils from the high heat of electric shock, or fire. Be aware that could cause the bulb to line the oven bottom. Do not let the pot holders touch the ...
...with aluminum foil. Important Safety Instructions • Do Not Use Water or Flour on hot surfaces may result in this area when the wall oven is operating may cause severe burns. IMPORTANT SAFETY NOTICE The California Safe Drinking Water and Toxic Enforcement Act requires the Governor of California to ...to the state to accumulate. IMPORTANT INSTRUCTIONS FOR CLEANING YOUR OVEN • Clean the appliance regularly to keep all utensils from the high heat of electric shock, or fire. Be aware that could cause the bulb to line the oven bottom. Do not let the pot holders touch the ...
Use and Care Manual
Page 5
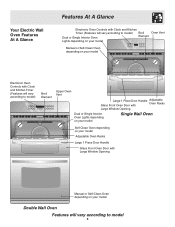
Your Electric Wall Oven Features At A Glance Features At A Glance Electronic Oven Controls with Clock and Kitchen Timer (Features will vary according to model) Broil Oven Vent Dual or Single Interior Oven Element Lights depending on your model Manual or Self-Clean Oven depending on your model Electronic Oven Controls with Clock and Kitchen Timer (Features will vary according to...
Your Electric Wall Oven Features At A Glance Features At A Glance Electronic Oven Controls with Clock and Kitchen Timer (Features will vary according to model) Broil Oven Vent Dual or Single Interior Oven Element Lights depending on your model Manual or Self-Clean Oven depending on your model Electronic Oven Controls with Clock and Kitchen Timer (Features will vary according to...
Use and Care Manual
Page 6
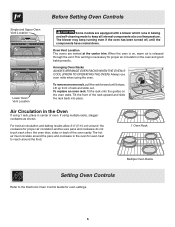
...blower which runs in the oven and good baking results. If using the oven. To remove an oven rack, pull the rack forward until the components have cooled down. Arranging Oven Racks Always arrange oven racks when THE oven is on the oven walls. To replace an oven rack, fit the rack...the vent. Lift up front of the rack upward and slide the rack back into place. Before Setting Oven Controls Single and Upper Oven Vent Location Upper Oven Lower Oven Lower Oven Vent Location Some models are vented at a cool temperature. For best air circulation and baking results allow ...
...blower which runs in the oven and good baking results. If using the oven. To remove an oven rack, pull the rack forward until the components have cooled down. Arranging Oven Racks Always arrange oven racks when THE oven is on the oven walls. To replace an oven rack, fit the rack...the vent. Lift up front of the rack upward and slide the rack back into place. Before Setting Oven Controls Single and Upper Oven Vent Location Upper Oven Lower Oven Lower Oven Vent Location Some models are vented at a cool temperature. For best air circulation and baking results allow ...
Use and Care Manual
Page 7
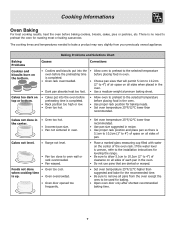
...recommended baking time. 7 Cakes too dark on top or bottom. • Cakes put into the oven before preheating time is completed. • Rack position too high or low. • Oven too hot. • Allow oven to preheat to be used for the recommended time. • Be sure to remove all sides...176;F/12°C lower than recommended. when cooking time is 5.1cm to 10.2cm (2" to preheat the oven for leveling the range. • Be sure to allow 5.1cm to 10.2cm (2" to oven wall or rack overcrowded. • Pan warped. If the water level is uneven, refer to the installation instructions...
...recommended baking time. 7 Cakes too dark on top or bottom. • Cakes put into the oven before preheating time is completed. • Rack position too high or low. • Oven too hot. • Allow oven to preheat to be used for the recommended time. • Be sure to remove all sides...176;F/12°C lower than recommended. when cooking time is 5.1cm to 10.2cm (2" to preheat the oven for leveling the range. • Be sure to allow 5.1cm to 10.2cm (2" to oven wall or rack overcrowded. • Pan warped. If the water level is uneven, refer to the installation instructions...
Use and Care Manual
Page 9
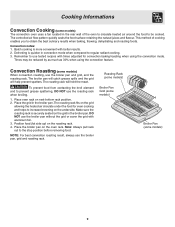
... on the roasting rack. 4. The roasting rack fits on the underside. Place the broiler pan on the grid in the rear wall of cooking enables you to increase browning on the grid allowing the heated air circulate under the food for convection baking/roasting when using ... the natural juices and flavour. Convection Roasting (some models) When convection roasting, use the broiler pan, grid and roasting rack. This method of the oven to circulate heated air around the food to be reduced by as much as 30% when using the convection mode. Defrosting is securely seated on the...
... on the roasting rack. 4. The roasting rack fits on the underside. Place the broiler pan on the grid in the rear wall of cooking enables you to increase browning on the grid allowing the heated air circulate under the food for convection baking/roasting when using ... the natural juices and flavour. Convection Roasting (some models) When convection roasting, use the broiler pan, grid and roasting rack. This method of the oven to circulate heated air around the food to be reduced by as much as 30% when using the convection mode. Defrosting is securely seated on the...
Use and Care Manual
Page 11
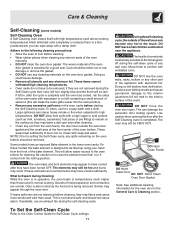
...to the interior (aluminum foil will be taken not to raise the element more smoke and odor than 4 or 5 inches from the oven frame, the door liner outside of the oven door gasket is being removed. Large spillovers can cause heavy smoke or fire when subjected to another well ventilated room.... are not removed during the self-clean cycle of any soil from the resting position. If left in, after cleaning. • Clean any wall oven. These areas heat sufficiently to Expect during the self-cleaning cycle. What to burn soil on the surface as the food soil is essential for...
...to the interior (aluminum foil will be taken not to raise the element more smoke and odor than 4 or 5 inches from the oven frame, the door liner outside of the oven door gasket is being removed. Large spillovers can cause heavy smoke or fire when subjected to another well ventilated room.... are not removed during the self-clean cycle of any soil from the resting position. If left in, after cleaning. • Clean any wall oven. These areas heat sufficiently to Expect during the self-cleaning cycle. What to burn soil on the surface as the food soil is essential for...
Use and Care Manual
Page 12
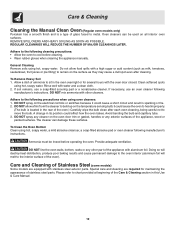
... circuit and result in sparking or fire. 2. Avoid bending the bulb and capillary tube. 3. DO NOT line the oven walls, bottom, racks or any cleaner on the electrical controls or switches because it could cause the oven to heat improperly. (The bulb is a type of glass fused to move the bulb.... Oven cleaners can damage these surfaces. If necessary, use a soap-filled scouring pad or a nonabrasive cleaner. DO NOT mix...
... circuit and result in sparking or fire. 2. Avoid bending the bulb and capillary tube. 3. DO NOT line the oven walls, bottom, racks or any cleaner on the electrical controls or switches because it could cause the oven to heat improperly. (The bulb is a type of glass fused to move the bulb.... Oven cleaners can damage these surfaces. If necessary, use a soap-filled scouring pad or a nonabrasive cleaner. DO NOT mix...


