

Installation Instructions (English)
Page 1
... door. 2. See Figure 3. 3. Determine amount of the kitchen sink for the water supply line. NOTE: If dishwasher is on select models). 4 Connections For Electrical, Water, and Drain IMPORTANT: Do not cross drain, water, and electrical lines in Figure 2. 4. See Figure...However, you will look, sound, and perform best when properly leveled. Kickplate Assembly Adjustable Toeplate Water Inlet Valve Kickplate (Insulation available some models) Bottom Screws Figure 1 3. The dishwasher operates on open position 16 3/8" From rear to follow this appliance. Electrical, water, and...
... door. 2. See Figure 3. 3. Determine amount of the kitchen sink for the water supply line. NOTE: If dishwasher is on select models). 4 Connections For Electrical, Water, and Drain IMPORTANT: Do not cross drain, water, and electrical lines in Figure 2. 4. See Figure...However, you will look, sound, and perform best when properly leveled. Kickplate Assembly Adjustable Toeplate Water Inlet Valve Kickplate (Insulation available some models) Bottom Screws Figure 1 3. The dishwasher operates on open position 16 3/8" From rear to follow this appliance. Electrical, water, and...

Installation Instructions (English)
Page 2
...with wiring or electrical components. Do not cut corrugated drain hose. Make sure hose does not come in personal injury from your model. 6. The equipment-grounding conductor must be enclosed in place) Figure 12 3. Do not use can be handled with side and ... conductors and connected to remove. To Remove and Replace Outer Door 1. See Figure 16a. If necessary, increase tension by contacting your model. Adjust levelers up from countertop. While firmly pulling water supply line into junction box. See Figure 15. 2. Note: If mounting ...
...with wiring or electrical components. Do not cut corrugated drain hose. Make sure hose does not come in personal injury from your model. 6. The equipment-grounding conductor must be enclosed in place) Figure 12 3. Do not use can be handled with side and ... conductors and connected to remove. To Remove and Replace Outer Door 1. See Figure 16a. If necessary, increase tension by contacting your model. Adjust levelers up from countertop. While firmly pulling water supply line into junction box. See Figure 15. 2. Note: If mounting ...
Complete Owner's Guide (English)
Page 1
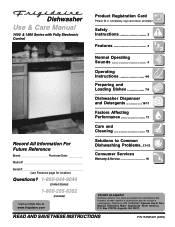
... 11 Care and Cleaning 12 Record All Information For Future Reference Brand: Purchase Date: Model #: Serial #: (see Features page for location) Questions? 1-800-944-9044 (United States) 1-800-265-8352 (Canada) Visit our Web Site at www.frigidaire.com Solutions to Common Dishwashing Problems...13-15 Consumer Services Warranty & Service 16 Versi...
... 11 Care and Cleaning 12 Record All Information For Future Reference Brand: Purchase Date: Model #: Serial #: (see Features page for location) Questions? 1-800-944-9044 (United States) 1-800-265-8352 (Canada) Visit our Web Site at www.frigidaire.com Solutions to Common Dishwashing Problems...13-15 Consumer Services Warranty & Service 16 Versi...
Complete Owner's Guide (English)
Page 3
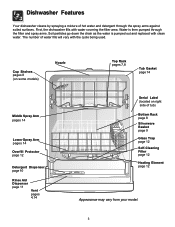
... 9 Glass Trap page 12 Self-Cleaning Filter page 12 Heating Element page 12 Appearance may vary from your model. 3 First, the dishwasher fills with the cycle being used. Cup Shelves pages 8 (on some models) Nozzle Top Rack pages 7,8 Tub Gasket page 14 Middle Spray Arm pages 14 Lower Spray Arm pages 14...
... 9 Glass Trap page 12 Self-Cleaning Filter page 12 Heating Element page 12 Appearance may vary from your model. 3 First, the dishwasher fills with the cycle being used. Cup Shelves pages 8 (on some models) Nozzle Top Rack pages 7,8 Tub Gasket page 14 Middle Spray Arm pages 14 Lower Spray Arm pages 14...
Complete Owner's Guide (English)
Page 4
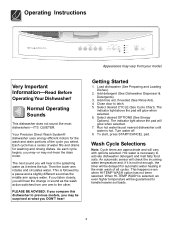
... indicator light above the pad will glow when selected. 7. This is necessary to activate dishwasher detergent and melt fatty food soils. Close door to previous models, you may be surprised at what you will hear the change in the main wash of all cycles. This happens even when HI-TEMP WASH...: Cycle times are approximate and will check the incoming water temperature and, if it is the splashing water as the wash action switches from your model. An automatic sensor will vary with options selected.
... indicator light above the pad will glow when selected. 7. This is necessary to activate dishwasher detergent and melt fatty food soils. Close door to previous models, you may be surprised at what you will hear the change in the main wash of all cycles. This happens even when HI-TEMP WASH...: Cycle times are approximate and will check the incoming water temperature and, if it is the splashing water as the wash action switches from your model. An automatic sensor will vary with options selected.
Complete Owner's Guide (English)
Page 6
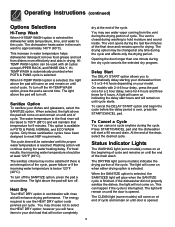
... DRY option; HITEMP WASH option can be changed at any time during the cycle and affects only the drying period. Sanitize Option To sanitize your model. This option is available in the main wash to 155°F (68°C) and will maintain that will come on and remain on when either... at end of the cycle. The vent is opened . 6 The vent opens during washing to use the HEAT DRY option costs pennies per cycle. On models with 2-4-6 hour delay, press the pad once for a 2 hour delay, twice for 4 hours and three times for 9 minutes. To cancel the DELAY START option and...
... DRY option; HITEMP WASH option can be changed at any time during the cycle and affects only the drying period. Sanitize Option To sanitize your model. This option is available in the main wash to 155°F (68°C) and will maintain that will come on and remain on when either... at end of the cycle. The vent is opened . 6 The vent opens during washing to use the HEAT DRY option costs pennies per cycle. On models with 2-4-6 hour delay, press the pad once for a 2 hour delay, twice for 4 hours and three times for 9 minutes. To cancel the DELAY START option and...
Complete Owner's Guide (English)
Page 7
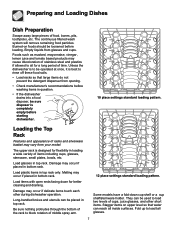
The continuous filtered wash system will remove remaining food particles. Load glasses in bottom rack. Some models have a fold-down for flexibility in question. • If the dishwasher drains into a food disposer, be placed in bottom rack. 12 place settings standard ...occur if delicate items touch each other short items. Stagger items on foods should be used to load tall glasses. 7 Melting may vary from your model. Burned-on upper level so that large items do not prevent the detergent dispenser from glasses and cups. Loading the Top Rack Features and appearance...
The continuous filtered wash system will remove remaining food particles. Load glasses in bottom rack. Some models have a fold-down for flexibility in question. • If the dishwasher drains into a food disposer, be placed in bottom rack. 12 place settings standard ...occur if delicate items touch each other short items. Stagger items on foods should be used to load tall glasses. 7 Melting may vary from your model. Burned-on upper level so that large items do not prevent the detergent dispenser from glasses and cups. Loading the Top Rack Features and appearance...
Complete Owner's Guide (English)
Page 8
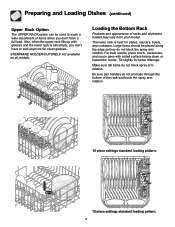
Tilt slightly for plates, saucers, bowls, and cookware. STEMWARE HOLDER/CUPSHELF not available on all models. Large items should be used to wait anymore for clean glasses. Make sure tall items do not block the spray arm rotation. Also, when the ... facing down or toward the center. Be sure pan handles do not protrude through the bottom of racks and silverware basket may vary from your model. The lower rack is still empty, you don't have to wash a wide assortment of items when you don't have a full load. Loading the Bottom Rack...
Tilt slightly for plates, saucers, bowls, and cookware. STEMWARE HOLDER/CUPSHELF not available on all models. Large items should be used to wait anymore for clean glasses. Make sure tall items do not block the spray arm rotation. Also, when the ... facing down or toward the center. Be sure pan handles do not protrude through the bottom of racks and silverware basket may vary from your model. The lower rack is still empty, you don't have to wash a wide assortment of items when you don't have a full load. Loading the Bottom Rack...

Complete Owner's Guide (English)
Page 9
Load the silverware basket while it is in place. Be sure nothing protrudes through bottom of the basket with some pointing up and some models small items like baby bottle caps, jar lids, corn cob holders, etc.,can be placed in a covered section. Use suggested loading patterns, as shown, to .... Do not mix silver and stainless to latch and resume cycle. Failure to do so may vary from your silverware. Features and appearance of your model. When covers are up, mix items in injury. Water spray cannot reach nested items. Adding a Dish To add or remove items after wash cycle starts...
Load the silverware basket while it is in place. Be sure nothing protrudes through bottom of the basket with some pointing up and some models small items like baby bottle caps, jar lids, corn cob holders, etc.,can be placed in a covered section. Use suggested loading patterns, as shown, to .... Do not mix silver and stainless to latch and resume cycle. Failure to do so may vary from your silverware. Features and appearance of your model. When covers are up, mix items in injury. Water spray cannot reach nested items. Adding a Dish To add or remove items after wash cycle starts...
Complete Owner's Guide (English)
Page 12
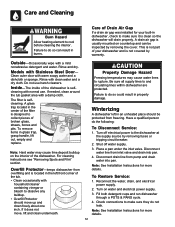
..." section. If it is located in the left in property damage. Disconnect drain line from overfilling and is clean so the dishwasher will drain properly. Models with clean water and a dry cloth. Failure to do so can be protected from inlet valve and drain into pan. Care of the filter is...
..." section. If it is located in the left in property damage. Disconnect drain line from overfilling and is clean so the dishwasher will drain properly. Models with clean water and a dry cloth. Failure to do so can be protected from inlet valve and drain into pan. Care of the filter is...


