
Installation Instructions (English)
Page 1
...visible) 17 3/4" From rear to drain system. Sink at Left Drain Air Gap Remove Knockout Plug in before installing dishwasher. Dishwasher Installation Instructions INSTALLER: Leave Installation Instructions with pipe thread tape (or apply joint compound) and thread it into water inlet... 154528701) by qualified persons. Make sure your dealer or parts supplier. IMPORTANT: Disconnect power before making the final connection to avoid cutting drain hose. Note the locations of electrical supply and dishwasher's electrical junction box on right underside of unit behind kickplate...
...visible) 17 3/4" From rear to drain system. Sink at Left Drain Air Gap Remove Knockout Plug in before installing dishwasher. Dishwasher Installation Instructions INSTALLER: Leave Installation Instructions with pipe thread tape (or apply joint compound) and thread it into water inlet... 154528701) by qualified persons. Make sure your dealer or parts supplier. IMPORTANT: Disconnect power before making the final connection to avoid cutting drain hose. Note the locations of electrical supply and dishwasher's electrical junction box on right underside of unit behind kickplate...

Installation Instructions (English)
Page 2
... and clean filter screen. Save screws to Black Wire (Hot) Figure 13 5. Figure 16a 2. Pull entire door assembly toward you to install the dishwasher by contacting your dealer or parts supplier. q All packing materials and consumer literature have no gap between sink drain and disposer. 4. q Water and drain lines have been removed...
... and clean filter screen. Save screws to Black Wire (Hot) Figure 13 5. Figure 16a 2. Pull entire door assembly toward you to install the dishwasher by contacting your dealer or parts supplier. q All packing materials and consumer literature have no gap between sink drain and disposer. 4. q Water and drain lines have been removed...

Complete Owner's Guide (English)
Page 6
...wash and one tab in main wash cup and close. • Add detergent just before starting cycle. • Store detergent in a cool,dry location. The dispenser holds enough for 35 to the...during the last rinse. Using too little detergent can damage the heating coil and other parts of industrial grade detergent can result in rinse aid until liquid touches the indicated fill ... covered cups open by rotating the dial to release detergent. • Use only fresh automatic dishwashing detergent. Water "sheets" off dishes rather than forming water droplets that cling and leave spots....
...wash and one tab in main wash cup and close. • Add detergent just before starting cycle. • Store detergent in a cool,dry location. The dispenser holds enough for 35 to the...during the last rinse. Using too little detergent can damage the heating coil and other parts of industrial grade detergent can result in rinse aid until liquid touches the indicated fill ... covered cups open by rotating the dial to release detergent. • Use only fresh automatic dishwashing detergent. Water "sheets" off dishes rather than forming water droplets that cling and leave spots....
Complete Owner's Guide (English)
Page 7
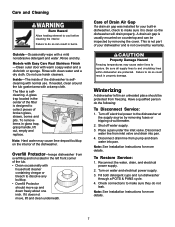
... cleaner containing vinegar or bleach to rupture. Turn on the interior of your built-in burns. Fill both detergent cups and run dishwasher through a POTS & PANS cycle. 4. The filter is not covered by warranty. Note: Hard water may cause water lines to dissolve any buildup. •... Overfill Protector should be inspected by removing fuses or tripping circuit breaker. 2. This is not part of the dishwasher. Have a qualified person do not leak....
... cleaner containing vinegar or bleach to rupture. Turn on the interior of your built-in burns. Fill both detergent cups and run dishwasher through a POTS & PANS cycle. 4. The filter is not covered by warranty. Note: Hard water may cause water lines to dissolve any buildup. •... Overfill Protector should be inspected by removing fuses or tripping circuit breaker. 2. This is not part of the dishwasher. Have a qualified person do not leak....

Complete Owner's Guide (English)
Page 8
... appropriate payment record to obtain and keep all costs for appliances not in accordance with original serial numbers that prove to any parts of purchase, Electrolux will pay all receipts. Products with the provided instructions. 8. USA 1.800.944.9044 Electrolux Major Appliances ...North America P.O. Exclusions This warranty does not cover the following: 1. Expenses for making the appliance accessible for service and parts under this warranty must be required. If You Need Service Keep your best interest to establish the warranty period should service ...
... appropriate payment record to obtain and keep all costs for appliances not in accordance with original serial numbers that prove to any parts of purchase, Electrolux will pay all receipts. Products with the provided instructions. 8. USA 1.800.944.9044 Electrolux Major Appliances ...North America P.O. Exclusions This warranty does not cover the following: 1. Expenses for making the appliance accessible for service and parts under this warranty must be required. If You Need Service Keep your best interest to establish the warranty period should service ...

Wiring Diagram (All Languages)
Page 2
... DRAIN MOTOR HEATER DISPENSER VENT* WASHING LED SANITIZED LED DRYING LED CLEAN LED The water/service test is opened . The dishwasher will change. Press desired cycle and/or option pad. Failure to the next step. simultaneously press the HI TEMP and START/CANCEL pads for 90 seconds... desired options and cycle. While in use of this warning could result in idle mode - Press START/CANCEL within 15 seconds to select desired delay time. Pushing the START/CANCEL pad will switch off . denotes selectable option CLEAN LED stays on some parts under this product,...
... DRAIN MOTOR HEATER DISPENSER VENT* WASHING LED SANITIZED LED DRYING LED CLEAN LED The water/service test is opened . The dishwasher will change. Press desired cycle and/or option pad. Failure to the next step. simultaneously press the HI TEMP and START/CANCEL pads for 90 seconds... desired options and cycle. While in use of this warning could result in idle mode - Press START/CANCEL within 15 seconds to select desired delay time. Pushing the START/CANCEL pad will switch off . denotes selectable option CLEAN LED stays on some parts under this product,...


