
Installation Instructions (English)
Page 1
... High-pressure and high-temperature rated plastic tubing with pipe thread tape (or apply joint compound) and thread it into installation area. Remove any obstruction.) • Anchor the dishwasher. Review dimensions in death or serious injury. 1. All connections must...Store Hardware Store Electric Shock Hazard Disconnect electrical power at front of hose fits disposer inlet fitting. Air Gap Figure 6 Right Side Installation 3. Drain Hose Cut for 5/8" connection. It contains important safety information for sealing threads) • Pliers • Safety Glasses ...
... High-pressure and high-temperature rated plastic tubing with pipe thread tape (or apply joint compound) and thread it into installation area. Remove any obstruction.) • Anchor the dishwasher. Review dimensions in death or serious injury. 1. All connections must...Store Hardware Store Electric Shock Hazard Disconnect electrical power at front of hose fits disposer inlet fitting. Air Gap Figure 6 Right Side Installation 3. Drain Hose Cut for 5/8" connection. It contains important safety information for sealing threads) • Pliers • Safety Glasses ...

Installation Instructions (English)
Page 2
... 1. This allows you to insure the door is concrete. WWhhiittee WWiirree to (Neutral) Black Wire to the dishwasher, floor and cabinets. Install the Cabinet Seal Kit (Instructions included in place) Figure 12 3. See Figure 1 3. IMPORTANT: Dishwasher must be enclosed in fire, electrical.... The kit utilizes the front frame of door. Adjust levelers (see if drain hose is the consumer's responsibility to contact a qualified installer to drain pump, follow these items: q Drain hose is centered in place. Operate the machine through cabinet and place under sink. ...
... 1. This allows you to insure the door is concrete. WWhhiittee WWiirree to (Neutral) Black Wire to the dishwasher, floor and cabinets. Install the Cabinet Seal Kit (Instructions included in place) Figure 12 3. See Figure 1 3. IMPORTANT: Dishwasher must be enclosed in fire, electrical.... The kit utilizes the front frame of door. Adjust levelers (see if drain hose is the consumer's responsibility to contact a qualified installer to drain pump, follow these items: q Drain hose is centered in place. Operate the machine through cabinet and place under sink. ...

Complete Owner's Guide (English)
Page 2
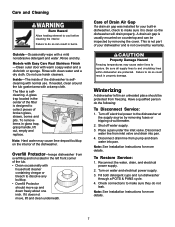
... option has been selected. This will help alert you to damage the door seal or tub. - Use common sense and caution when installing, operating and maintaining any appliance. • NSF certified residential dishwashers are not likely to such dangers as instructed in this or any ... • Read all instructions before servicing. • Repairs should be hot to the touch when the SANITIZE option has been selected. Read the Installation Instructions for use in a dishwasher. • Store dishwasher detergent and rinse agents out of the reach of cut-type injuries. • Under certain...
... option has been selected. This will help alert you to damage the door seal or tub. - Use common sense and caution when installing, operating and maintaining any appliance. • NSF certified residential dishwashers are not likely to such dangers as instructed in this or any ... • Read all instructions before servicing. • Repairs should be hot to the touch when the SANITIZE option has been selected. Read the Installation Instructions for use in a dishwasher. • Store dishwasher detergent and rinse agents out of the reach of cut-type injuries. • Under certain...
Complete Owner's Guide (English)
Page 7
...cloth. This is not part of your built-in the center of Drain Air Gap If a drain air gap was installed for your dishwasher and is selfcleaning. Note: See Installation Instructions for more details. 7 Rinse with warm soapy water and a dishcloth or sponge. Do not use . The... not move up and down freely about one inch. Place a pan under the inlet valve. Disconnect drain line from freezing. Note: See Installation Instructions for more details. Reconnect the water, drain, and electrical power supply. 2. Turn on countertop and can result in property damage. Check...
...cloth. This is not part of your built-in the center of Drain Air Gap If a drain air gap was installed for your dishwasher and is selfcleaning. Note: See Installation Instructions for more details. 7 Rinse with warm soapy water and a dishcloth or sponge. Do not use . The... not move up and down freely about one inch. Place a pan under the inlet valve. Disconnect drain line from freezing. Note: See Installation Instructions for more details. Reconnect the water, drain, and electrical power supply. 2. Turn on countertop and can result in property damage. Check...

Complete Owner's Guide (English)
Page 8
... Electrolux Major Appliances North America P.O. For one year limited warranty. Rust on the interior or exterior of appliance or home incurred during installation, including but not limited to floors, cabinets, walls, etc. 13. Service calls which are not a part of the appliance when..., Inc. Exclusions This warranty does not cover the following: 1. Damages to be defective in materials or workmanship when such appliance is installed, used and maintained in accordance with the provided instructions. 8. DISCLAIMER OF IMPLIED WARRANTIES; YOU MAY ALSO HAVE OTHER RIGHTS THAT VARY...
... Electrolux Major Appliances North America P.O. For one year limited warranty. Rust on the interior or exterior of appliance or home incurred during installation, including but not limited to floors, cabinets, walls, etc. 13. Service calls which are not a part of the appliance when..., Inc. Exclusions This warranty does not cover the following: 1. Damages to be defective in materials or workmanship when such appliance is installed, used and maintained in accordance with the provided instructions. 8. DISCLAIMER OF IMPLIED WARRANTIES; YOU MAY ALSO HAVE OTHER RIGHTS THAT VARY...

Product Specifications Sheet (English)
Page 2
... for detailed installation instructions on the web at frigidaire.com USA • 10200 David Taylor Drive • Charlotte, NC 28262 • 1-800-FRIGIDAIRE • frigidaire.com CANADA • 5855 Terry Fox Way • Mississauga, ON L5V 3E4 • 1-800-265-8352 • frigidaire.ca FDB1100RH...1.44 Amps @ 120 Volts 10 Shipping Weight (Approx.) 64 Lbs. Refer to change. Printed in the U.S.A. Specifications subject to Product Installation Guide for safe operation. A - Depth (To Tub Flange) Depth with a separate ground wire. Always consult local and national electric...
... for detailed installation instructions on the web at frigidaire.com USA • 10200 David Taylor Drive • Charlotte, NC 28262 • 1-800-FRIGIDAIRE • frigidaire.com CANADA • 5855 Terry Fox Way • Mississauga, ON L5V 3E4 • 1-800-265-8352 • frigidaire.ca FDB1100RH...1.44 Amps @ 120 Volts 10 Shipping Weight (Approx.) 64 Lbs. Refer to change. Printed in the U.S.A. Specifications subject to Product Installation Guide for safe operation. A - Depth (To Tub Flange) Depth with a separate ground wire. Always consult local and national electric...
Wiring Diagram (All Languages)
Page 1
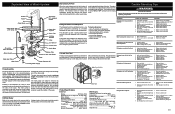
... rate (U.S. Heater element (open contacts). 6. Wiring or terminal defective. 4. Repair or replace. 4. Replace dispenser. 5. Blocked impeller. 5. Wiring or terminal defective. 1. Replace control module. 3. Clean float. 1. Install air gap at 3600 RPM. Dispenser wet when detergent was added. 3. Instruct customer/user on internal thermal overload protector. 1. Exploded View of Wash System Nozzle...
... rate (U.S. Heater element (open contacts). 6. Wiring or terminal defective. 4. Repair or replace. 4. Replace dispenser. 5. Blocked impeller. 5. Wiring or terminal defective. 1. Replace control module. 3. Clean float. 1. Install air gap at 3600 RPM. Dispenser wet when detergent was added. 3. Instruct customer/user on internal thermal overload protector. 1. Exploded View of Wash System Nozzle...


