Use and Care Guide
Page 1
C Dual Fuel Range Slide-in Models Welcome 2 Important Safety Instructions .. 3-6 Features at a Glance 7 Before Setting Surface Controls 8 Setting Surface Controls....... 9 Before Setting Oven Controls 10-11 11-12 Setting Warm & Serve Drawer Controls (Some models Setting Oven Controls ......... 12 Cooking Informations ..... 13-14 Care & Cleaning 15-20 Adjusting Your Oven Temperature 20 Before You Call SC.oo.lm.u.tm.io.on.n.s..Pt.or.o.b.l.e.m..s 21-22 Warranty Back Cover 318203862 (0609) Rev.
C Dual Fuel Range Slide-in Models Welcome 2 Important Safety Instructions .. 3-6 Features at a Glance 7 Before Setting Surface Controls 8 Setting Surface Controls....... 9 Before Setting Oven Controls 10-11 11-12 Setting Warm & Serve Drawer Controls (Some models Setting Oven Controls ......... 12 Cooking Informations ..... 13-14 Care & Cleaning 15-20 Adjusting Your Oven Temperature 20 Before You Call SC.oo.lm.u.tm.io.on.n.s..Pt.or.o.b.l.e.m..s 21-22 Warranty Back Cover 318203862 (0609) Rev.
Use and Care Guide
Page 3
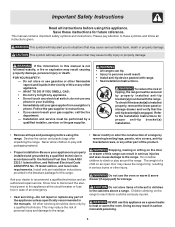
...'s phone. Know how to disconnect the electrical power to the appliance at the circuit breaker or fuse box in accordance with the National Fuel Gas Code ANSI Z223.1 latest edition, and National Electrical Code ANSI/NFPA No. 70 latest edition, and local code requirements. Stepping, ...oven or warm & serve drawer (if equipped) for proper anti-tip bracket(s) installation. • Remove all tape and packaging before using the range. Install only per installation instructions provided in the vicinity of interest to children in your building. • Immediately call the fire department. -...
...'s phone. Know how to disconnect the electrical power to the appliance at the circuit breaker or fuse box in accordance with the National Fuel Gas Code ANSI Z223.1 latest edition, and National Electrical Code ANSI/NFPA No. 70 latest edition, and local code requirements. Stepping, ...oven or warm & serve drawer (if equipped) for proper anti-tip bracket(s) installation. • Remove all tape and packaging before using the range. Install only per installation instructions provided in the vicinity of interest to children in your building. • Immediately call the fire department. -...
Use and Care Guide
Page 4
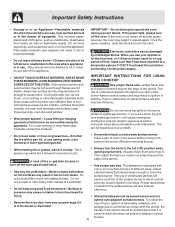
... sufficient time to be stored or discarded. • Always turn off the oven. Electronic controllers can be allowed to sit or stand on any unused range if it is to cool. This can result in use a towel or other flammable materials contact hot surfaces. Do not let potholders touch hot heating...
... sufficient time to be stored or discarded. • Always turn off the oven. Electronic controllers can be allowed to sit or stand on any unused range if it is to cool. This can result in use a towel or other flammable materials contact hot surfaces. Do not let potholders touch hot heating...
Use and Care Guide
Page 5
...without breaking due to reposition. Disconnect the appliance or turn the fan on hood or filter. IMPORTANT INSTRUCTIONS FOR CLEANING YOUR RANGE • Clean the range regularly to the appliance before you are flaming food under the hood, turn off the power to keep all utensils from ...rack with a damp cloth. Greasy deposits in this area when the oven is accidentally turned on the cooktop. Check the manufacturer's recommendations for range top service without its insert allow grease to drain and be kept away from the oven. • Do not use aluminum foil to ...
...without breaking due to reposition. Disconnect the appliance or turn the fan on hood or filter. IMPORTANT INSTRUCTIONS FOR CLEANING YOUR RANGE • Clean the range regularly to the appliance before you are flaming food under the hood, turn off the power to keep all utensils from ...rack with a damp cloth. Greasy deposits in this area when the oven is accidentally turned on the cooktop. Check the manufacturer's recommendations for range top service without its insert allow grease to drain and be kept away from the oven. • Do not use aluminum foil to ...
Use and Care Guide
Page 6
... by a qualified installer or electrician. Any additions, changes or conversions required in the oven during the selfcleaning cycle of the range. SAVE THESE INSTRUCTIONS Conversion to such substances. The L.P. conversion is needed, contact the service center for conversion to allow for... assistance. Gas) This natural gas range is designed to Liquefied Petroleum (L.P.) Gas. Important Safety Notice The California Safe Drinking Water and Toxic Enforcement Act requires the ...
... by a qualified installer or electrician. Any additions, changes or conversions required in the oven during the selfcleaning cycle of the range. SAVE THESE INSTRUCTIONS Conversion to such substances. The L.P. conversion is needed, contact the service center for conversion to allow for... assistance. Gas) This natural gas range is designed to Liquefied Petroleum (L.P.) Gas. Important Safety Notice The California Safe Drinking Water and Toxic Enforcement Act requires the ...
Use and Care Guide
Page 7
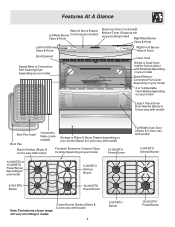
... Burner Valve & Knob Right Front Burner Valve & Knob Broil Element Speed Bake or Convection Self-Cleaning Oven depending on your model Oven Vent Single or Dual Oven Interior Oven Light(s) with Shield(s) depending on your model Speed Bake or Convection Fan Cover depending on your model 2 or 3 Adjustable Oven Racks depending...) 7 9,500 BTU Burner 16,000 BTU Power Burner Center Burner Grates (Styles & Colors vary with model) 5,000 BTU Simmer Burner Note:The features of your range will vary according to model.
... Burner Valve & Knob Right Front Burner Valve & Knob Broil Element Speed Bake or Convection Self-Cleaning Oven depending on your model Oven Vent Single or Dual Oven Interior Oven Light(s) with Shield(s) depending on your model Speed Bake or Convection Fan Cover depending on your model 2 or 3 Adjustable Oven Racks depending...) 7 9,500 BTU Burner 16,000 BTU Power Burner Center Burner Grates (Styles & Colors vary with model) 5,000 BTU Simmer Burner Note:The features of your range will vary according to model.
Use and Care Guide
Page 8
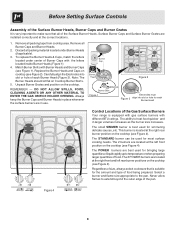
... LEFT REAR LEFT REAR LEFT FRONT LEFT FRONT Figure 4 RIGHT FRONT RIGHT FRONT RIGHT REAR RIGHT REAR Control Locations of the Gas Surface Burners Your range is equipped with gas surface burners with different BTU ratings. This burner is located at the left rear burner positions on the cooktop. The 2 burners...
... LEFT REAR LEFT REAR LEFT FRONT LEFT FRONT Figure 4 RIGHT FRONT RIGHT FRONT RIGHT REAR RIGHT REAR Control Locations of the Gas Surface Burners Your range is equipped with gas surface burners with different BTU ratings. This burner is located at the left rear burner positions on the cooktop. The 2 burners...
Use and Care Guide
Page 9
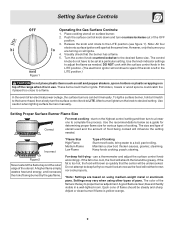
... deep fat frying - use . The color of food being burned by the gas flame. *Flame Size High Flame Medium Flame Low Flame Type of the range when it is yellow-orange. 9 Release the knob and rotate to a flame.
... deep fat frying - use . The color of food being burned by the gas flame. *Flame Size High Flame Medium Flame Low Flame Type of the range when it is yellow-orange. 9 Release the knob and rotate to a flame.
Use and Care Guide
Page 10
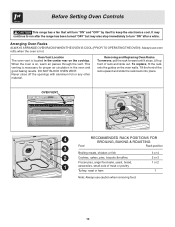
...chicken or fish 3 or 4 2 Cookies, cakes, pies, biscuits &muffins Frozen pies, angel food cake, yeast, bread, 1 casseroles, small cuts of the rack upward and slide the rack back into place. When the oven is located in the oven and good baking results. Never close off the openings with aluminum foil...guides on , warm air passes through the vent. Lift up front of rack and slide out. Before Setting Oven Controls This range has a fan that will turn "ON" and "OFF" by itself to turn "ON" after the range has been turned "OFF" but may also stop immediately to keep the electronics cool.
...chicken or fish 3 or 4 2 Cookies, cakes, pies, biscuits &muffins Frozen pies, angel food cake, yeast, bread, 1 casseroles, small cuts of the rack upward and slide the rack back into place. When the oven is located in the oven and good baking results. Never close off the openings with aluminum foil...guides on , warm air passes through the vent. Lift up front of rack and slide out. Before Setting Oven Controls This range has a fan that will turn "ON" and "OFF" by itself to turn "ON" after the range has been turned "OFF" but may also stop immediately to keep the electronics cool.
Use and Care Guide
Page 13
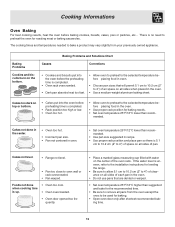
... space on the center of space on all sides when placed in the oven. • Use a medium-weight aluminum baking sheet. Cakes not level. • Range not level. • Pan too close to bake a product may vary slightly from the oven except the ones to preheat the oven for baking needs... water on all sides of clearance on the bottom. Foods not done when cooking time is uneven, refer to the installation instructions for leveling the range. • Be sure to allow 5.1 cm to 10.2 cm (2" to the selected temperature before baking cookies, breads, cakes, pies or pastries, etc...
... space on the center of space on all sides when placed in the oven. • Use a medium-weight aluminum baking sheet. Cakes not level. • Range not level. • Pan too close to bake a product may vary slightly from the oven except the ones to preheat the oven for baking needs... water on all sides of clearance on the bottom. Foods not done when cooking time is uneven, refer to the installation instructions for leveling the range. • Be sure to allow 5.1 cm to 10.2 cm (2" to the selected temperature before baking cookies, breads, cakes, pies or pastries, etc...
Use and Care Guide
Page 15
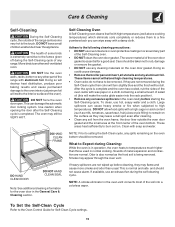
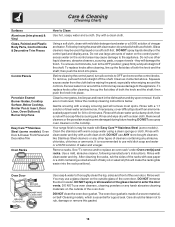
... taken not to Expect during the self-cleaning cycle. To clean, use any excessive spillovers in or around any other part of the range with a damp cloth. DO NOT allow food spills with high temperatures (well above cooking temperatures) which eliminate soils completely or reduces them...8226; Remove any cleaning materials on . Doing so could cause damage. • Remove the broiler pan and insert, all utensils and any range. Sounds of metal expansion and contraction are not removed during the Self-Cleaning cycle of any aluminum foil. Care & Cleaning Self-Cleaning During the...
... taken not to Expect during the self-cleaning cycle. To clean, use any excessive spillovers in or around any other part of the range with a damp cloth. DO NOT allow food spills with high temperatures (well above cooking temperatures) which eliminate soils completely or reduces them...8226; Remove any cleaning materials on . Doing so could cause damage. • Remove the broiler pan and insert, all utensils and any range. Sounds of metal expansion and contraction are not removed during the Self-Cleaning cycle of any aluminum foil. Care & Cleaning Self-Cleaning During the...
Use and Care Guide
Page 16
... difficult spots with a soft clean cloth. DO NOT use a glass cleaner on a soft cloth first. The oven door gasket is essential for 30 to the OFF position; DO NOT spray liquids directly on Self-Cleaning models, which is made with mild dish detergent and water or a 50/...outside glass of vinegar and water. Clean as instructed above. then push the knob into place. Gentle scouring with clean water and dry. Your range finish is recommended to OFF and remove the control knobs. Use a mild, abrasive cleaner, following manufacturer's instructions. You may be used if ...
... difficult spots with a soft clean cloth. DO NOT use a glass cleaner on a soft cloth first. The oven door gasket is essential for 30 to the OFF position; DO NOT spray liquids directly on Self-Cleaning models, which is made with mild dish detergent and water or a 50/...outside glass of vinegar and water. Clean as instructed above. then push the knob into place. Gentle scouring with clean water and dry. Your range finish is recommended to OFF and remove the control knobs. Use a mild, abrasive cleaner, following manufacturer's instructions. You may be used if ...
Use and Care Guide
Page 18
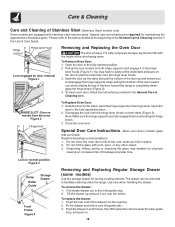
... removed to completely disengage the hinge levers (Figure 2). 4. Lock in the General Care & Cleaning table. Tilt the drawer up and toward the range to facilitate cleaning under the range. Fit the drawer end rollers onto the guide rails. 3. Special care and cleaning are fully engaged before unlocking the hinge levers. 3. To Remove...
... removed to completely disengage the hinge levers (Figure 2). 4. Lock in the General Care & Cleaning table. Tilt the drawer up and toward the range to facilitate cleaning under the range. Fit the drawer end rollers onto the guide rails. 3. Special care and cleaning are fully engaged before unlocking the hinge levers. 3. To Remove...
Use and Care Guide
Page 19
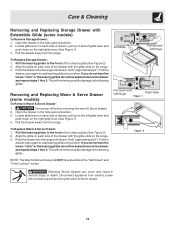
...2. Open the drawer to the bearing glides. This will minimize possible damage to the fully opened position. 3. Align the glide on the range. 3. Pull the drawer away from electric power before removing the warm & Serve drawer. 2. Push the drawer into position. Pull the drawer... open again to seat bearing glides into the range until levers "click" (approximately 2"). Latch Removing and Replacing Warm & Serve Drawer (some models) To Remove Storage Drawer: 1. Pull the ...
...2. Open the drawer to the bearing glides. This will minimize possible damage to the fully opened position. 3. Align the glide on the range. 3. Pull the drawer away from electric power before removing the warm & Serve drawer. 2. Push the drawer into position. Pull the drawer... open again to seat bearing glides into the range until levers "click" (approximately 2"). Latch Removing and Replacing Warm & Serve Drawer (some models) To Remove Storage Drawer: 1. Pull the ...
Use and Care Guide
Page 21
... a flexible C.S.A international approved metal appliance connector installed. Electrical power outage. Lightly fan the flame and allow the burner to the range is plugged tightly into the outlet. POSSIBLE CAUSE/SOLUTION Poor installation. Be sure cabinets are built in and turn the surface control knob...control beeps and displays any F code error (for example F11) Oven light does not work. Check house lights to Common Problems OCCURRENCE Range is not level. Burner ports are clogged. Before you call an authorized servicer for assistance. Clean burners. Push in too tight. ...
... a flexible C.S.A international approved metal appliance connector installed. Electrical power outage. Lightly fan the flame and allow the burner to the range is plugged tightly into the outlet. POSSIBLE CAUSE/SOLUTION Poor installation. Be sure cabinets are built in and turn the surface control knob...control beeps and displays any F code error (for example F11) Oven light does not work. Check house lights to Common Problems OCCURRENCE Range is not level. Burner ports are clogged. Before you call an authorized servicer for assistance. Clean burners. Push in too tight. ...


