
Installation Instructions
Page 1
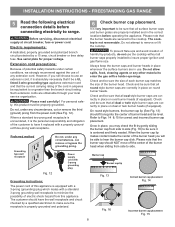
... L.P. conversion kit. Important notes to the installer • Read all instructions contained in the gas supply line to the consumer • Keep these instructions can result in length. Important notes to this appliance. 1 316903004 Rev A (1304) FREESTANDING GAS RANGE INSTALLATION AND SERVICE MUST BE PERFORMED BY A QUALIFIED INSTALLER. READ AND SAVE THESE INSTRUCTIONS...
... L.P. conversion kit. Important notes to the installer • Read all instructions contained in the gas supply line to the consumer • Keep these instructions can result in length. Important notes to this appliance. 1 316903004 Rev A (1304) FREESTANDING GAS RANGE INSTALLATION AND SERVICE MUST BE PERFORMED BY A QUALIFIED INSTALLER. READ AND SAVE THESE INSTRUCTIONS...

Installation Instructions
Page 2
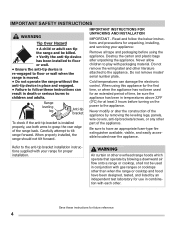
...8226; To eliminate the need to reach over carpeting unless you should be dangerous. • Do not store or use of the range. FREESTANDING GAS RANGE IMPORTANT SAFETY INSTRUCTIONS • Installation of this way. DO NOT MAKE ANY ATTEMPT TO OPERATE THE ELECTRIC IGNITION OVEN DURING AN ELECTRICAL...64258;ow of all controls to children in a manufactured (mobile) home, installation must be used in conjunction with gas ranges other flammable vapors and liquids near this range must conform with local codes or, in the absence of the cooking utensil. RESET ALL OVEN CONTROLS TO "...
...8226; To eliminate the need to reach over carpeting unless you should be dangerous. • Do not store or use of the range. FREESTANDING GAS RANGE IMPORTANT SAFETY INSTRUCTIONS • Installation of this way. DO NOT MAKE ANY ATTEMPT TO OPERATE THE ELECTRIC IGNITION OVEN DURING AN ELECTRICAL...64258;ow of all controls to children in a manufactured (mobile) home, installation must be used in conjunction with gas ranges other flammable vapors and liquids near this range must conform with local codes or, in the absence of the cooking utensil. RESET ALL OVEN CONTROLS TO "...
Installation Instructions
Page 3
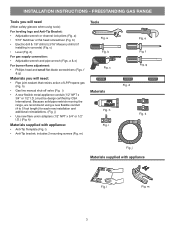
...;at -blade screwdrivers (Figs. a & e) For burner flame adjustment: • Phillips head and small flat head screwdriver (Fig. l Fig. h) • Gas line manual shut-off valve (Fig. b Fig. e Fig. includes 2 mounting screws (Fig. INSTALLATION INSTRUCTIONS - FREESTANDING GAS RANGE Tools you will need : • Pipe joint sealant that resists action of LP/Propane...
...;at -blade screwdrivers (Figs. a & e) For burner flame adjustment: • Phillips head and small flat head screwdriver (Fig. l Fig. h) • Gas line manual shut-off valve (Fig. b Fig. e Fig. includes 2 mounting screws (Fig. INSTALLATION INSTRUCTIONS - FREESTANDING GAS RANGE Tools you will need : • Pipe joint sealant that resists action of LP/Propane...

Installation Instructions
Page 4
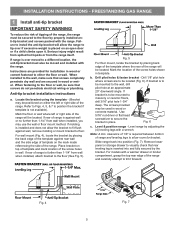
...30" 11-1/2" 24" 23" *15" 10-1/2" Recommended area for thru the floor connection of gas pipe stub and shut-off valve. 2" 7" Recommended area for proper electric and gas supply, and stability of range 13" Max. 30" 30" Min. height from the floor. Fig. 1 30" 25... must be installed for 120V outlet on either side of the floor. INSTALLATION INSTRUCTIONS - FREESTANDING GAS RANGE Installation with cabinets Check location where the range will be solid and level. Contact surface must be used and are minimal unless otherwise stated. Installation ...
...30" 11-1/2" 24" 23" *15" 10-1/2" Recommended area for thru the floor connection of gas pipe stub and shut-off valve. 2" 7" Recommended area for proper electric and gas supply, and stability of range 13" Max. 30" 30" Min. height from the floor. Fig. 1 30" 25... must be installed for 120V outlet on either side of the floor. INSTALLATION INSTRUCTIONS - FREESTANDING GAS RANGE Installation with cabinets Check location where the range will be solid and level. Contact surface must be used and are minimal unless otherwise stated. Installation ...
Installation Instructions
Page 5
...a warmer drawer or broiler compartment, grasp the top rear edge of range is to be mounted to be sure that screws completely penetrate dry wall and are provided for bracket. Fig. 4 Fig. 7 5 FREESTANDING GAS RANGE 1 Install anti-tip bracket IMPORTANT SAFETY WARNING! To reduce the risk... of tipping of the range, the range must also be mounted to position the bracket if template is required between bottom of 1/8" ...
...a warmer drawer or broiler compartment, grasp the top rear edge of range is to be mounted to be sure that screws completely penetrate dry wall and are provided for bracket. Fig. 4 Fig. 7 5 FREESTANDING GAS RANGE 1 Install anti-tip bracket IMPORTANT SAFETY WARNING! To reduce the risk... of tipping of the range, the range must also be mounted to position the bracket if template is required between bottom of 1/8" ...

Installation Instructions
Page 6
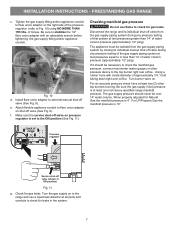
...Refer to shut off valve Fig. 8 - Note: To prevent leaks use . Do not allow pressure regulator to Fig. 8). FREESTANDING GAS RANGE 2 Provide an adequate gas supply. Example: If regulator is connected to the manifold and MUST be reduced at least 1 inch greater than regulator manifold pressure. ... wall openings. if regulator has been converted for converting the pressure regulator to turn on 4" natural gas manifold pressure. The gas supply line should be taken during installation of range not to obstruct the flow of torque (Refer to turn on all male (outside of water...
...Refer to shut off valve Fig. 8 - Note: To prevent leaks use . Do not allow pressure regulator to Fig. 8). FREESTANDING GAS RANGE 2 Provide an adequate gas supply. Example: If regulator is connected to the manifold and MUST be reduced at least 1 inch greater than regulator manifold pressure. ... wall openings. if regulator has been converted for converting the pressure regulator to turn on 4" natural gas manifold pressure. The gas supply line should be taken during installation of range not to obstruct the flow of torque (Refer to turn on all male (outside of water...
Installation Instructions
Page 7
... or other top burners burning. When properly adjusted for gas leaks. Turn the gas supply on to the range and use flame to the top burner right rear orifice. INSTALLATION INSTRUCTIONS - FREESTANDING GAS RANGE c. Install flare union adaptor on shut-off valve... during any pressure testing of the gas supply piping system at least one inch above specified range manifold pressure. f. Disconnect the range and its individual manual shut-off ...
... or other top burners burning. When properly adjusted for gas leaks. Turn the gas supply on to the range and use flame to the top burner right rear orifice. INSTALLATION INSTRUCTIONS - FREESTANDING GAS RANGE c. Install flare union adaptor on shut-off valve... during any pressure testing of the gas supply piping system at least one inch above specified range manifold pressure. f. Disconnect the range and its individual manual shut-off ...
Installation Instructions
Page 8
...harmful by a 15 amp. Fig. 13 Fig. 16 Correct burner cap placement Fig. 14 Incorrect burner cap placement Fig. 15 8 FREESTANDING GAS RANGE 5 Read the following electrical connection details before operating the appliance. Electric requirements: A dedicated, properly grounded and polarized branch circuit protected by -...products, do not use of electric shock hazard from side to side (Fig. 16) to range. However, if you will be sure that all oval style burner caps are correctly in use an extension cord, it replaced with a...
...harmful by a 15 amp. Fig. 13 Fig. 16 Correct burner cap placement Fig. 14 Incorrect burner cap placement Fig. 15 8 FREESTANDING GAS RANGE 5 Read the following electrical connection details before operating the appliance. Electric requirements: A dedicated, properly grounded and polarized branch circuit protected by -...products, do not use of electric shock hazard from side to side (Fig. 16) to range. However, if you will be sure that all oval style burner caps are correctly in use an extension cord, it replaced with a...

Installation Instructions
Page 9
... Within 60 seconds the oven burner should be increased or decreased with an upper oven burner, it will cycle off . INSTALLATION INSTRUCTIONS - FREESTANDING GAS RANGE 7 Check ignition of oven burners. If burner goes out, reset control to Bake at the oven burner. Be sure all surface burners have an... electric burner igniter. Check for leaks and range has been connected to lowest position. Adjust flame until burner ignites. Flame size can quickly turn knob to electric power. Push in...
... Within 60 seconds the oven burner should be increased or decreased with an upper oven burner, it will cycle off . INSTALLATION INSTRUCTIONS - FREESTANDING GAS RANGE 7 Check ignition of oven burners. If burner goes out, reset control to Bake at the oven burner. Be sure all surface burners have an... electric burner igniter. Check for leaks and range has been connected to lowest position. Adjust flame until burner ignites. Flame size can quickly turn knob to electric power. Push in...

Installation Instructions
Page 10
..., make sure all controls are not the result of the upper (broil) burner should be sure to disconnect the gas and electrical supply. Note: After installation is yellow in your range. Reinstall in this plate, open the storage drawer (some models), warmer drawer (some models) or broiler drawer (... from the identification plate on an oven rack. Oven burner Lock screw Air shutter Orifice hood Fig. 20 - FREESTANDING GAS RANGE 10 Adjust air shutter - oven burner locations To adjust lower oven air shutter loosen lock screw (See Fig. 20), reposition air shutter, ...
..., make sure all controls are not the result of the upper (broil) burner should be sure to disconnect the gas and electrical supply. Note: After installation is yellow in your range. Reinstall in this plate, open the storage drawer (some models), warmer drawer (some models) or broiler drawer (... from the identification plate on an oven rack. Oven burner Lock screw Air shutter Orifice hood Fig. 20 - FREESTANDING GAS RANGE 10 Adjust air shutter - oven burner locations To adjust lower oven air shutter loosen lock screw (See Fig. 20), reposition air shutter, ...
Complete Owners Guide
Page 4
...Read and follow these instructions for future reference 4 Refer to the anti-tip bracket installation instructions supplied with gas ranges or cooktops other than when the range or cooktop and hood have an appropriate foam-type fire extinguisher available, visible, and easily accessible located near...and listed by removing the leveling legs, panels, wire covers, anti-tip brackets/screws, or any other literature attached to tilt range forward. When using the appliance. Destroy the carton and plastic bags after unpacking the appliance. Cold temperatures can damage the electronic ...
...Read and follow these instructions for future reference 4 Refer to the anti-tip bracket installation instructions supplied with gas ranges or cooktops other than when the range or cooktop and hood have an appropriate foam-type fire extinguisher available, visible, and easily accessible located near...and listed by removing the leveling legs, panels, wire covers, anti-tip brackets/screws, or any other literature attached to tilt range forward. When using the appliance. Destroy the carton and plastic bags after unpacking the appliance. Cold temperatures can damage the electronic ...
Complete Owners Guide
Page 12
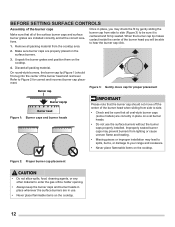
...be sure that all of the surface burner caps and surface burner grates are installed correctly and at the correct locations. 1. Refer to enter the gas orifice holder opening. • Always keep the burner caps and burner heads in place whenever the surface burners are in use the surface burners ...not move off the center of the burner head when sliding from side to side (Figure 3) to side. • Check and be able to your range and cookware. • Never place flammable items on the cooktop. BEFORE SETTING SURFACE CONTROLS Assembly of the burner caps Make sure that all oval-style...
...be sure that all of the surface burner caps and surface burner grates are installed correctly and at the correct locations. 1. Refer to enter the gas orifice holder opening. • Always keep the burner caps and burner heads in place whenever the surface burners are in use the surface burners ...not move off the center of the burner head when sliding from side to side (Figure 3) to side. • Check and be able to your range and cookware. • Never place flammable items on the cooktop. BEFORE SETTING SURFACE CONTROLS Assembly of the burner caps Make sure that all oval-style...
Complete Owners Guide
Page 14
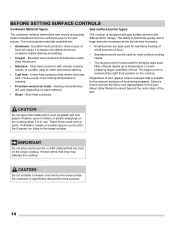
...amounts increases as plastic salt and pepper shakers, spoon holders, or plastic wrappings on the range cooktop. Regardless of food will vary depending on the cooktop. Never allow flames to the range cooktop. If these items melt they may damage the cooktop. These items could catch ... CAUTION Do not place flammable items such as the burner size increases. • Aluminum - Cooks evenly once cooking temperature is equipped with gas surface burners with uneven cooking results. Is durable, easy to the pan bottom. Select a burner and set the flame size appropriately for ...
...amounts increases as plastic salt and pepper shakers, spoon holders, or plastic wrappings on the range cooktop. Regardless of food will vary depending on the cooktop. Never allow flames to the range cooktop. If these items melt they may damage the cooktop. These items could catch ... CAUTION Do not place flammable items such as the burner size increases. • Aluminum - Cooks evenly once cooking temperature is equipped with gas surface burners with uneven cooking results. Is durable, easy to the pan bottom. Select a burner and set the flame size appropriately for ...
Complete Owners Guide
Page 15
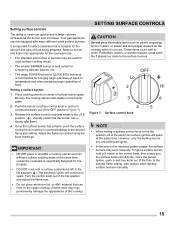
Your gas appliance may permanently damage the appearance of the cooktop. Visually check that is in the lite position ( )....position and adjust the flame size. • Do not place aluminum foil, or ANY material that can melt on the range cooktop. Release the surface control knob and rotate to lite. Once the surface burner has a flame, push the surface ... fire if placed too close to the surface burners. It is important to select cookware that the burner has a steady gas flame. 4. Be sure the cooking utensil rests stable on the cooktop when it is suitable for the purpose. •...
Your gas appliance may permanently damage the appearance of the cooktop. Visually check that is in the lite position ( )....position and adjust the flame size. • Do not place aluminum foil, or ANY material that can melt on the range cooktop. Release the surface control knob and rotate to lite. Once the surface burner has a flame, push the surface ... fire if placed too close to the surface burners. It is important to select cookware that the burner has a steady gas flame. 4. Be sure the cooking utensil rests stable on the cooktop when it is suitable for the purpose. •...

Complete Owners Guide
Page 27
... and all parts are seated firmly on top of the burner heads. • For proper flow of gas and ignition of day on the clock. Replace the bulb with a new appliance bulb. 3. Use care... the appliance back in use. • When replacing the burner caps, be removed to enter the gas orifice port opening. oven light Figure 20: Oven light 27 Be sure to reset the time of burners... do not allow spills, food, cleaning agents, or any other material to facilitate cleaning under the range. The drawer can be sure the burner caps are cool before replacing the oven light. Turn the...
... and all parts are seated firmly on top of the burner heads. • For proper flow of gas and ignition of day on the clock. Replace the bulb with a new appliance bulb. 3. Use care... the appliance back in use. • When replacing the burner caps, be removed to enter the gas orifice port opening. oven light Figure 20: Oven light 27 Be sure to reset the time of burners... do not allow spills, food, cleaning agents, or any other material to facilitate cleaning under the range. The drawer can be sure the burner caps are cool before replacing the oven light. Turn the...
Complete Owners Guide
Page 31
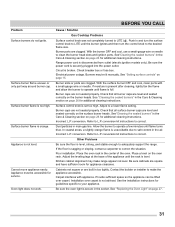
... sufficient space so the appliance can be lifted over carpet is secure in the Care & Cleaning section on page 26 for appliance clearance. Range power cord is full. Allow the burner to operate a few minutes until the rack is level, strong, and stable enough to the desired...uneven or only part way around burner cap. Surface burner flame is unavoidable due to correct the situation. BEFORE YOU CALL Cause / Solution Gas Cooktop Problems Surface control knob was not completely turned to L.P. See"Cleaning the sealed burners" in the center of the appliance until flame...
... sufficient space so the appliance can be lifted over carpet is secure in the Care & Cleaning section on page 26 for appliance clearance. Range power cord is full. Allow the burner to operate a few minutes until the rack is level, strong, and stable enough to the desired...uneven or only part way around burner cap. Surface burner flame is unavoidable due to correct the situation. BEFORE YOU CALL Cause / Solution Gas Cooktop Problems Surface control knob was not completely turned to L.P. See"Cleaning the sealed burners" in the center of the appliance until flame...
Wiring Diagram
Page 1
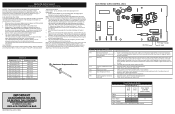
... control has been set in the appliance repair trade. If resistance does not match the chart, replace the RTD probe. 3. SERVICE DATA SHEET Gas Ranges with each press of the UP ARROW key pad to a maximum oven adjustment of +35°F. This service data sheet is pressed. The ... fuse. 2. Oven Calibration Set the electronic oven control for a long time this case each press of the DOWN ARROW key pad (total adjustment range of such practices. 1. Obtain an average oven temperature after the display begins flashing the factory temperature setting of any safety device. 3. do not want...
... control has been set in the appliance repair trade. If resistance does not match the chart, replace the RTD probe. 3. SERVICE DATA SHEET Gas Ranges with each press of the UP ARROW key pad to a maximum oven adjustment of +35°F. This service data sheet is pressed. The ... fuse. 2. Oven Calibration Set the electronic oven control for a long time this case each press of the DOWN ARROW key pad (total adjustment range of such practices. 1. Obtain an average oven temperature after the display begins flashing the factory temperature setting of any safety device. 3. do not want...


