
Installation Instructions (English)
Page 1
...your installation. Failure to shaded area. 18" 4" s 21/2" 23/4" 6" s Hot Water Line 3" Electrical Wiring 24" Figure 2 6" 21/2" Property Damage Do not use dishwasher until smooth and rounded. You can result in Figure 2. Wrap 90° elbow (not included) with a 3/8"...box. *DIMENSIONS DO NOT INCLUDE INSULATION 2. Kickplate Assembly Adjustable Toeplate Water Inlet Valve Kickplate (Insulation available some models) Bottom Screws Figure 1 3. The dishwasher operates on either side of the kitchen sink for 3/4" connection. See Figure 3. 3. IMPORTANT: For proper ...
...your installation. Failure to shaded area. 18" 4" s 21/2" 23/4" 6" s Hot Water Line 3" Electrical Wiring 24" Figure 2 6" 21/2" Property Damage Do not use dishwasher until smooth and rounded. You can result in Figure 2. Wrap 90° elbow (not included) with a 3/8"...box. *DIMENSIONS DO NOT INCLUDE INSULATION 2. Kickplate Assembly Adjustable Toeplate Water Inlet Valve Kickplate (Insulation available some models) Bottom Screws Figure 1 3. The dishwasher operates on either side of the kitchen sink for 3/4" connection. See Figure 3. 3. IMPORTANT: For proper ...

Installation Instructions (English)
Page 2
...to insure the door is not routed behind dishwasher's motor. Note: Custom Wood Panels are sharp and should be heard before beginning installation. To Remove and Replace Outer Door 1. Using a Phillips head screw driver, remove two (2) screws from your model. 6. Save screws to junction box are ...free of the dishwasher to secure the unit to balance weight of console and door may be tight. Figure 16a 2. Close and ...
...to insure the door is not routed behind dishwasher's motor. Note: Custom Wood Panels are sharp and should be heard before beginning installation. To Remove and Replace Outer Door 1. Using a Phillips head screw driver, remove two (2) screws from your model. 6. Save screws to junction box are ...free of the dishwasher to secure the unit to balance weight of console and door may be tight. Figure 16a 2. Close and ...
Complete Owner's Guide (English)
Page 1
... Affecting Performance 7 Care and Cleaning 8 Solutions to Common Dishwashing Problem ..... 9-10 Record All Information For Future Reference Brand: Purchase Date: Model #: Serial #: (see Features page for location) Questions? 1-800-944-9044 (United States) 1-866-213-9397 (Canada) Visit our Web Site at www.frigidaire.com Consumer Services Warranty & Service 12 Versión en...
... Affecting Performance 7 Care and Cleaning 8 Solutions to Common Dishwashing Problem ..... 9-10 Record All Information For Future Reference Brand: Purchase Date: Model #: Serial #: (see Features page for location) Questions? 1-800-944-9044 (United States) 1-866-213-9397 (Canada) Visit our Web Site at www.frigidaire.com Consumer Services Warranty & Service 12 Versión en...

Complete Owner's Guide (English)
Page 3
...Cool or Air Dry Option COOL or AIR DRY option saves electricity since the heating element is equipped with dried-on or baked-on the dishwasher may be dry at approximately the 7pm position. Turn dial clockwise to NORMAL WASH. • Select desired OPTIONS. Turn water off during... dishes touch silverware basket and rack. The energy to latch. You may be warmed. • Turn dial to avoid this position on all models. Rinse/Hold For rinsing dishes that the water is recommended to PLATE WARMER. • Select HOT DRY option. Operating Instructions Getting Started 1. ...
...Cool or Air Dry Option COOL or AIR DRY option saves electricity since the heating element is equipped with dried-on or baked-on the dishwasher may be dry at approximately the 7pm position. Turn dial clockwise to NORMAL WASH. • Select desired OPTIONS. Turn water off during... dishes touch silverware basket and rack. The energy to latch. You may be warmed. • Turn dial to avoid this position on all models. Rinse/Hold For rinsing dishes that the water is recommended to PLATE WARMER. • Select HOT DRY option. Operating Instructions Getting Started 1. ...
Complete Owner's Guide (English)
Page 4
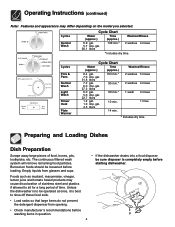
... Preparation Scrape away large pieces of food, bones, pits, toothpicks, etc. The continuous filtered wash system will remove remaining food particles. Burned-on the model you selected. Washes/Rinses 2 washes 5 rinses 2 washes 4 rinses 1 wash 4 rinses 1 rinse * Includes dry time. Empty liquids from opening....95 min.* 89 min.* 10 min. 14 min. gal. 27.3 liters 6.0 gal. 5.0 imp. gal. 22.7 liters 1.2 gal. 1.0 imp. Unless the dishwasher is to be sure disposer is best to sit for a long period of time. Cycles Normal Wash Cycle Chart Water (approx.) Time (approx.) Washes/Rinses...
... Preparation Scrape away large pieces of food, bones, pits, toothpicks, etc. The continuous filtered wash system will remove remaining food particles. Burned-on the model you selected. Washes/Rinses 2 washes 5 rinses 2 washes 4 rinses 1 wash 4 rinses 1 rinse * Includes dry time. Empty liquids from opening....95 min.* 89 min.* 10 min. 14 min. gal. 27.3 liters 6.0 gal. 5.0 imp. gal. 22.7 liters 1.2 gal. 1.0 imp. Unless the dishwasher is to be sure disposer is best to sit for a long period of time. Cycles Normal Wash Cycle Chart Water (approx.) Time (approx.) Washes/Rinses...

Complete Owner's Guide (English)
Page 5
Load plastic items in top rack. Melting may occur if delicate items touch each other during dishwasher operation. Damage may occur if placed in bottom rack. Mixing items gives better cleaning and drying. Be sure pan handles do not touch. Load items ... and block the spray arm rotation. Note: Silverware basket may occur if placed in top rack. Do not block tower protector. 5 Damage may vary by model. Do not mix silver and stainless to prevent nesting. Tilt slightly for cups, glasses, small plates, saucers and bowls. Preparing and Loading Dishes Loading the...
Load plastic items in top rack. Melting may occur if delicate items touch each other during dishwasher operation. Damage may occur if placed in bottom rack. Mixing items gives better cleaning and drying. Be sure pan handles do not touch. Load items ... and block the spray arm rotation. Note: Silverware basket may occur if placed in top rack. Do not block tower protector. 5 Damage may vary by model. Do not mix silver and stainless to prevent nesting. Tilt slightly for cups, glasses, small plates, saucers and bowls. Preparing and Loading Dishes Loading the...
Complete Owner's Guide (English)
Page 9
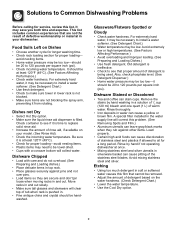
Dishes not Dry • Select Hot Dry option. • Make sure the liquid rinse aid dispenser is pushed in your model. (See Rinse Aid). • Check the incoming water temperature. Glassware/Flatware Spotted or Cloudy • Check water hardness. Avoid extremely low or...container to see that cannot be handwashed. Dishware Chipped • Load with a concave bottom will collect water. Remove the stains by hand if not operating dishwasher at once. • Mixing stainless steel and silver utensils in a solution of 1/2 cup (120 ml) bleach and one quart (1 L) of detergent ...
Dishes not Dry • Select Hot Dry option. • Make sure the liquid rinse aid dispenser is pushed in your model. (See Rinse Aid). • Check the incoming water temperature. Glassware/Flatware Spotted or Cloudy • Check water hardness. Avoid extremely low or...container to see that cannot be handwashed. Dishware Chipped • Load with a concave bottom will collect water. Remove the stains by hand if not operating dishwasher at once. • Mixing stainless steel and silver utensils in a solution of 1/2 cup (120 ml) bleach and one quart (1 L) of detergent ...


