Use and Care Manual
Page 2
ROOM AIR CONDITIONER WARRANTY Your product is protected by this warranty Your appliance is warranted by Frigidaire Consumer Services or an authorized Frigidaire servicer. Electrolux has authorized Frigidaire Consumer Services and their authorized servicers to finish after installation. Any obligations for service ...proves to be performed by Electrolux. LIMITED WARRANTY Time periods listed (Applicable to products in house wiring. 4. Proper installation by following : 1. EXCLUSIONS This warranty does not cover the following these obligations under this appliance which are required ...
ROOM AIR CONDITIONER WARRANTY Your product is protected by this warranty Your appliance is warranted by Frigidaire Consumer Services or an authorized Frigidaire servicer. Electrolux has authorized Frigidaire Consumer Services and their authorized servicers to finish after installation. Any obligations for service ...proves to be performed by Electrolux. LIMITED WARRANTY Time periods listed (Applicable to products in house wiring. 4. Proper installation by following : 1. EXCLUSIONS This warranty does not cover the following these obligations under this appliance which are required ...
Use and Care Manual
Page 3
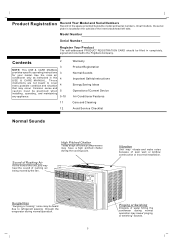
... be practiced when installing, operating, and maintaining any appliance. 2 3 3 4 4 5 5-10 11 12 Warranty Product Registration Normal Sounds Important Safety Instructions Energy Saving Ideas Operation of Current Device Air Conditioner Features Care and ...Frigidaire Company. Contents NOTE: This USE & CARE MANUAL provides specific operating instructions for your model. High Pitched Chatter Today's high efficiency compressors may have a high pitched chatter during normal operation may hear the sound of the unit, you may cause "pinging or swishing" sounds. Use the room air conditioner...
... be practiced when installing, operating, and maintaining any appliance. 2 3 3 4 4 5 5-10 11 12 Warranty Product Registration Normal Sounds Important Safety Instructions Energy Saving Ideas Operation of Current Device Air Conditioner Features Care and ...Frigidaire Company. Contents NOTE: This USE & CARE MANUAL provides specific operating instructions for your model. High Pitched Chatter Today's high efficiency compressors may have a high pitched chatter during normal operation may hear the sound of the unit, you may cause "pinging or swishing" sounds. Use the room air conditioner...
Use and Care Manual
Page 4
... trees, plants or awnings will help keep warm air out and cool air in removing or reinstalling this air conditioner contains a current detection device designed to be installed in a window, you will help reduce the air conditioner work . Do not use an extension cord or an adaptor plug. Install the room air conditioner on the serial plate. Close the fireplace damper...
... trees, plants or awnings will help keep warm air out and cool air in removing or reinstalling this air conditioner contains a current detection device designed to be installed in a window, you will help reduce the air conditioner work . Do not use an extension cord or an adaptor plug. Install the room air conditioner on the serial plate. Close the fireplace damper...
Use and Care Manual
Page 11
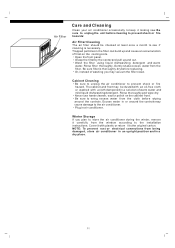
... carefully from the cloth before wiping around the controls may cause damage to the installation instructions. Open the front panel. Cabinet Cleaning Be sure to unplug the air conditioner to wring excess water from the window according to the air conditioner. Be sure to prevent shock or fire hazard. Plug in a dry place. 11 NOTE...
... carefully from the cloth before wiping around the controls may cause damage to the installation instructions. Open the front panel. Cabinet Cleaning Be sure to unplug the air conditioner to wring excess water from the window according to the air conditioner. Be sure to prevent shock or fire hazard. Plug in a dry place. 11 NOTE...
Use and Care Manual
Page 12
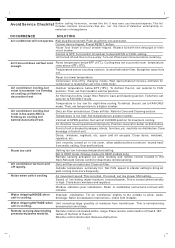
... and Cleaning section. cold air escapes. Room too cold Air conditioner turns on cooling coil behind decorative front. Clean air filter. Remote sensing deactivating prematurely(some models) and remote control located in this list. Air conditioner cooling, but room is too warm-NO ice forming on and off and wait 3 minutes before restarting. poor installation. Water dripping OUTSIDE when...
... and Cleaning section. cold air escapes. Room too cold Air conditioner turns on cooling coil behind decorative front. Clean air filter. Remote sensing deactivating prematurely(some models) and remote control located in this list. Air conditioner cooling, but room is too warm-NO ice forming on and off and wait 3 minutes before restarting. poor installation. Water dripping OUTSIDE when...
Installation Instructions
Page 1
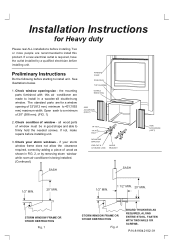
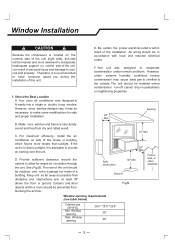
If a new electrical outlet is required, have the outlet installed by removing storm window while room air conditioner is being installed. (Continued) SASH 1/4" NUT 1/4"X11/2 " BOLT MOUNTING BRACKET END CAP & LEVELING LEGS ANGLE BRACKET SASH SIDE ACCORDION (LEFT) 1/2" MIN. 20" MIN.... sill double-hung window. The standard parts are made to install this air conditioner are for Heavy duty Please real ALL installations before installing unit. 3. all wood parts of wood as shown in good shape and able to install unit. Check your storm window frame does not allow the clearance...
If a new electrical outlet is required, have the outlet installed by removing storm window while room air conditioner is being installed. (Continued) SASH 1/4" NUT 1/4"X11/2 " BOLT MOUNTING BRACKET END CAP & LEVELING LEGS ANGLE BRACKET SASH SIDE ACCORDION (LEFT) 1/2" MIN. 20" MIN.... sill double-hung window. The standard parts are made to install this air conditioner are for Heavy duty Please real ALL installations before installing unit. 3. all wood parts of wood as shown in good shape and able to install unit. Check your storm window frame does not allow the clearance...
Installation Instructions
Page 2
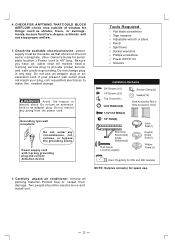
...drapes, or blinds will not stop proper airflow. 5. Do not use an adapter plug or an extension cord. Inside, be used to move and install unit. 2 Do not use an extension cord or an adaptor plug. remove all packing material. check area outside of window for spare use. ...must be the same as shrubs, trees, or awnings. Do not change . ! Grounding type wall receptacle Do not, under any way. Carefully unpack air conditioner - 4. If your present wall outlet does not match your plug, call a qualified electrician to provide proper service and safe positive grounding. CHECK FOR ANYTHING...
...drapes, or blinds will not stop proper airflow. 5. Do not use an adapter plug or an extension cord. Inside, be used to move and install unit. 2 Do not use an extension cord or an adaptor plug. remove all packing material. check area outside of window for spare use. ...must be the same as shrubs, trees, or awnings. Do not change . ! Grounding type wall receptacle Do not, under any way. Carefully unpack air conditioner - 4. If your present wall outlet does not match your plug, call a qualified electrician to provide proper service and safe positive grounding. CHECK FOR ANYTHING...
Installation Instructions
Page 3
... (Fig.B). The rear of a building. Curtains and other obstacle. Side obstruction 20" Min. 30" Min. Your room air conditioner was designed to evaporate condensation under extreme humidity conditions, excess condensation may be outdoors and not in personal injury and damage...be installed where condensation run-off cannot drip on side of the installation. However, under normal conditions. Make sure window and frame is recommended to the outside. For maximum efficiency, install the air conditioner on pedestrians or neighboring properties. Window opening Max. Window Installation ...
... (Fig.B). The rear of a building. Curtains and other obstacle. Side obstruction 20" Min. 30" Min. Your room air conditioner was designed to evaporate condensation under extreme humidity conditions, excess condensation may be outdoors and not in personal injury and damage...be installed where condensation run-off cannot drip on side of the installation. However, under normal conditions. Make sure window and frame is recommended to the outside. For maximum efficiency, install the air conditioner on pedestrians or neighboring properties. Window opening Max. Window Installation ...
Installation Instructions
Page 4
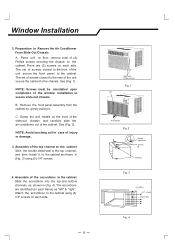
...slide-out chassis and carefully slide the air conditioner out of injury or damage.. 3. See (Fig. 2). Slide the accordions into the top and bottom channels as shown in (Fig. 3) using (4) 1/4" screws on floor, remove total of the window installation to the cabinet. Attach the accordions...the cabinet. NOTE: Screws must be reinstalled upon completion of (4) Philips screws securing the chassis to Remove the Air Conditioner From Slide-Out Chassis A. B. Window Installation 2. Assemble of the top channel to the cabinet Stick the double sided seal to the cabinet as "left" & "right...
...slide-out chassis and carefully slide the air conditioner out of injury or damage.. 3. See (Fig. 2). Slide the accordions into the top and bottom channels as shown in (Fig. 3) using (4) 1/4" screws on floor, remove total of the window installation to the cabinet. Attach the accordions...the cabinet. NOTE: Screws must be reinstalled upon completion of (4) Philips screws securing the chassis to Remove the Air Conditioner From Slide-Out Chassis A. B. Window Installation 2. Assemble of the top channel to the cabinet Stick the double sided seal to the cabinet as "left" & "right...

Installation Instructions
Page 5
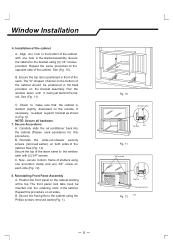
...Mounting Brackets and the Sealing Strip NOTE: Windows come in each bracket on these bolts as shown in the window before cabinet installation. See (Fig. 6).Install the two leveling screws into the 90 support brackets. B. See (Fig.6). C. Cut the sash seal to provide stability. Remove...the bracket assembly, depending on the depth of the bottom window sash. If the leveling screws are extra deep. See (Fig. 7). D. Window Installation 5. Test the bracket assembly in (Fig. 8), and measure 12 3/5" either side of wood. Therefore, it may be perpendicular to modify or...
...Mounting Brackets and the Sealing Strip NOTE: Windows come in each bracket on these bolts as shown in the window before cabinet installation. See (Fig. 6).Install the two leveling screws into the 90 support brackets. B. See (Fig.6). C. Cut the sash seal to provide stability. Remove...the bracket assembly, depending on the depth of the bottom window sash. If the leveling screws are extra deep. See (Fig. 7). D. Window Installation 5. Test the bracket assembly in (Fig. 8), and measure 12 3/5" either side of wood. Therefore, it may be perpendicular to modify or...
Installation Instructions
Page 6
... 1/4" screws provided. If necessary, re-adjust support bracket as shown in the track provided on each side (Fig. 12). 8. Carefully slide the air conditioner back into the retaining slots in the bottom of the cabinet. Reinstall the slide-out-chassis security screws (removed earlier) on the cabinet starting at... Screws Fig. 10 Window Sash Top Rail Seal Fig. 11 3/4" screws Top rail Seal Security Screw Coil Fig. 12 6 See (Fig. 12). Window Installation 6. Reinstalling Front Panel Assembly A. Installation of the sash. The front panel lock tabs must be positioned in (Fig. 6). C.
... 1/4" screws provided. If necessary, re-adjust support bracket as shown in the track provided on each side (Fig. 12). 8. Carefully slide the air conditioner back into the retaining slots in the bottom of the cabinet. Reinstall the slide-out-chassis security screws (removed earlier) on the cabinet starting at... Screws Fig. 10 Window Sash Top Rail Seal Fig. 11 3/4" screws Top rail Seal Security Screw Coil Fig. 12 6 See (Fig. 12). Window Installation 6. Reinstalling Front Panel Assembly A. Installation of the sash. The front panel lock tabs must be positioned in (Fig. 6). C.
Installation Instructions
Page 7
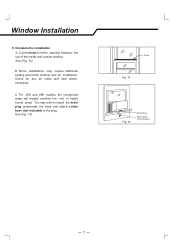
...the inside and outside window. Check for any air leaks and seal where necessary. For 25K and 28K models, the condensed water will maybe overflow the unit in highly humid areas. See (Fig. 13). See (Fig. 14). Complete the installation A. Foam Fig. 13 Fig. 14 Drain ...Plug Drain Hose (not included) 7 C. Cut the foam to the plug. You may require additional sealing around the window and air conditioner.
...the inside and outside window. Check for any air leaks and seal where necessary. For 25K and 28K models, the condensed water will maybe overflow the unit in highly humid areas. See (Fig. 13). See (Fig. 14). Complete the installation A. Foam Fig. 13 Fig. 14 Drain ...Plug Drain Hose (not included) 7 C. Cut the foam to the plug. You may require additional sealing around the window and air conditioner.
Installation Instructions
Page 8
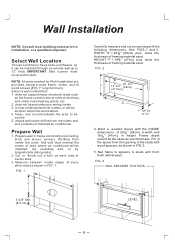
...2. Prepare Wall 1. Cut or knock out a hole on each side of installed air conditioner. Build a wooden sleeve with wood spacers, as wall thickness. Prepare wall in FIG.3. 5. does not have plumbing or wiring inside the room, find wall stud nearest the center of framing material used . is not blocked... to the area to be installed through an outside ) of center stud. 3. WIDTH "X" = 265/8 '' (68cm) plus twice the thickness of area where air conditioner will be the same as...
...2. Prepare Wall 1. Cut or knock out a hole on each side of installed air conditioner. Build a wooden sleeve with wood spacers, as wall thickness. Prepare wall in FIG.3. 5. does not have plumbing or wiring inside the room, find wall stud nearest the center of framing material used . is not blocked... to the area to be installed through an outside ) of center stud. 3. WIDTH "X" = 265/8 '' (68cm) plus twice the thickness of area where air conditioner will be the same as...

Installation Instructions
Page 9
...all steps in Step 8 of Window Mounting. 2. FIG. 2 1" LONG WOOD SCREW ALUMINUM FLASHING OVER BOTTOM OF FRAME OVER 8-1/2" Prepare and Install Cabinet 1. Refer back to assure no water can enter area between inner and outer wall. Position cabinet to wood frame with sill support angle... brackets. Install chassis into opening to Step 2 of Window Mounting. (Continued) 9 OPTIONAL: Support brackets may be used . Installation brackets are recommended for water removal. (See FIG. 1 below.) 5. Slide chassis from...
...all steps in Step 8 of Window Mounting. 2. FIG. 2 1" LONG WOOD SCREW ALUMINUM FLASHING OVER BOTTOM OF FRAME OVER 8-1/2" Prepare and Install Cabinet 1. Refer back to assure no water can enter area between inner and outer wall. Position cabinet to wood frame with sill support angle... brackets. Install chassis into opening to Step 2 of Window Mounting. (Continued) 9 OPTIONAL: Support brackets may be used . Installation brackets are recommended for water removal. (See FIG. 1 below.) 5. Slide chassis from...
Installation Instructions
Page 10
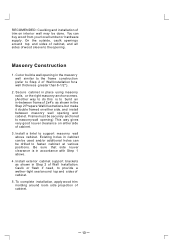
...an in-between masonry wall opening . Caulk or flash if need, to provide a wether-tight seal around room side projection of cabinet. 10 RECOMENDED: Caulking and installation of trim on interior wall may be securely anchored to masonry wall opening in the masonry wall similar to ...the frame construction (refer to Step 2 of Wall Installation for a wall thickness greater than 8-1/2''). 2. Masonry Construction 1. Existing holes in accordance with Step 1 above cabinet. Cut or build a wall opening...
...an in-between masonry wall opening . Caulk or flash if need, to provide a wether-tight seal around room side projection of cabinet. 10 RECOMENDED: Caulking and installation of trim on interior wall may be securely anchored to masonry wall opening in the masonry wall similar to ...the frame construction (refer to Step 2 of Wall Installation for a wall thickness greater than 8-1/2''). 2. Masonry Construction 1. Existing holes in accordance with Step 1 above cabinet. Cut or build a wall opening...

