
Installation Instructions (English, Español, Français)
Page 19
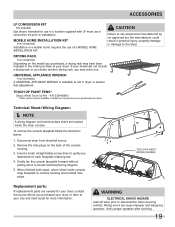
... console. Gently lay the console faceplate forward without pulling wires to your dryer or refer to access technical/wiring diagram. 5. TECH DATA SHEET/ WIRING DIAGRAM Replacement parts: If replacements parts are located inside console, snap faceplate to the dryer.
... console. Gently lay the console faceplate forward without pulling wires to your dryer or refer to access technical/wiring diagram. 5. TECH DATA SHEET/ WIRING DIAGRAM Replacement parts: If replacements parts are located inside console, snap faceplate to the dryer.

Complete Owner's Guide (English)
Page 4
... after correcting the fault. • Failure to comply with controls. • Do not sit on, step on or stand on top. Use only authorized factory parts. • Do not tamper with these warnings could result in serious personal injuries. Close supervision of potential exposure to cover every possible condition and situation... not meant to such substances. If the dryer is used near children. PREVENT INJURY AND DAMAGE TO THE DRYER • All repairs and servicing must replace the thermal limiter switch after the dryer is unpacked. Included in this Owner's Guide.
... after correcting the fault. • Failure to comply with controls. • Do not sit on, step on or stand on top. Use only authorized factory parts. • Do not tamper with these warnings could result in serious personal injuries. Close supervision of potential exposure to cover every possible condition and situation... not meant to such substances. If the dryer is used near children. PREVENT INJURY AND DAMAGE TO THE DRYER • All repairs and servicing must replace the thermal limiter switch after the dryer is unpacked. Included in this Owner's Guide.

Complete Owner's Guide (English)
Page 14
... Safety Instructions and those listed below. • Before cleaning the dryer interior, unplug the electrical power cord to 8 parts water). Or, touch residue with diluted chlorine bleach (1 part bleach to avoid electrical shock hazards. • Do not use harsh, gritty or abrasive cleansers. • If the...outdoors exhaust. They can collect lint and dust over time. IMPORTANT Clean the lint filter after every load. Remove the lint and replace the filter. • Occasionally a waxy build-up on the lint filter and/or moisture sensing bars from using dryer-added...
... Safety Instructions and those listed below. • Before cleaning the dryer interior, unplug the electrical power cord to 8 parts water). Or, touch residue with diluted chlorine bleach (1 part bleach to avoid electrical shock hazards. • Do not use harsh, gritty or abrasive cleansers. • If the...outdoors exhaust. They can collect lint and dust over time. IMPORTANT Clean the lint filter after every load. Remove the lint and replace the filter. • Occasionally a waxy build-up on the lint filter and/or moisture sensing bars from using dryer-added...

Complete Owner's Guide (English)
Page 17
... Electrolux at the addresses or phone numbers below , as measured from your original date of purchase, Electrolux will repair or replace any parts of this appliance that prove to use your appliance. 9. Obligations for appliances not in materials or workmanship when such appliance ...the factory. 10. Food loss due to repair or replace appliance light bulbs, air filters, water filters, other consumables, or knobs, handles, or other than genuine Electrolux parts or parts obtained from persons other cosmetic parts. 11. Service calls to any refrigerator or freezer failures....
... Electrolux at the addresses or phone numbers below , as measured from your original date of purchase, Electrolux will repair or replace any parts of this appliance that prove to use your appliance. 9. Obligations for appliances not in materials or workmanship when such appliance ...the factory. 10. Food loss due to repair or replace appliance light bulbs, air filters, water filters, other consumables, or knobs, handles, or other than genuine Electrolux parts or parts obtained from persons other cosmetic parts. 11. Service calls to any refrigerator or freezer failures....


