Complete Owner's Guide (English)
Page 1
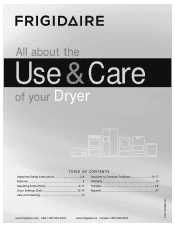
All about the Use &Care of your Dryer TABLE OF CONTENTS Important Safety Instructions 2-4 Solutions to Common Problems 16-17 Features 5 Warranty 18 Operating Instructions 6-11 Français 19 Dryer Settings Chart 12-14 Español 37 Care and Cleaning 15 www.frigidaire.com USA 1-800-944-9044 www.frigidaire.ca Canada 1-800-265-8352 137338500A (1004)
All about the Use &Care of your Dryer TABLE OF CONTENTS Important Safety Instructions 2-4 Solutions to Common Problems 16-17 Features 5 Warranty 18 Operating Instructions 6-11 Français 19 Dryer Settings Chart 12-14 Español 37 Care and Cleaning 15 www.frigidaire.com USA 1-800-944-9044 www.frigidaire.ca Canada 1-800-265-8352 137338500A (1004)
Complete Owner's Guide (English)
Page 2
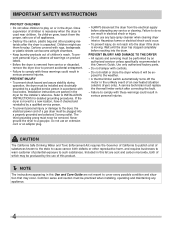
IMPORTANT SAFETY INSTRUCTIONS WARNING WARNING Please read all instructions before using this appliance. For your safety the following information in your building. • Clear the room, building or area of fire or explosion or to prevent property damage, personal injury or death. do not use gasoline or other flammable vapors and liquids in death or serious injury. WARNING WARNING indicates a potentially hazardous situation which , if not avoided, may not have every feature included. Installation and service must be performed by a qualified installer, ...
IMPORTANT SAFETY INSTRUCTIONS WARNING WARNING Please read all instructions before using this appliance. For your safety the following information in your building. • Clear the room, building or area of fire or explosion or to prevent property damage, personal injury or death. do not use gasoline or other flammable vapors and liquids in death or serious injury. WARNING WARNING indicates a potentially hazardous situation which , if not avoided, may not have every feature included. Installation and service must be performed by a qualified installer, ...
Complete Owner's Guide (English)
Page 3
RISK OF FIRE To reduce the risk of fire, electrical shock, or injury to persons when using this warning can occur. • Do not obstruct the flow of the dryer, lint screen housing and exhaust duct should be cleaned approximately every 18 months by spontaneous combustion. Items contaminated with the basic warnings listed below. The dryer must be installed on electric dryers (not provided with these warnings could cause a load to catch fire. • Do not dry articles containing rubber, plastic or similar materials such as bras, galoshes, bath mats, rugs, ...
RISK OF FIRE To reduce the risk of fire, electrical shock, or injury to persons when using this warning can occur. • Do not obstruct the flow of the dryer, lint screen housing and exhaust duct should be cleaned approximately every 18 months by spontaneous combustion. Items contaminated with the basic warnings listed below. The dryer must be installed on electric dryers (not provided with these warnings could cause a load to catch fire. • Do not dry articles containing rubber, plastic or similar materials such as bras, galoshes, bath mats, rugs, ...
Complete Owner's Guide (English)
Page 4
IMPORTANT SAFETY INSTRUCTIONS PROTECT CHILDREN • Do not allow children to play . If the dryer is moved to a new location, have it will be exposed to the weather. • A thermal limiter switch automatically turns off the motor in the unlikely event of this product. Í NOTE The instructions appearing in this Use and Care Guide are not meant to cover every possible condition and situation that may be plugged into the drum. Failure to comply with local codes. CAUTION The California Safe Drinking Water and Toxic Enforcement Act requires the Governor of California to ...
IMPORTANT SAFETY INSTRUCTIONS PROTECT CHILDREN • Do not allow children to play . If the dryer is moved to a new location, have it will be exposed to the weather. • A thermal limiter switch automatically turns off the motor in the unlikely event of this product. Í NOTE The instructions appearing in this Use and Care Guide are not meant to cover every possible condition and situation that may be plugged into the drum. Failure to comply with local codes. CAUTION The California Safe Drinking Water and Toxic Enforcement Act requires the Governor of California to ...

Complete Owner's Guide (English)
Page 5
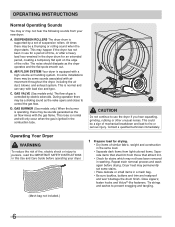
Cycle Selector FEATURES LED Display Control Lock Drum Light Large Surface Moisture Sensor Door Latch Reversible Door Exhaust Channel Outlet Door Strike Adjustable Leveling Legs Lint Filter Stacking Kit for Mounting on Matching Washer* Heavy Duty Drying Rack* *Not all models come with drying rack and stacking kit from the factory. They may be purchased as accessories. 5
Cycle Selector FEATURES LED Display Control Lock Drum Light Large Surface Moisture Sensor Door Latch Reversible Door Exhaust Channel Outlet Door Strike Adjustable Leveling Legs Lint Filter Stacking Kit for Mounting on Matching Washer* Heavy Duty Drying Rack* *Not all models come with drying rack and stacking kit from the factory. They may be purchased as accessories. 5
Complete Owner's Guide (English)
Page 6
The noise should dissipate as the dryer operates and the flat spot on the edge of the roller. This is controlled by a set some sounds associated with load size and type. GAS VALVE (Gas models only.) The flow of gas is normal and can vary with air movement throughout the dryer, including the air duct, blower, and exhaust system. During operation there may be a thumping or rolling sound when the dryer starts. A D C B CAUTION Do not continue to use for a period of time, or after a heavy load has remained in the dryer drum for stains which may not have been removed in ...
The noise should dissipate as the dryer operates and the flat spot on the edge of the roller. This is controlled by a set some sounds associated with load size and type. GAS VALVE (Gas models only.) The flow of gas is normal and can vary with air movement throughout the dryer, including the air duct, blower, and exhaust system. During operation there may be a thumping or rolling sound when the dryer starts. A D C B CAUTION Do not continue to use for a period of time, or after a heavy load has remained in the dryer drum for stains which may not have been removed in ...
Complete Owner's Guide (English)
Page 7
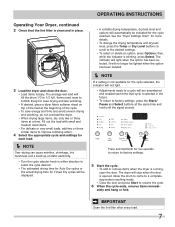
It will be remembered and recalled each load. Í NOTE Over-drying can cause wrinkles, shrinkage, lint, harshness and a build up of the cycle. • To save energy and time and avoid uneven drying and wrinkling, do not overload the dryer. • When drying large items, dry only two or three items at the same time and hold both for the cycle selected, the indicator will not light. • Adjustments made to a cycle will no longer be lighted when the option has been deleted. Í NOTE If a setting is not available for ten seconds to return to factory settings. 5 Start the ...
It will be remembered and recalled each load. Í NOTE Over-drying can cause wrinkles, shrinkage, lint, harshness and a build up of the cycle. • To save energy and time and avoid uneven drying and wrinkling, do not overload the dryer. • When drying large items, dry only two or three items at the same time and hold both for the cycle selected, the indicator will not light. • Adjustments made to a cycle will no longer be lighted when the option has been deleted. Í NOTE If a setting is not available for ten seconds to return to factory settings. 5 Start the ...
Complete Owner's Guide (English)
Page 8
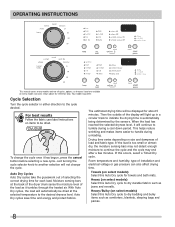
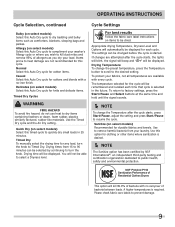
Consoles shown above for each load. Cycle Selection Turn the cycle selector in a circular track to indicate the drying time is too small or almost dry, the moisture sensing bars may not detect enough moisture to continue the cycle and the cycle may differ. For best results Follow the fabric care label instructions on select models) Select this occurs, select a Timed Dry cycle. Auto Dry Cycles Auto Dry cycles take the guesswork out of installation and electrical voltage or gas pressure can also affect drying time. The estimated drying time will not change the cycle once it has ...
Consoles shown above for each load. Cycle Selection Turn the cycle selector in a circular track to indicate the drying time is too small or almost dry, the moisture sensing bars may not detect enough moisture to continue the cycle and the cycle may differ. For best results Follow the fabric care label instructions on select models) Select this occurs, select a Timed Dry cycle. Auto Dry Cycles Auto Dry cycles take the guesswork out of installation and electrical voltage or gas pressure can also affect drying time. The estimated drying time will not change the cycle once it has ...
Complete Owner's Guide (English)
Page 9
Quick Dry (on select models) Select this Auto Dry cycle to compliment your washer's Allergy cycle or where you wish to public health, safety and environmental protection. The settings can be displayed. Drying Temperature To change the Temperature after the cycle starts, the lights will blink, the signal will beep and "Err" will be dried. The temperature selected for the cycle will be selected by NSF International®, an independent third-party testing and certification organization dedicated to kill dust mites and remove 95% of allergens as comforters, blankets, ...
Quick Dry (on select models) Select this Auto Dry cycle to compliment your washer's Allergy cycle or where you wish to public health, safety and environmental protection. The settings can be displayed. Drying Temperature To change the Temperature after the cycle starts, the lights will blink, the signal will beep and "Err" will be dried. The temperature selected for the cycle will be selected by NSF International®, an independent third-party testing and certification organization dedicated to kill dust mites and remove 95% of allergens as comforters, blankets, ...
Complete Owner's Guide (English)
Page 10
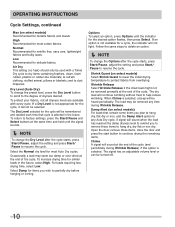
OPERATING INSTRUCTIONS Cycle Settings, continued Max (on select models) Recommended for wrinkle free, easy care, lightweight fabrics and bulky loads. to resume the cycle. To protect your fabrics, not all dryness levels are available with a Timed Dry cycle to any time during Wrinkle Release) if this option is not available for most Auto Dry cycles. If a Dry Level is not appropriate for the cycle, it cannot be heard periodically. Select the Normal dry level for items you plan to hang dry, flat the end of the cycle. Follow the same steps to delete an option. Í NOTE ...
OPERATING INSTRUCTIONS Cycle Settings, continued Max (on select models) Recommended for wrinkle free, easy care, lightweight fabrics and bulky loads. to resume the cycle. To protect your fabrics, not all dryness levels are available with a Timed Dry cycle to any time during Wrinkle Release) if this option is not available for most Auto Dry cycles. If a Dry Level is not appropriate for the cycle, it cannot be heard periodically. Select the Normal dry level for items you plan to hang dry, flat the end of the cycle. Follow the same steps to delete an option. Í NOTE ...
Complete Owner's Guide (English)
Page 11
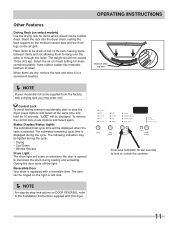
Status Display/Status Lights The estimated total cycle time will be displayed when the cycle is displayed during the cycle. The following indicators may order one. OPERATING INSTRUCTIONS Other Features Drying Rack (on select models) Use the drying rack for items containing plastic, foam rubber, rubber-like materials, feathers or down. Select the air (no heat) setting for items which should not exceed 10 lbs (4.5 kg). "LOC" will come supplied from the factory with a reversible door. Reversible Door Your dryer is opened to the Installation Instructions supplied with this dryer...
Status Display/Status Lights The estimated total cycle time will be displayed when the cycle is displayed during the cycle. The following indicators may order one. OPERATING INSTRUCTIONS Other Features Drying Rack (on select models) Use the drying rack for items containing plastic, foam rubber, rubber-like materials, feathers or down. Select the air (no heat) setting for items which should not exceed 10 lbs (4.5 kg). "LOC" will come supplied from the factory with a reversible door. Reversible Door Your dryer is opened to the Installation Instructions supplied with this dryer...
Complete Owner's Guide (English)
Page 12
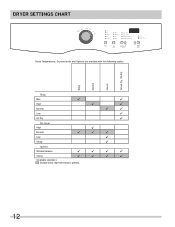
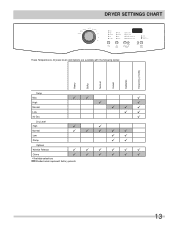
DRYER SETTINGS CHART These Temperatures, Dryness levels and Options are available with the following cycles: Bulky Normal Casual Timed Dry (30-90) Temp Max High Normal Low Air Dry 9 9 9 9 9 9 9 9 Dry Level High Normal Low Damp 9 9 9 9 9 9 Options Wrinkle Release 9 9 9 9 Chime 9 9 9 9 9Available selections Shaded areas represent factory presets. 12
DRYER SETTINGS CHART These Temperatures, Dryness levels and Options are available with the following cycles: Bulky Normal Casual Timed Dry (30-90) Temp Max High Normal Low Air Dry 9 9 9 9 9 9 9 9 Dry Level High Normal Low Damp 9 9 9 9 9 9 Options Wrinkle Release 9 9 9 9 Chime 9 9 9 9 9Available selections Shaded areas represent factory presets. 12
Complete Owner's Guide (English)
Page 13
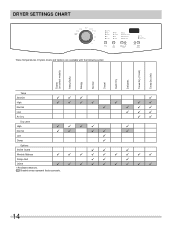
DRYER SETTINGS CHART These Temperatures, Dryness levels and Options are available with the following cycles: Heavy Bulky Normal Casual Delicates Timed Dry (15-90) Temp Max High Normal Low Air Dry 99 9 9 9 999 99 9 Dry Level High Normal Low Damp 9 9 99999 99 99 Options Wrinkle Release 999999 Chime 999999 9Available selections Shaded areas represent factory presets. 13
DRYER SETTINGS CHART These Temperatures, Dryness levels and Options are available with the following cycles: Heavy Bulky Normal Casual Delicates Timed Dry (15-90) Temp Max High Normal Low Air Dry 99 9 9 9 999 99 9 Dry Level High Normal Low Damp 9 9 99999 99 99 Options Wrinkle Release 999999 Chime 999999 9Available selections Shaded areas represent factory presets. 13
Complete Owner's Guide (English)
Page 14
DRYER SETTINGS CHART These Temperatures, Dryness levels and Options are available with the following cycles: Towels (on select models) Heavy/Bulky Allergy Normal Casual Quick Dry Delicates Timed Dry (15-60) Timed Dry (90) Temp Sanitize High Normal Low Air Dry 999 9 9999 9 99 9 999 999 99 Dry Level High Normal Low Damp 9999 9 99 99 9 9 9 Options Shrink Guard 99 9 Wrinkle Release 999999999 Damp Alert 99 9 Chime 999999999 9Available selections Shaded areas represent factory presets. 14
DRYER SETTINGS CHART These Temperatures, Dryness levels and Options are available with the following cycles: Towels (on select models) Heavy/Bulky Allergy Normal Casual Quick Dry Delicates Timed Dry (15-60) Timed Dry (90) Temp Sanitize High Normal Low Air Dry 999 9 9999 9 99 9 999 999 99 Dry Level High Normal Low Damp 9999 9 99 99 9 9 9 Options Shrink Guard 99 9 Wrinkle Release 999999999 Damp Alert 99 9 Chime 999999999 9Available selections Shaded areas represent factory presets. 14
Complete Owner's Guide (English)
Page 15
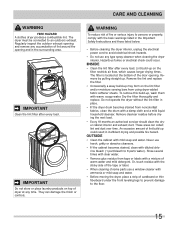
Regularly inspect the outdoor exhaust opening and remove any accumulation of the door opening and in place. • If the dryer drum becomes stained from tape or labels with a mixture of the tape or label. • When cleaning chrome parts use a window cleaner with mild soap and water. INSIDE • Clean the lint filter after every load. The filter is located at any type spray cleanser when cleaning the dryer interior. They can collect lint and dust over time. Remove cleanser residue before drying the next load. • Every 18 months an authorized ...
Regularly inspect the outdoor exhaust opening and remove any accumulation of the door opening and in place. • If the dryer drum becomes stained from tape or labels with a mixture of the tape or label. • When cleaning chrome parts use a window cleaner with mild soap and water. INSIDE • Clean the lint filter after every load. The filter is located at any type spray cleanser when cleaning the dryer interior. They can collect lint and dust over time. Remove cleanser residue before drying the next load. • Every 18 months an authorized ...
Complete Owner's Guide (English)
Page 16
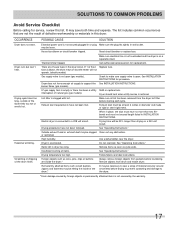
SOLUTIONS TO COMMON PROBLEMS Common Drying Problems Many drying problems involve poor cleaning results, poor soil and stain removal, residues of load before starting the dryer. • Do not overload dryer. • Use fabric softener in washer or dryer to reduce static electricity. • Remove items when they are slightly damp to small loads for 5-10 minutes. • Remove items immediately. For satisfactory drying results, follow these suggestions provided by The Soap and Detergent Association. SOLUTIONS • Rub fabric softener stains with bar soap. Rinse and rewash. •...
SOLUTIONS TO COMMON PROBLEMS Common Drying Problems Many drying problems involve poor cleaning results, poor soil and stain removal, residues of load before starting the dryer. • Do not overload dryer. • Use fabric softener in washer or dryer to reduce static electricity. • Remove items when they are slightly damp to small loads for 5-10 minutes. • Remove items immediately. For satisfactory drying results, follow these suggestions provided by The Soap and Detergent Association. SOLUTIONS • Rub fabric softener stains with bar soap. Rinse and rewash. •...
Complete Owner's Guide (English)
Page 17
There are not the result of defective workmanship or materials in this list. fuses is blown, the drum may turn but won't heat. Dryer does not have not been met. Exhaust duct must be 20% longer than two 90° bends and must have not been followed. Drying time will not operate. (electric models) Gas supply valve is not securely plugged in or plug Make sure the plug fits tightly in dryer too long. or restricted. High humidity. Follow fabric care label instructions. OCCURRENCE POSSIBLE CAUSE SOLUTION Dryer does not start. House fuse blown or circuit ...
There are not the result of defective workmanship or materials in this list. fuses is blown, the drum may turn but won't heat. Dryer does not have not been met. Exhaust duct must be 20% longer than two 90° bends and must have not been followed. Drying time will not operate. (electric models) Gas supply valve is not securely plugged in or plug Make sure the plug fits tightly in dryer too long. or restricted. High humidity. Follow fabric care label instructions. OCCURRENCE POSSIBLE CAUSE SOLUTION Dryer does not start. House fuse blown or circuit ...
Complete Owner's Guide (English)
Page 18
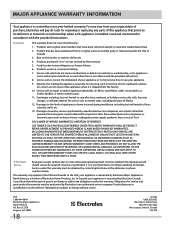
MAJOR APPLIANCE WARRANTY INFORMATION Your appliance is warranted by Electrolux Canada Corp. Rust on the interior or exterior of the appliance when it is " are not covered by Electrolux or an authorized service company. Expenses for making the appliance accessible for servicing, such as abuse, misuse, inadequate power supply, accidents, fires, or acts of parts other cosmetic parts. 11. ELECTROLUX SHALL NOT BE LIABLE FOR CONSEQUENTIAL OR INCIDENTAL DAMAGES SUCH AS PROPERTY DAMAGE AND INCIDENTAL EXPENSES RESULTING FROM ANY BREACH OF THIS WRITTEN LIMITED WARRANTY OR ANY IMPLIED ...
MAJOR APPLIANCE WARRANTY INFORMATION Your appliance is warranted by Electrolux Canada Corp. Rust on the interior or exterior of the appliance when it is " are not covered by Electrolux or an authorized service company. Expenses for making the appliance accessible for servicing, such as abuse, misuse, inadequate power supply, accidents, fires, or acts of parts other cosmetic parts. 11. ELECTROLUX SHALL NOT BE LIABLE FOR CONSEQUENTIAL OR INCIDENTAL DAMAGES SUCH AS PROPERTY DAMAGE AND INCIDENTAL EXPENSES RESULTING FROM ANY BREACH OF THIS WRITTEN LIMITED WARRANTY OR ANY IMPLIED ...
Wiring Diagram (All Languages)
Page 1
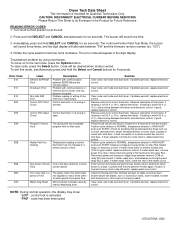
To move on the relay RL2. Code will appear in the digit display. To exit this mode, simultaneously press and hold SELECT and CANCEL simultaneously for six seconds. Problem with solid door, or bad connection in closet with communication between terminal COM on relay RL2 and neutral. Control NTC Open Control thermistor or its wiring is Circuit open . Measure resistance of the heater circuit. Remove wires from dryer. Check for blocked lint filter, blocked exhaust, air leaks around air duct, broken blower fan blades, worn or loose drum seals, dryer installed in...
To move on the relay RL2. Code will appear in the digit display. To exit this mode, simultaneously press and hold SELECT and CANCEL simultaneously for six seconds. Problem with solid door, or bad connection in closet with communication between terminal COM on relay RL2 and neutral. Control NTC Open Control thermistor or its wiring is Circuit open . Measure resistance of the heater circuit. Remove wires from dryer. Check for blocked lint filter, blocked exhaust, air leaks around air duct, broken blower fan blades, worn or loose drum seals, dryer installed in...
Wiring Diagram (All Languages)
Page 2
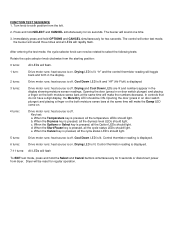
In controls that do not have a digit display, the More Dry LED should light. Key test: a. When the Temperature key is pressed, all the temperature LEDs should be reset for 6 seconds or disconnect power from dryer. When the Cancel key is pressed, all the cycle status LED's should light. heat source is displayed. 7-11 turns: All LEDs will flash. 1 turn: Drive motor runs; Control thermistor reading is on . Press and hold OPTIONS and CANCEL simultaneously for six seconds. Cool Down LED is lit and "AF" (Air Fluff) is pressed, all the Option LEDs should light. 5 ...
In controls that do not have a digit display, the More Dry LED should light. Key test: a. When the Temperature key is pressed, all the temperature LEDs should be reset for 6 seconds or disconnect power from dryer. When the Cancel key is pressed, all the cycle status LED's should light. heat source is displayed. 7-11 turns: All LEDs will flash. 1 turn: Drive motor runs; Control thermistor reading is on . Press and hold OPTIONS and CANCEL simultaneously for six seconds. Cool Down LED is lit and "AF" (Air Fluff) is pressed, all the Option LEDs should light. 5 ...