
Installation Instructions (All Languages)
Page 2
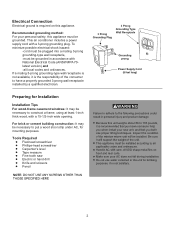
... in accordance with a 3-prong grounding plug. Handle AC with a 15-1/2-inch wide opening. Electrical Connection Electrical ground is required on front and rear coils. This air conditioner includes a power supply cord with National Electrical Code (ANSI/NFPA 70latest version) and -all applicable codes and ordinances.
... in accordance with a 3-prong grounding plug. Handle AC with a 15-1/2-inch wide opening. Electrical Connection Electrical ground is required on front and rear coils. This air conditioner includes a power supply cord with National Electrical Code (ANSI/NFPA 70latest version) and -all applicable codes and ordinances.
Installation Instructions (All Languages)
Page 4
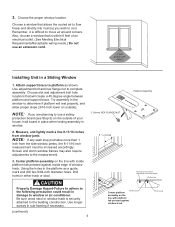
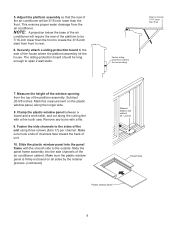
... 3. NOTE: If any sash stop protrudes more than 1 inch from window jamb. Be sure wood stool or window track is difficult to window or air conditioner. Measure, and lightly mark a line 8-11/16 inches from the side window jambs, the 8-11/16-inch measurement must be increased accordingly. Screen ... to complete assembly. Use longer screws in the platform as shown. Choose slot and adjustment bolt hole locations that allows the cooled air to flow freely and directly into room(s) you are planning to use an extension cord. 6 foot power cord reach Installing Unit in damage to move...
... 3. NOTE: If any sash stop protrudes more than 1 inch from window jamb. Be sure wood stool or window track is difficult to window or air conditioner. Measure, and lightly mark a line 8-11/16 inches from the side window jambs, the 8-11/16-inch measurement must be increased accordingly. Screen ... to complete assembly. Use longer screws in the platform as shown. Choose slot and adjustment bolt hole locations that allows the cooled air to flow freely and directly into room(s) you are planning to use an extension cord. 6 foot power cord reach Installing Unit in damage to move...
Installation Instructions (All Languages)
Page 5
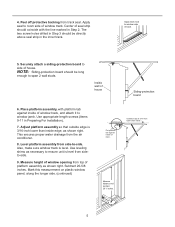
...). 7. This ensures proper water drainage from track seal. Subtract 20-5/8 inches. Apply track seal to -side. Peel off protective backing from the air conditioner. 8. Securely attach a siding-protection board to room side of house. Apply seal to side of window track. Adjust platform assembly so that outside edge is level. Inside wall of...
...). 7. This ensures proper water drainage from track seal. Subtract 20-5/8 inches. Apply track seal to -side. Peel off protective backing from the air conditioner. 8. Securely attach a siding-protection board to room side of house. Apply seal to side of window track. Adjust platform assembly so that outside edge is level. Inside wall of...
Installation Instructions (All Languages)
Page 7
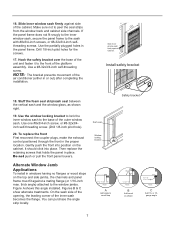
...must fit against a mating flange (or 1/16-inch max. thick angle) attached to wood stop Safety bracket Flush Room B Add wood as shown right. 19. You can purchase the angle strip locally. Use a #8-32x3/4-inch self...Cabinet. Stuff the foam seal strip/sash seal between the vertical sash and the window glass, as shown Room C Add 16- Gently push the front into place. Then replace the retaining screws that holds the panel ... the sash side of the opening, the leading corner of the air conditioner (either in place. Sash seal Window locking bracket Room A Add angle to the window jambs.
...must fit against a mating flange (or 1/16-inch max. thick angle) attached to wood stop Safety bracket Flush Room B Add wood as shown right. 19. You can purchase the angle strip locally. Use a #8-32x3/4-inch self...Cabinet. Stuff the foam seal strip/sash seal between the vertical sash and the window glass, as shown Room C Add 16- Gently push the front into place. Then replace the retaining screws that holds the panel ... the sash side of the opening, the leading corner of the air conditioner (either in place. Sash seal Window locking bracket Room A Add angle to the window jambs.
Installation Instructions (All Languages)
Page 9
... on all sides by the retainer grooves. (continued) Measure distance and subtract 20 /5 8 inches. NOTE: A projection below the base of the air conditioner will be 3/16-inch lower than the front. Remove any burrs with the smooth side to rear. 6. Slide the panel frame assembly into the ... assembly. Subtract 20-5/8 inches. Fasten the side channels to span 2 wall studs. Adjust the platform assembly so that the rear of the air conditioner will require the rear of the house where the platform assembly hit the house. Securely attach a siding-protection board to the side of the...
... on all sides by the retainer grooves. (continued) Measure distance and subtract 20 /5 8 inches. NOTE: A projection below the base of the air conditioner will be 3/16-inch lower than the front. Remove any burrs with the smooth side to rear. 6. Slide the panel frame assembly into the ... assembly. Subtract 20-5/8 inches. Fasten the side channels to span 2 wall studs. Adjust the platform assembly so that the rear of the air conditioner will require the rear of the house where the platform assembly hit the house. Securely attach a siding-protection board to the side of the...
Installation Instructions (All Languages)
Page 10
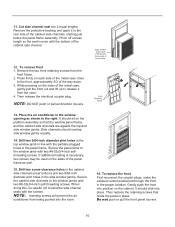
.... 12. To replace the front First reconnect the coupler plugs, make the exhaust control positioned through the front in the side window jambs. Place the air conditioner in the window opening as well. 15. It should sit on each side of the metal case close to the window jambs with the screws.... If additional holding is even with the bottom of the way down. 3. Gently push the front into the room. 16. Pinch off excess length so the seal is necessary, two screws may be careful not to the window jamb with the partially plugged holes...
.... 12. To replace the front First reconnect the coupler plugs, make the exhaust control positioned through the front in the side window jambs. Place the air conditioner in the window opening as well. 15. It should sit on each side of the metal case close to the window jambs with the screws.... If additional holding is even with the bottom of the way down. 3. Gently push the front into the room. 16. Pinch off excess length so the seal is necessary, two screws may be careful not to the window jamb with the partially plugged holes...


