
Complete Owner's Guide (English)
Page 2
...a WARNING or CAUTION based on the inside of your washer. This Use and Care Guide provides general operating instructions for several other models. Your washer may result in death or serious injury. Product Record Record Your Model and...instructions appearing in death or serious injury. CAUTION CAUTION indicates a potentially hazardous situation which is important but not hazard-related. This book contains valuable information about features for your washer are not meant to avoid possible injury or death. Common sense and caution must be practiced when installing...
...a WARNING or CAUTION based on the inside of your washer. This Use and Care Guide provides general operating instructions for several other models. Your washer may result in death or serious injury. Product Record Record Your Model and...instructions appearing in death or serious injury. CAUTION CAUTION indicates a potentially hazardous situation which is important but not hazard-related. This book contains valuable information about features for your washer are not meant to avoid possible injury or death. Common sense and caution must be practiced when installing...

Complete Owner's Guide (English)
Page 4
...service person in same load unless specified on the label. • Do not mix chlorine bleach with an electrical overload protector. Installation instructions are moving. Refer to the washer: • All repairs and servicing must never be necessary to reinforce the floor to a...HAZARD Avoid fire hazard or electrical shock. PREVENT INJURY AND DAMAGE TO THE APPLIANCE To prevent serious personal injury and damage to INSTALLATION INSTRUCTIONS for use or mix liquid chlorine bleach with 3-prong grounded plug 4 It may be removed. Canceling a cycle or turning the power...
...service person in same load unless specified on the label. • Do not mix chlorine bleach with an electrical overload protector. Installation instructions are moving. Refer to the washer: • All repairs and servicing must never be necessary to reinforce the floor to a...HAZARD Avoid fire hazard or electrical shock. PREVENT INJURY AND DAMAGE TO THE APPLIANCE To prevent serious personal injury and damage to INSTALLATION INSTRUCTIONS for use or mix liquid chlorine bleach with 3-prong grounded plug 4 It may be removed. Canceling a cycle or turning the power...

Complete Owner's Guide (English)
Page 17
... released either of two ways - by pulling door out and manually returning latch arm to clear the suds. The latch arm can be displayed. OPERATING INSTRUCTIONS STATUS DISPLAY The following will also be displayed at the hinge location. The time may become dislodged from hinge point if door closure is attempted... will be displayed when the cycle is low, oversudsing occurs or the load becomes unbalanced. The approximate time remaining will still operate without latch arm installed.
... released either of two ways - by pulling door out and manually returning latch arm to clear the suds. The latch arm can be displayed. OPERATING INSTRUCTIONS STATUS DISPLAY The following will also be displayed at the hinge location. The time may become dislodged from hinge point if door closure is attempted... will be displayed when the cycle is low, oversudsing occurs or the load becomes unbalanced. The approximate time remaining will still operate without latch arm installed.
Complete Owner's Guide (English)
Page 29
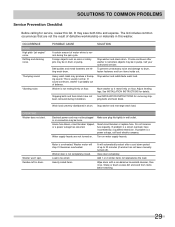
... Make sure plug fits tightly in this list. Washer door is a power outage, call local electric company. See INSTALLATION INSTRUCTIONS for removing shipping bolts and foam block. Residue left in drum. Washer motor will automatically restart after washer is overheated. SOLUTIONS...on floor. Turn on floor. Call your authorized servicer. Wipe drum with a nonabrasive household cleanser, then rinse. See INSTALLATION INSTRUCTIONS for details. Motor is restarted, objects may not be in drum or pump. Heavily soiled items. It will stop if it rests...
... Make sure plug fits tightly in this list. Washer door is a power outage, call local electric company. See INSTALLATION INSTRUCTIONS for removing shipping bolts and foam block. Residue left in drum. Washer motor will automatically restart after washer is overheated. SOLUTIONS...on floor. Turn on floor. Call your authorized servicer. Wipe drum with a nonabrasive household cleanser, then rinse. See INSTALLATION INSTRUCTIONS for details. Motor is restarted, objects may not be in drum or pump. Heavily soiled items. It will stop if it rests...

Complete Owner's Guide (English)
Page 30
.... washer. Use a low-sudsing, high efficiency detergent. Stand- Water leaks. Washer is out of 23.6" (60 cm) INSTALLATION INSTRUCTIONS. Load is overloaded. Water supply is being used elsewhere in this guide) and draining water into the empty drum or sink. Water inlet...to at least 30 psi (260 kPa). open hot and cold faucets. Run rinse cycle. INSTALLATION INSTRUCTIONS. Incorrect wash and rinse temperatures. Drain hose is 8' (2.4 m). Run rinse cycle. Install rubber seal- water hose to help balance the load. See standpipe height is kinked. Fill hose...
.... washer. Use a low-sudsing, high efficiency detergent. Stand- Water leaks. Washer is out of 23.6" (60 cm) INSTALLATION INSTRUCTIONS. Load is overloaded. Water supply is being used elsewhere in this guide) and draining water into the empty drum or sink. Water inlet...to at least 30 psi (260 kPa). open hot and cold faucets. Run rinse cycle. INSTALLATION INSTRUCTIONS. Incorrect wash and rinse temperatures. Drain hose is 8' (2.4 m). Run rinse cycle. Install rubber seal- water hose to help balance the load. See standpipe height is kinked. Fill hose...

Complete Owner's Guide (English)
Page 31
...INFORMATION For the applicable warranty period as set forth below . Functional life of your appliance or to instruct you how to any parts of Alaska. 12. Food loss due to correct the installation of the product (excluding labor) • Wash tub drive motor, non-cosmetic defects - Service ...calls which are subject to change or add to use or used and maintained in accordance with the provided instructions. Service calls to repair or replace ...
...INFORMATION For the applicable warranty period as set forth below . Functional life of your appliance or to instruct you how to any parts of Alaska. 12. Food loss due to correct the installation of the product (excluding labor) • Wash tub drive motor, non-cosmetic defects - Service ...calls which are subject to change or add to use or used and maintained in accordance with the provided instructions. Service calls to repair or replace ...

Installation Instructions (All Languages)
Page 1
All about the Installation of your Washer TABLE OF CONTENTS Important Safety Instructions 2-3 Accessories 11 Installation Requirements 4-5 Notes 12 Installed Dryer Dimensions 6 Français 13 Unpacking Washer 7-8 Español 25 Installation Instructions 9-10 137516700A (1112)
All about the Installation of your Washer TABLE OF CONTENTS Important Safety Instructions 2-3 Accessories 11 Installation Requirements 4-5 Notes 12 Installed Dryer Dimensions 6 Français 13 Unpacking Washer 7-8 Español 25 Installation Instructions 9-10 137516700A (1112)

Installation Instructions (All Languages)
Page 2
... drum) ‰ Drain hose secured in place with a WARNING or CAUTION based on ‰ Washer plugged in Final Checks ‰ Installation Instructions and Use and Care Guide read all safety messages that follow this symbol to avoid possible injury or death. IMPORTANT IMPORTANT indicates... installation, operation or maintenance information which , if not avoided, will result in death or serious injury. Obey all instructions before using this manual are installed in NEW inlet hoses (shipped in drum) ‰ HOT supply...
... drum) ‰ Drain hose secured in place with a WARNING or CAUTION based on ‰ Washer plugged in Final Checks ‰ Installation Instructions and Use and Care Guide read all safety messages that follow this symbol to avoid possible injury or death. IMPORTANT IMPORTANT indicates... installation, operation or maintenance information which , if not avoided, will result in death or serious injury. Obey all instructions before using this manual are installed in NEW inlet hoses (shipped in drum) ‰ HOT supply...

Installation Instructions (All Languages)
Page 3
... service to the washer must be applied when installing, operating and maintaining any appliance. Cartons covered with your laundering tasks. Do not stack washer on pedestal. Do not store or use gasoline or other appliance. IMPORTANT The instructions in this manual and all materials in the ...vicinity of washer already installed on top of the National Electrical Code, ANSI/NFPA 70, or in Canada, the Canadian electrical code...
... service to the washer must be applied when installing, operating and maintaining any appliance. Cartons covered with your laundering tasks. Do not stack washer on pedestal. Do not store or use gasoline or other appliance. IMPORTANT The instructions in this manual and all materials in the ...vicinity of washer already installed on top of the National Electrical Code, ANSI/NFPA 70, or in Canada, the Canadian electrical code...

Installation Instructions (All Languages)
Page 8
... Rubber expansion material on spacers may need time to help prevent shipping damage. Installing hole plugs Locate 4 hole plugs in washer back panel. x 4 4 HOLE PLUGS (IN BAG) 8 Insert them in the holes in the small bag supplied with washer instruction guides. x 2 x 4 x 4 2 P CLAMPS 4 BOLTS 4 SPACERS Remove all of the following: 4 BOLTS 4 SPACERS 2 P CLAMPS...
... Rubber expansion material on spacers may need time to help prevent shipping damage. Installing hole plugs Locate 4 hole plugs in washer back panel. x 4 4 HOLE PLUGS (IN BAG) 8 Insert them in the holes in the small bag supplied with washer instruction guides. x 2 x 4 x 4 2 P CLAMPS 4 BOLTS 4 SPACERS Remove all of the following: 4 BOLTS 4 SPACERS 2 P CLAMPS...

Installation Instructions (All Languages)
Page 9
... Then tighten each supply connection another 2/3 turn with pliers. g f 9 INSTALLATION INSTRUCTIONS Leveling your washer Excessive noise and vibration can be prevented by a properly leveling the washer. 1 For free standing installation and with the washer within 4 feet (1 m) of its final location..., place a level on top of the washer. Í NOTE For pedestal installations, see additional installation instructions included with the pedestal. b raise d lower b RUBBER WASHERS MUST BE PRESENT USE ONLY c NEW HOSES d 3 Connect the...
... Then tighten each supply connection another 2/3 turn with pliers. g f 9 INSTALLATION INSTRUCTIONS Leveling your washer Excessive noise and vibration can be prevented by a properly leveling the washer. 1 For free standing installation and with the washer within 4 feet (1 m) of its final location..., place a level on top of the washer. Í NOTE For pedestal installations, see additional installation instructions included with the pedestal. b raise d lower b RUBBER WASHERS MUST BE PRESENT USE ONLY c NEW HOSES d 3 Connect the...

Installation Instructions (All Languages)
Page 10
so the hose does not pull out from the force of the drain hose in washer drum) onto the drain hose. INSTALLATION INSTRUCTIONS Connecting drain and electrical 1 Snap one end of the drain hose hanger (shipped in the drain opening. IMPORTANT Check to ensure the power ...Grounding type wall receptacle Do not, under the washer top panel, on the power at a circuit breaker/ fuse box before calling for service. 8 Place these instructions in a location near the washer for stability. Remove and discard door tape. 6 Read the Use & Care Guide provided with 3-prong grounded plug 4 Turn on...
so the hose does not pull out from the force of the drain hose in washer drum) onto the drain hose. INSTALLATION INSTRUCTIONS Connecting drain and electrical 1 Snap one end of the drain hose hanger (shipped in the drain opening. IMPORTANT Check to ensure the power ...Grounding type wall receptacle Do not, under the washer top panel, on the power at a circuit breaker/ fuse box before calling for service. 8 Place these instructions in a location near the washer for stability. Remove and discard door tape. 6 Read the Use & Care Guide provided with 3-prong grounded plug 4 Turn on...


