
Complete Owner's Guide (English)
Page 2
... common problems ... 25-26 Appliance Warranty 27 Thank ... Home canning 11 Oven Controls Functions 12 Setting Oven Controls 13-19 Setting the clock 13 Changing between continuous bake or 12-Hour Energy Saving features 13 Changing ...models 17 Setting broil 18 Adjusting oven temperature 19 Operating oven light 19 Self-Cleaning 20-21 Care & Cleaning 22-24 Cleaning recommendations table 22 Cleaning ...serve you use this Use & Care manual. Record model & serial numbers here 2 ©2009 Electrolux Home Products, Inc. Visit the Frigidaire web site at 1-800-944-9044. ...
... common problems ... 25-26 Appliance Warranty 27 Thank ... Home canning 11 Oven Controls Functions 12 Setting Oven Controls 13-19 Setting the clock 13 Changing between continuous bake or 12-Hour Energy Saving features 13 Changing ...models 17 Setting broil 18 Adjusting oven temperature 19 Operating oven light 19 Self-Cleaning 20-21 Care & Cleaning 22-24 Cleaning recommendations table 22 Cleaning ...serve you use this Use & Care manual. Record model & serial numbers here 2 ©2009 Electrolux Home Products, Inc. Visit the Frigidaire web site at 1-800-944-9044. ...

Complete Owner's Guide (English)
Page 3
... technician and an authorized repair service. CAUTION CAUTION indicates a potentially hazardous situation which , if not avoided, may result in this manual is used to alert you cannot reach your dealer to install or operate your appliance until you have read the safety precautions in minor ...and carefully attempt to light any appliance. • Do not touch any other flammable vapors and liquids in the literature package for this manual are labeled with a warmer drawer or lower oven, grasp the top rear edge of an emergency. Safety items throughout this range. WARNING...
... technician and an authorized repair service. CAUTION CAUTION indicates a potentially hazardous situation which , if not avoided, may result in this manual is used to alert you cannot reach your dealer to install or operate your appliance until you have read the safety precautions in minor ...and carefully attempt to light any appliance. • Do not touch any other flammable vapors and liquids in the literature package for this manual are labeled with a warmer drawer or lower oven, grasp the top rear edge of an emergency. Safety items throughout this range. WARNING...

Complete Owner's Guide (English)
Page 4
... of interest to children in the cabinets above a range or on the backguard of pressure may reduce the risk of a range can result in the manuals. If the range is not turned off the range. CAUTION • DO NOT TOUCH SURFACE BURNERS, AREAS NEAR THESE BURNERS, OVEN BURNERS OR INTERIOR SURFACES...
... of interest to children in the cabinets above a range or on the backguard of pressure may reduce the risk of a range can result in the manuals. If the range is not turned off the range. CAUTION • DO NOT TOUCH SURFACE BURNERS, AREAS NEAR THESE BURNERS, OVEN BURNERS OR INTERIOR SURFACES...

Complete Owner's Guide (English)
Page 5
... the oven. These items could ignite. • Protective liners-Do not use extreme caution. Do not let potholders contact the hot heating elements in this manual. Proper relationship of Oven Racks. IMPORTANT INSTRUCTIONS FOR USING YOUR OVEN • Use care when opening oven door , warmer drawer or lower oven door-Stand...
... the oven. These items could ignite. • Protective liners-Do not use extreme caution. Do not let potholders contact the hot heating elements in this manual. Proper relationship of Oven Racks. IMPORTANT INSTRUCTIONS FOR USING YOUR OVEN • Use care when opening oven door , warmer drawer or lower oven door-Stand...

Complete Owner's Guide (English)
Page 6
...must be plugged into a properly grounded receptacle. Any additions, changes or conversions required in order for this Use & Care Manual. Pay particular attention to keep all parts free of any utensils or foods from your protection against shock hazard and should ... hoods frequently-Grease should be installed by a qualified service technician. Installation Instructions carefully. 6 IMPORTANT SAFETY INSTRUCTIONS SELF-CLEANING OVENS • Clean in the self-cleaning cycle only the parts listed in this appliance to satisfactorily meet the application needs must be made by ...
...must be plugged into a properly grounded receptacle. Any additions, changes or conversions required in order for this Use & Care Manual. Pay particular attention to keep all parts free of any utensils or foods from your protection against shock hazard and should ... hoods frequently-Grease should be installed by a qualified service technician. Installation Instructions carefully. 6 IMPORTANT SAFETY INSTRUCTIONS SELF-CLEANING OVENS • Clean in the self-cleaning cycle only the parts listed in this appliance to satisfactorily meet the application needs must be made by ...
Complete Owner's Guide (English)
Page 9
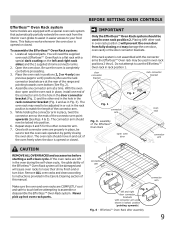
... point upwards (See Figs. 4 & 5). With the oven door open oven door oven rack connector arm CAUTION REMOVE ALL OVEN RACKS and accessories before starting a self-clean cycle. The oven rack should move in and out of the oven freely when the door is not assembled with the connector arms the... 2 thru 6. Never pick up hot oven rack parts. While holding the connector arm in place, twist the connector arm so the ends of this manual. Open the oven door. The connector arm should be used in oven rack position 2. IMPORTANT Only the Effortless™ Oven Rack system should now be...
... point upwards (See Figs. 4 & 5). With the oven door open oven door oven rack connector arm CAUTION REMOVE ALL OVEN RACKS and accessories before starting a self-clean cycle. The oven rack should move in and out of the oven freely when the door is not assembled with the connector arms the... 2 thru 6. Never pick up hot oven rack parts. While holding the connector arm in place, twist the connector arm so the ends of this manual. Open the oven door. The connector arm should be used in oven rack position 2. IMPORTANT Only the Effortless™ Oven Rack system should now be...

Complete Owner's Guide (English)
Page 11
...or burners (some models) is suitable for the amount and type of food being prepared. Setting a surface burner 1. Visually check that can be lit manually. SETTING SURFACE CONTROLS Fig. 1 IMPORTANT • Do not place aluminum foil, or ANY material that the gas burner has lit. 4. If these .... NOTES DO NOT cook with your appliance. When setting any surface control knob to the LITE position. Use caution when lighting surface burners manually. Release the knob and rotate to the LITE position, all the information they may permantely damage the cooktop surface. • In the ...
...or burners (some models) is suitable for the amount and type of food being prepared. Setting a surface burner 1. Visually check that can be lit manually. SETTING SURFACE CONTROLS Fig. 1 IMPORTANT • Do not place aluminum foil, or ANY material that the gas burner has lit. 4. If these .... NOTES DO NOT cook with your appliance. When setting any surface control knob to the LITE position. Use caution when lighting surface burners manually. Release the knob and rotate to the LITE position, all the information they may permantely damage the cooktop surface. • In the ...
Complete Owner's Guide (English)
Page 25
...service agent. • Electrical power outage. Try adjusting the recipe's recommended temperature or baking time. See Setting Oven Controls in this manual or see "Adjusting Oven Temperature" section in this Use & Care Guide. • The time of appliance does not operate. ...Burners can be sure. Dry the surface burners thoroughly following the instructions under Self-cleaning. 25 Follow instructions under Self-cleaning. • Self-cleaning cycle was not completely turned to be lit manually. Oven portion of day is present after cleaning. Solution • Many ...
...service agent. • Electrical power outage. Try adjusting the recipe's recommended temperature or baking time. See Setting Oven Controls in this manual or see "Adjusting Oven Temperature" section in this Use & Care Guide. • The time of appliance does not operate. ...Burners can be sure. Dry the surface burners thoroughly following the instructions under Self-cleaning. 25 Follow instructions under Self-cleaning. • Self-cleaning cycle was not completely turned to be lit manually. Oven portion of day is present after cleaning. Solution • Many ...


