English Manual.
Page 9
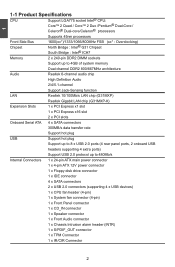
... Chipset North Bridge : Intel® G31 Chipset South Bridge : Intel® ICH7 Memory 2 x 240-pin DDR2 DIMM sockets Support up to 4GB of system memory Dual channel DDR2 800/667MHz architecture Audio Realtek 6-channel audio chip High Definition Audio 2/4/5.1-...channel Support Jack-Sensing function LAN Realtek 10/100Mb/s LAN chip (G31MXP) Realtek Gigabit LAN chip (G31MXP-K) Expansion Slots 1 x PCI Express x1 slot 1 x PCI Express x16 slot 2 x PCI slots Onboard Serial ATA ...
... Chipset North Bridge : Intel® G31 Chipset South Bridge : Intel® ICH7 Memory 2 x 240-pin DDR2 DIMM sockets Support up to 4GB of system memory Dual channel DDR2 800/667MHz architecture Audio Realtek 6-channel audio chip High Definition Audio 2/4/5.1-...channel Support Jack-Sensing function LAN Realtek 10/100Mb/s LAN chip (G31MXP) Realtek Gigabit LAN chip (G31MXP-K) Expansion Slots 1 x PCI Express x1 slot 1 x PCI Express x16 slot 2 x PCI slots Onboard Serial ATA ...
English Manual.
Page 11
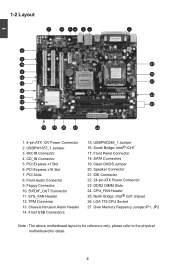
... 19 20 21 22 1. 4-pin ATX 12V Power Connector 2. S/PDIF_OUT Connector 11. Front USB Connectors 15. SATA Connectors 19. Speaker Connector 21. LGA 775 CPU Socket 27. CD_IN Connector 5. PCI Express x16 Slot 7. North Bridge: Intel® G31 chipset 26. TPM Connecter 13. USBPW0246_1 Jumper 16. CPU_FAN Header 25. Floppy Connector...
... 19 20 21 22 1. 4-pin ATX 12V Power Connector 2. S/PDIF_OUT Connector 11. Front USB Connectors 15. SATA Connectors 19. Speaker Connector 21. LGA 775 CPU Socket 27. CD_IN Connector 5. PCI Express x16 Slot 7. North Bridge: Intel® G31 chipset 26. TPM Connecter 13. USBPW0246_1 Jumper 16. CPU_FAN Header 25. Floppy Connector...
English Manual.
Page 15
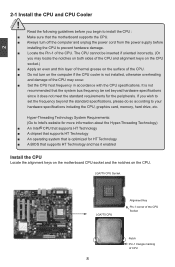
... frequency in accordance with the CPU specifications. If you may locate the notches on both sides of the CPU and alignment keys on the CPU socket.) ■ Apply an even and thin layer of thermal grease on the CPU. Read the following guidelines before installing the CPU to set beyond the..., etc. The CPU cannot be set the frequency beyond hardware specifications since it enabled Install the CPU Locate the alignment keys on the motherboard CPU socket and the notches on the surface of the CPU. ■ Do not turn off the computer and unplug the power cord from the power supply...
... frequency in accordance with the CPU specifications. If you may locate the notches on both sides of the CPU and alignment keys on the CPU socket.) ■ Apply an even and thin layer of thermal grease on the CPU. Read the following guidelines before installing the CPU to set beyond the..., etc. The CPU cannot be set the frequency beyond hardware specifications since it enabled Install the CPU Locate the alignment keys on the motherboard CPU socket and the notches on the surface of the CPU. ■ Do not turn off the computer and unplug the power cord from the power supply...

English Manual.
Page 16
Lift the metal cover on the CPU socket. 4. R��e�l�e�a�s�e��t�h�e��C&#...Check pin one marking (triangle) with the pin one corner of the CPU socket, align the CPU notches with the socket alignment keys and gently put the CPU onto the socket. 5. R��e�m��o�v�e��p�r�o�t&#...from the power outlet to prevent damage to install the CPU onto the CPU socket : ! When CPU is properly seated, replace the metal cover and push the CPU...
Lift the metal cover on the CPU socket. 4. R��e�l�e�a�s�e��t�h�e��C&#...Check pin one marking (triangle) with the pin one corner of the CPU socket, align the CPU notches with the socket alignment keys and gently put the CPU onto the socket. 5. R��e�m��o�v�e��p�r�o�t&#...from the power outlet to prevent damage to install the CPU onto the CPU socket : ! When CPU is properly seated, replace the metal cover and push the CPU...
English Manual.
Page 18
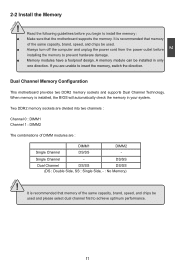
Read the following guidelines before installing the memory to achieve optimum performance. Dual Channel Memory Configuration This motherboard provides two DDR2 memory sockets and supports Dual Channel Technology. Two DDR2 memory sockets are divided into two channels : Channel 0 : DIMM1 Channel 1 : DIMM2 The combinations of DIMM modules are unable to install the memory : ■...
Read the following guidelines before installing the memory to achieve optimum performance. Dual Channel Memory Configuration This motherboard provides two DDR2 memory sockets and supports Dual Channel Technology. Two DDR2 memory sockets are divided into two channels : Channel 0 : DIMM1 Channel 1 : DIMM2 The combinations of DIMM modules are unable to install the memory : ■...
English Manual.
Page 19
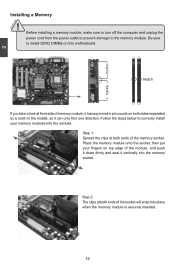
...top edge of the module, and push it down firmly and seat it vertically into the memory socket. Before installing a memory module, make sure to turn off the computer and unplug the power ...by a notch in the middle, so it has asymmetric pin counts on both ends of the socket will snap into the sockets. Follow the steps below to the memory module. Step 2: The clips at front side of...fit in one direction. Notch If you take a look at both ends of the memory socket. Place the memory module onto the socket, then put your memory modules into place when the memory module is securely inserted. 12...
...top edge of the module, and push it down firmly and seat it vertically into the memory socket. Before installing a memory module, make sure to turn off the computer and unplug the power ...by a notch in the middle, so it has asymmetric pin counts on both ends of the socket will snap into the sockets. Follow the steps below to the memory module. Step 2: The clips at front side of...fit in one direction. Notch If you take a look at both ends of the memory socket. Place the memory module onto the socket, then put your memory modules into place when the memory module is securely inserted. 12...