

User Guide
Page 8
...connections for leaks. The cap prevents water leaking from Fisher & Paykel) MUST be connected to the cold. 1 Faucet end of hose 2 Washer end of installation. (See diagram 2). 3 Turn on the corner cabinets, then fit the rubber leveling inserts (refer to diagram 1). Check that it sits slightly forward of the.... Readjust the feet if necessary. 6 Open the lid and check the washer tub to both hot and cold water. Corner cabinets Adjustable feet Rubber insert Diagram 1 1" (25mm) 1" (25mm) 2 Move the washer into its final position. We suggest a minimum clearance of 1" (25mm) on each side ...
...connections for leaks. The cap prevents water leaking from Fisher & Paykel) MUST be connected to the cold. 1 Faucet end of hose 2 Washer end of installation. (See diagram 2). 3 Turn on the corner cabinets, then fit the rubber leveling inserts (refer to diagram 1). Check that it sits slightly forward of the.... Readjust the feet if necessary. 6 Open the lid and check the washer tub to both hot and cold water. Corner cabinets Adjustable feet Rubber insert Diagram 1 1" (25mm) 1" (25mm) 2 Move the washer into its final position. We suggest a minimum clearance of 1" (25mm) on each side ...

User Guide
Page 18
... and special-care fabrics with normal soil and clothes which wrinkle easily. A more traditional wash for normally soiled knits and machine washable woollens. The following diagrams: ( ) = light is off To select Wash Options 1 Select wash cycle. 2 Use the up or down arrows, or the options button, to select the wash options...
... and special-care fabrics with normal soil and clothes which wrinkle easily. A more traditional wash for normally soiled knits and machine washable woollens. The following diagrams: ( ) = light is off To select Wash Options 1 Select wash cycle. 2 Use the up or down arrows, or the options button, to select the wash options...
User Guide
Page 26
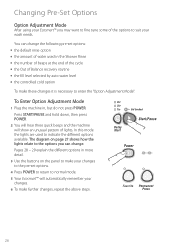
... cold option To make further changes, repeat the above steps. 26 In this mode the lights are used in , but do not press POWER. The diagram on the panel to make your changes to enter the "Option Adjustment Mode". Changing Pre-Set Options Option Adjustment Mode After using your Ecosmart™...
... cold option To make further changes, repeat the above steps. 26 In this mode the lights are used in , but do not press POWER. The diagram on the panel to make your changes to enter the "Option Adjustment Mode". Changing Pre-Set Options Option Adjustment Mode After using your Ecosmart™...

User Guide
Page 27
... panel to the options you first enter the Option Adjustment Mode. Changing Pre-Set Options US 1 Press START/PAUSE and hold down. Press POWER. 2 The diagram below shows how the lights relate to change .
... panel to the options you first enter the Option Adjustment Mode. Changing Pre-Set Options US 1 Press START/PAUSE and hold down. Press POWER. 2 The diagram below shows how the lights relate to change .