
User Guide
Page 3
... refrigerator 33 Storing food in your refrigerator 37 Storing food in your local Fisher & Paykel dealer. SAVE THESE INSTRUCTIONS The models shown in this User Guide, refers to change at any time. Contents 1 US CA Introduction 2 Safety and warnings 3 Installation instructions 5 Moving or storing your appliance 18 Door conversion 19 Soft closing refrigerator...
... refrigerator 33 Storing food in your refrigerator 37 Storing food in your local Fisher & Paykel dealer. SAVE THESE INSTRUCTIONS The models shown in this User Guide, refers to change at any time. Contents 1 US CA Introduction 2 Safety and warnings 3 Installation instructions 5 Moving or storing your appliance 18 Door conversion 19 Soft closing refrigerator...
User Guide
Page 5
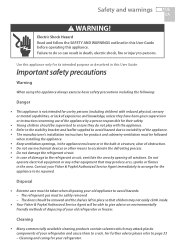
..., electric shock, fire or injury to page 33 - Cleaning and caring for your Fisher & Paykel Authorized Service Agent immediately to arrange for product and cabinetry ventilation must be followed when installing the appliance. ■■ Keep ventilation openings, in the appliance enclosure or in ...the built-in place so that may not easily climb inside. ■■ Your Fisher & Paykel Authorized Service Agent will be repaired. Failure...
..., electric shock, fire or injury to page 33 - Cleaning and caring for your Fisher & Paykel Authorized Service Agent immediately to arrange for product and cabinetry ventilation must be followed when installing the appliance. ■■ Keep ventilation openings, in the appliance enclosure or in ...the built-in place so that may not easily climb inside. ■■ Your Fisher & Paykel Authorized Service Agent will be repaired. Failure...
User Guide
Page 6
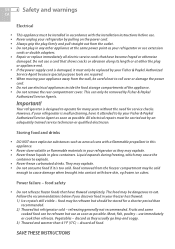
...if you discover food in your Fisher & Paykel Authorized Service Agent as soon as they may explode. ■■ Do not consume food if it is damaged, it attended to cause damage when brought into contact with the installation instructions before use. ■&#...9632; Never unplug your refrigerator by your refrigerator as possible. Your refrigerator is malfunctioning, have it must only be replaced by your Fisher & Paykel Authorized Service Agent because special purpose tools are...
...if you discover food in your Fisher & Paykel Authorized Service Agent as soon as they may explode. ■■ Do not consume food if it is damaged, it attended to cause damage when brought into contact with the installation instructions before use. ■&#...9632; Never unplug your refrigerator by your refrigerator as possible. Your refrigerator is malfunctioning, have it must only be replaced by your Fisher & Paykel Authorized Service Agent because special purpose tools are...
User Guide
Page 7
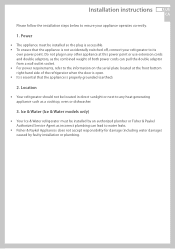
... is not accidentally switched off, connect your appliance operates correctly. 1. Installation instructions 5 US CA Please follow the installation steps below to any other appliance at the front bottom right-hand side of both power cords can lead to water leaks. ■■ Fisher & Paykel Appliances does not accept responsibility for damage (including water damage...
... is not accidentally switched off, connect your appliance operates correctly. 1. Installation instructions 5 US CA Please follow the installation steps below to any other appliance at the front bottom right-hand side of both power cords can lead to water leaks. ■■ Fisher & Paykel Appliances does not accept responsibility for damage (including water damage...

User Guide
Page 8
... VIEW H/I H/I Q S S Q B R D A FRONT VIEW C P PROFILE VIEW R K/L T PLAN VIEW FLUSH WITH REFRIGERATOR DOOR - Ventilation and installation - FULL DOOR ROTATION E P M M PLAN VIEW F PLAN VIEW PLAN VIEW Q FLUSH WITH REFRIGERATOR DOOR - FULL DOOR ROTATION G P M N PLAN ...K/L K/L T T BC P FRONT VIEW PROFILE VIEW C P PROFILE VIEW Note: these drawings and dimensions are also true for installation instructions. full PdLAoNoVIErWrotation FluPsLAhNHVw/IIEWith refrigeratPoLArNdVIoEWor - 90° door rotationK/L G G J J T FLUSH WITH REFRIGERATOR DOOFRLU- full ...
... VIEW H/I H/I Q S S Q B R D A FRONT VIEW C P PROFILE VIEW R K/L T PLAN VIEW FLUSH WITH REFRIGERATOR DOOR - Ventilation and installation - FULL DOOR ROTATION E P M M PLAN VIEW F PLAN VIEW PLAN VIEW Q FLUSH WITH REFRIGERATOR DOOR - FULL DOOR ROTATION G P M N PLAN ...K/L K/L T T BC P FRONT VIEW PROFILE VIEW C P PROFILE VIEW Note: these drawings and dimensions are also true for installation instructions. full PdLAoNoVIErWrotation FluPsLAhNHVw/IIEWith refrigeratPoLArNdVIoEWor - 90° door rotationK/L G G J J T FLUSH WITH REFRIGERATOR DOOFRLU- full ...

User Guide
Page 9
... - hinge side flush with chassis - full rotation 5 5/16 135 O side clearance - hinge side flush with door - 90° rotation 3 17/32 90 P rear clearance (incl. Installation instructions 7 US CA RF135B Product dimensions inches mm A overall height of flat door product 67 17/32 1715 A overall height of curved door product - - I inside...
... - hinge side flush with chassis - full rotation 5 5/16 135 O side clearance - hinge side flush with door - 90° rotation 3 17/32 90 P rear clearance (incl. Installation instructions 7 US CA RF135B Product dimensions inches mm A overall height of flat door product 67 17/32 1715 A overall height of curved door product - - I inside...

User Guide
Page 10
... F Q Q RF170A/RF201A F S Q Q R R DA B P H/I C P G M DA N T B P K/L J M O H/I T K/L T C P Note: these drawings and dimensions are also true for Ice & Water models. full door rotation FluJsh with refrigerator chassis - Ventilation and installation - US 8 Installation instructions CA 5.
... F Q Q RF170A/RF201A F S Q Q R R DA B P H/I C P G M DA N T B P K/L J M O H/I T K/L T C P Note: these drawings and dimensions are also true for Ice & Water models. full door rotation FluJsh with refrigerator chassis - Ventilation and installation - US 8 Installation instructions CA 5.

User Guide
Page 11
... 620 24 13/32 620 Flush with door - 90° rotation 3 17/32 90 3 17/32 90 P rear clearance (incl. hinge side flush with chassis - Installation instructions 9 US CA To ensure adequate ventilation for full drawer/shelf access, the doors need to curved door - - - -
... 620 24 13/32 620 Flush with door - 90° rotation 3 17/32 90 3 17/32 90 P rear clearance (incl. hinge side flush with chassis - Installation instructions 9 US CA To ensure adequate ventilation for full drawer/shelf access, the doors need to curved door - - - -
User Guide
Page 12
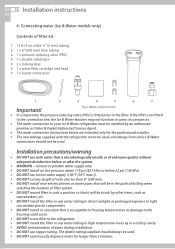
...exposure to light can weaken plastic components. ■■ DO NOT install in some circumstances. ■■ The water connection to your Ice & Water refrigerator must be installed by an authorized plumber or Fisher & Paykel Authorized Service Agent. ■■ The water connection instructions below 22 ...fitted to the connection line, the Ice & Water features may not function in a location that is fitted prior to the filter. Installation precautions/warning ■■ DO NOT use copper tubing. Fig.2 Water connection kit ■■ It is imperative the pressure ...
...exposure to light can weaken plastic components. ■■ DO NOT install in some circumstances. ■■ The water connection to your Ice & Water refrigerator must be installed by an authorized plumber or Fisher & Paykel Authorized Service Agent. ■■ The water connection instructions below 22 ...fitted to the connection line, the Ice & Water features may not function in a location that is fitted prior to the filter. Installation precautions/warning ■■ DO NOT use copper tubing. Fig.2 Water connection kit ■■ It is imperative the pressure ...

User Guide
Page 13
...locked. 5 Measure the required length of tubing to run at the top. We suggest that the faucet connection supplied should fit most installation situations. 8 Connect one locking key to each side of the water filter cartridge in between the cartridge and the locking collet as shown... in Diagram 1. Installation instructions 11 US CA Installation instructions: 1 Ensure the refrigerator is in a convenient location to access every 6 months for replacement. Gently pull on and run...
...locked. 5 Measure the required length of tubing to run at the top. We suggest that the faucet connection supplied should fit most installation situations. 8 Connect one locking key to each side of the water filter cartridge in between the cartridge and the locking collet as shown... in Diagram 1. Installation instructions 11 US CA Installation instructions: 1 Ensure the refrigerator is in a convenient location to access every 6 months for replacement. Gently pull on and run...
User Guide
Page 14
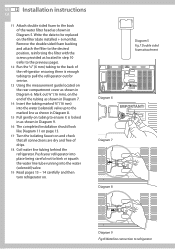
US 12 Installation instructions CA 11 Attach double sided foam to the back of the tubing as shown in Diagram 7. Write the date to refrigerator ...the refrigerator out for service. 13 Using the measurement guide located on the rear compartment cover as shown6 in Diagram 9. 16 The completed installation should look like Diagram 11 on page 13. 17 Turn the isolating faucet on the end of the water filter head as located ...Push your refrigerator into the water (solenoid) valve. 19 Read pages 13 - 14 carefully and then turn refrigerator on the filter (date installed + 6 months).
US 12 Installation instructions CA 11 Attach double sided foam to the back of the tubing as shown in Diagram 7. Write the date to refrigerator ...the refrigerator out for service. 13 Using the measurement guide located on the rear compartment cover as shown6 in Diagram 9. 16 The completed installation should look like Diagram 11 on page 13. 17 Turn the isolating faucet on the end of the water filter head as located ...Push your refrigerator into the water (solenoid) valve. 19 Read pages 13 - 14 carefully and then turn refrigerator on the filter (date installed + 6 months).
User Guide
Page 15
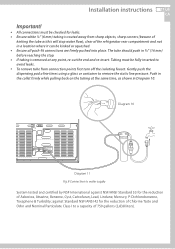
...-insert. against NSF/ANSI Standard 53 for the reduction of Chlorine Taste and Odor and Nominal Particulate Class I to a capacity of 750 gallons (2,838 liters). Installation instructions 13 US CA Important! ■■ All connections must be fully inserted to avoid leaks. ■■ To remove tube from sharp objects, sharp...
...-insert. against NSF/ANSI Standard 53 for the reduction of Chlorine Taste and Odor and Nominal Particulate Class I to a capacity of 750 gallons (2,838 liters). Installation instructions 13 US CA Important! ■■ All connections must be fully inserted to avoid leaks. ■■ To remove tube from sharp objects, sharp...

User Guide
Page 16
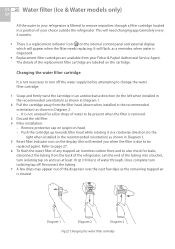
...force an ice maker cycle. The light above the button will result in the system. Fig.10 Water dispenser Please note that once installation is complete a few drips may appear out of the dispenser over the next few days as the remaining trapped air is cleared. ...enjoy ice and water from your water dispenser, stopping intermittently to remove trapped air in excessive dripping from your ActiveSmart™ refrigerator. US 14 Installation instructions CA Before you start using your Ice & Water refrigerator ■■ Check your refrigerator is switched on. ■■ Check that...
...force an ice maker cycle. The light above the button will result in the system. Fig.10 Water dispenser Please note that once installation is complete a few drips may appear out of the dispenser over the next few days as the remaining trapped air is cleared. ...enjoy ice and water from your water dispenser, stopping intermittently to remove trapped air in excessive dripping from your ActiveSmart™ refrigerator. US 14 Installation instructions CA Before you start using your Ice & Water refrigerator ■■ Check your refrigerator is switched on. ■■ Check that...

User Guide
Page 17
Installation (all models) Your Fisher & Paykel ActiveSmart™ refrigerator is the correct air gap between the product and surrounding cabinetry. Installation instructions 15 US CA 7. Lower the front of the refrigerator Raise the front of the refrigerator Fig.11 Refrigerator feet B Roll the refrigerator into its ...
Installation (all models) Your Fisher & Paykel ActiveSmart™ refrigerator is the correct air gap between the product and surrounding cabinetry. Installation instructions 15 US CA 7. Lower the front of the refrigerator Raise the front of the refrigerator Fig.11 Refrigerator feet B Roll the refrigerator into its ...

User Guide
Page 18
... floor when pushing gently on the floor). What to do not use metallic materials that may corrode, stain and/or damage floor coverings. US 16 Installation instructions CA 9.
... floor when pushing gently on the floor). What to do not use metallic materials that may corrode, stain and/or damage floor coverings. US 16 Installation instructions CA 9.

User Guide
Page 19
Installation instructions 17 US CA Before placing food in the fresh food or freezer compartments ■■ Remove all transit clips are small rubber stoppers located ...;■ Clean the inside of the appliance with a mix of warm water and a small amount of dust by wiping down before placing them in the installation instructions. ■■ Do not cover your door seals for leaks. These are removed from flowing around the cabinet sides. ■■ Ensure you vacuum...
Installation instructions 17 US CA Before placing food in the fresh food or freezer compartments ■■ Remove all transit clips are small rubber stoppers located ...;■ Clean the inside of the appliance with a mix of warm water and a small amount of dust by wiping down before placing them in the installation instructions. ■■ Do not cover your door seals for leaks. These are removed from flowing around the cabinet sides. ■■ Ensure you vacuum...

User Guide
Page 20
Storing your refrigerator ■■ When storing your refrigerator is turned off the appliance and unplug from the front). ■■ Relocate and install. Rinse with clean water and dry with a soft lint-free cloth. US 18 Moving or storing your appliance CA If your cleaned appliance, leave the ...
Storing your refrigerator ■■ When storing your refrigerator is turned off the appliance and unplug from the front). ■■ Relocate and install. Rinse with clean water and dry with a soft lint-free cloth. US 18 Moving or storing your appliance CA If your cleaned appliance, leave the ...

User Guide
Page 27
...; The light above the DISPENSER LOCK icon will no longer be illuminated and water dispensing will not encourage the dispenser to the user that once installation is complete a few days as the remaining trapped air is useful when you have read and followed page 14 before using a glass or container. Important...
...; The light above the DISPENSER LOCK icon will no longer be illuminated and water dispensing will not encourage the dispenser to the user that once installation is complete a few days as the remaining trapped air is useful when you have read and followed page 14 before using a glass or container. Important...
User Guide
Page 28
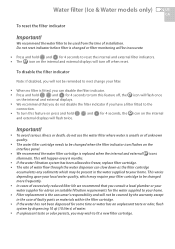
...a few drips may appear out of your Fisher & Paykel Authorized Service Agent. Remove protective cap on spigot on and run at least 10 qt (10 liters) of the replacement filter cartridge are available from the filter head (down when installed in the recommended orientation) as the remaining ... cartridges are labelled on the cartridge. This will need changing approximately every 6 months. ■■ There is due to the right when installed in the recommended orientation) as shown in Diagram 3. 5 Reset filter indicator icon on the display (this will remind you when the filter is...
...a few drips may appear out of your Fisher & Paykel Authorized Service Agent. Remove protective cap on spigot on and run at least 10 qt (10 liters) of the replacement filter cartridge are available from the filter head (down when installed in the recommended orientation) as the remaining ... cartridges are labelled on the cartridge. This will need changing approximately every 6 months. ■■ There is due to the right when installed in the recommended orientation) as shown in Diagram 3. 5 Reset filter indicator icon on the display (this will remind you when the filter is...
User Guide
Page 29
... water has not been dispensed for some time or water has an unpleasant taste or odor, flush system by dispensing 10 qt (10 liters) of installation. Important! ■■ To avoid serious illness or death, do not disable the filter indicator if you have a filter fitted to the connection. ■■...
... water has not been dispensed for some time or water has an unpleasant taste or odor, flush system by dispensing 10 qt (10 liters) of installation. Important! ■■ To avoid serious illness or death, do not disable the filter indicator if you have a filter fitted to the connection. ■■...