
User Guide
Page 2
Should the appliance be sold or transferred to another owner, please ensure that the User Guide is retained with your refrigerator for future reference. English Français Page 1 - 48 Page 50 - 98 Important! This will ensure that this User Guide is left with the information and warnings contained within the Guide. It is important that the new owner can familiarize themselves with the appliance.
Should the appliance be sold or transferred to another owner, please ensure that the User Guide is retained with your refrigerator for future reference. English Français Page 1 - 48 Page 50 - 98 Important! This will ensure that this User Guide is left with the information and warnings contained within the Guide. It is important that the new owner can familiarize themselves with the appliance.

User Guide
Page 3
... not be available in all models) 30 Cleaning and caring for your refrigerator 33 Storing food in your refrigerator 37 Storing food in this User Guide, refers to change at any time. SAVE THESE INSTRUCTIONS The models shown in your local Fisher & Paykel dealer. For current details about the external display (Ice & Water models...
... not be available in all models) 30 Cleaning and caring for your refrigerator 33 Storing food in your refrigerator 37 Storing food in this User Guide, refers to change at any time. SAVE THESE INSTRUCTIONS The models shown in your local Fisher & Paykel dealer. For current details about the external display (Ice & Water models...
User Guide
Page 4
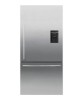
... and functions. Fig.1 ActiveSmart™ refrigerators US 2 Introduction CA Thank you for buying a Fisher & Paykel ActiveSmart™ refrigerator. Refrigerator French door and freezer drawer Refrigerator door and freezer drawer Refrigerator door and freezer door Note: non Ice & Water models do not have an external water dispenser. At Fisher & Paykel we are very proud of refrigeration experience has been programmed into...
... and functions. Fig.1 ActiveSmart™ refrigerators US 2 Introduction CA Thank you for buying a Fisher & Paykel ActiveSmart™ refrigerator. Refrigerator French door and freezer drawer Refrigerator door and freezer drawer Refrigerator door and freezer door Note: non Ice & Water models do not have an external water dispenser. At Fisher & Paykel we are very proud of refrigeration experience has been programmed into...
User Guide
Page 5
.... ■■ Refer to the stability bracket and leaflet supplied to avoid hazard due to instability of your old appliance to page 33 - Contact your refrigerator. Cleaning and caring for your Fisher & Paykel Authorized Service Agent immediately to arrange for their safety. ■■ Young children should be repaired.
.... ■■ Refer to the stability bracket and leaflet supplied to avoid hazard due to instability of your old appliance to page 33 - Contact your refrigerator. Cleaning and caring for your Fisher & Paykel Authorized Service Agent immediately to arrange for their safety. ■■ Young children should be repaired.
User Guide
Page 6
...or appliance end. ■■ If the power supply cord is damaged, it attended to by your Fisher & Paykel Authorized Service Agent as soon as possible. Your refrigerator is designed to explode. ■■ Never freeze carbonated drinks. Power failure - use extension cords or ...9632; Never freeze liquids in your refrigerator or use immediately or cook then refreeze. refreezing generally not recommended. Do not use as soon as possible. SAVE THESE INSTRUCTIONS All electrical repairs must be carried out by Fisher & Paykel Authorized Service Agents. Follow the ...
...or appliance end. ■■ If the power supply cord is damaged, it attended to by your Fisher & Paykel Authorized Service Agent as soon as possible. Your refrigerator is designed to explode. ■■ Never freeze carbonated drinks. Power failure - use extension cords or ...9632; Never freeze liquids in your refrigerator or use immediately or cook then refreeze. refreezing generally not recommended. Do not use as soon as possible. SAVE THESE INSTRUCTIONS All electrical repairs must be carried out by Fisher & Paykel Authorized Service Agents. Follow the ...
User Guide
Page 7
...refrigerator should not be located in any heat generating appliance such as incorrect plumbing can pull the double adaptor from a wall outlet socket. ■■ For power requirements, refer to water leaks. ■■ Fisher & Paykel Appliances does not accept responsibility for damage (including water damage) caused by an authorized plumber or Fisher & Paykel... located at this power point or use extension cords and double adaptors, as the combined weight of the refrigerator when the door is open. ■■ It is essential that the appliance is properly grounded (earthed...
...refrigerator should not be located in any heat generating appliance such as incorrect plumbing can pull the double adaptor from a wall outlet socket. ■■ For power requirements, refer to water leaks. ■■ Fisher & Paykel Appliances does not accept responsibility for damage (including water damage) caused by an authorized plumber or Fisher & Paykel... located at this power point or use extension cords and double adaptors, as the combined weight of the refrigerator when the door is open. ■■ It is essential that the appliance is properly grounded (earthed...

User Guide
Page 8
... drawings and dimensions are also true for Ice & Water models. full PdLAoNoVIErWrotation FluPsLAhNHVw/IIEWith refrigeratPoLArNdVIoEWor - 90° door rotationK/L G G J J T FLUSH WITH REFRIGERATOR DOOFRLU- full door rotation PLAN VIEW FLUSH WITH REFRIGERATOR CHASSIS - Freezer door models (RF135B, E522B) (Ice & Water and non Ice & Water) For all products with the integration kits. FULL DOOFRLURSOHTAWTIITOHNREFRIGERATOR...
... drawings and dimensions are also true for Ice & Water models. full PdLAoNoVIErWrotation FluPsLAhNHVw/IIEWith refrigeratPoLArNdVIoEWor - 90° door rotationK/L G G J J T FLUSH WITH REFRIGERATOR DOOFRLU- full door rotation PLAN VIEW FLUSH WITH REFRIGERATOR CHASSIS - Freezer door models (RF135B, E522B) (Ice & Water and non Ice & Water) For all products with the integration kits. FULL DOOFRLURSOHTAWTIITOHNREFRIGERATOR...

User Guide
Page 9
...27 3/8 695 C overall depth of cupboard (optional) 1 31/32 50 R top clearance - I inside depth flush to flat door 27 3/8 695 Flush with refrigerator door - 90° door rotation (for full drawer/shelf access, the doors need to be open past 90°) J inside width 29 11/32 745...31/32 50 1 31/32 50 25 13/32 645 20 7/8 530 Cabinetry dimensions (including minimum clearances) D inside depth 24 13/32 620 Flush with refrigerator chassis - full door rotation G inside width 31 3/32 790 H inside depth flush to flat door 27 3/8 695 Minimum clearances M side clearance 25/32 20...
...27 3/8 695 C overall depth of cupboard (optional) 1 31/32 50 R top clearance - I inside depth flush to flat door 27 3/8 695 Flush with refrigerator door - 90° door rotation (for full drawer/shelf access, the doors need to be open past 90°) J inside width 29 11/32 745...31/32 50 1 31/32 50 25 13/32 645 20 7/8 530 Cabinetry dimensions (including minimum clearances) D inside depth 24 13/32 620 Flush with refrigerator chassis - full door rotation G inside width 31 3/32 790 H inside depth flush to flat door 27 3/8 695 Minimum clearances M side clearance 25/32 20...

User Guide
Page 10
...J G N P M PO N N J P N O K/L H/I T K/L T C P Note: these drawings and dimensions are also true for Ice & Water models. full door rotation P M D AG N P MJ OP NG N P P M DA N P M E OP N N M H/I P M K/L M H/I P K/L H/I T K/L H/I C P Flush with refrigerator chassis - Ventilation and installation - Freezer drawer models (RF170W, RF170A, RF201A) (Ice & WPater aMnd Enon IcMe & Water) RF170W F Q Q RF170A/RF201A F S Q Q R R DA B P H/I C P G M DA N T B P K/L J M O H/I T K/L FT T CS P Q B CS P C P Q B C P R Flush ...
...J G N P M PO N N J P N O K/L H/I T K/L T C P Note: these drawings and dimensions are also true for Ice & Water models. full door rotation P M D AG N P MJ OP NG N P P M DA N P M E OP N N M H/I P M K/L M H/I P K/L H/I T K/L H/I C P Flush with refrigerator chassis - Ventilation and installation - Freezer drawer models (RF170W, RF170A, RF201A) (Ice & WPater aMnd Enon IcMe & Water) RF170W F Q Q RF170A/RF201A F S Q Q R R DA B P H/I C P G M DA N T B P K/L J M O H/I T K/L FT T CS P Q B CS P C P Q B C P R Flush ...

User Guide
Page 11
... 50 14 3/8 365 9 27/32 250 I inside depth flush to flat door 27 3/8 695 27 3/8 695 Flush with refrigerator door - 90° door rotation (for your refrigerator see recommended cabinetry dimensions below. hinge side flush with chassis - hinge side flush with door - 90° rotation 3 17/... full door rotation G inside width 37 7/32 945 41 23/32 1060 H inside height of cavity 68 5/16 1735 68 5/16 1735 Flush with refrigerator door - full rotation 5 5/16 135 5 5/16 135 O side clearance - RF170W RF170A Product dimensions inches mm inches mm A overall height of product...
... 50 14 3/8 365 9 27/32 250 I inside depth flush to flat door 27 3/8 695 27 3/8 695 Flush with refrigerator door - 90° door rotation (for your refrigerator see recommended cabinetry dimensions below. hinge side flush with chassis - hinge side flush with door - 90° rotation 3 17/... full door rotation G inside width 37 7/32 945 41 23/32 1060 H inside height of cavity 68 5/16 1735 68 5/16 1735 Flush with refrigerator door - full rotation 5 5/16 135 5 5/16 135 O side clearance - RF170W RF170A Product dimensions inches mm inches mm A overall height of product...
User Guide
Page 12
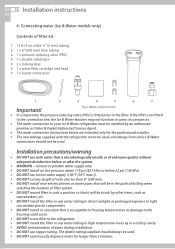
... quality without adequate disinfection before or after the system. ■■ WARNING - Installation precautions/warning ■■ DO NOT use with the refrigerator are to be used, old tubings from old Ice & Water connections should always be used. ■■ DO NOT continuously dispense water for...(200 mm). ■■ DO NOT install near electrical wires or water pipes that will be struck by an authorized plumber or Fisher & Paykel Authorized Service Agent. ■■ The water connection instructions below 22 psi (150 kPa). ■■ DO NOT use copper tubing.
... quality without adequate disinfection before or after the system. ■■ WARNING - Installation precautions/warning ■■ DO NOT use with the refrigerator are to be used, old tubings from old Ice & Water connections should always be used. ■■ DO NOT continuously dispense water for...(200 mm). ■■ DO NOT install near electrical wires or water pipes that will be struck by an authorized plumber or Fisher & Paykel Authorized Service Agent. ■■ The water connection instructions below 22 psi (150 kPa). ■■ DO NOT use copper tubing.

User Guide
Page 13
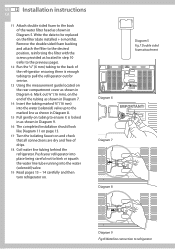
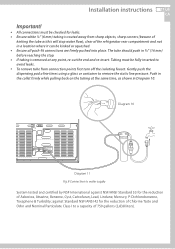
... on and run from the bottom of the filter cartridge is required to perform cartridge removal. ■■ Do not screw water filter to refrigerator. Gently pull to ensure it is locked. 4 Connect the white ¼" (6 mm) tubing to the outlet of the water filter cartridge...of the PRV (white collet) and then to the faucet as shown in Diagram 2. Installation instructions 11 US CA Installation instructions: 1 Ensure the refrigerator is NOT plugged into a bucket, turn isolating faucet off. 10 Locate desired position for water filter noting carefully the following points: ■■...
... on and run from the bottom of the filter cartridge is required to perform cartridge removal. ■■ Do not screw water filter to refrigerator. Gently pull to ensure it is locked. 4 Connect the white ¼" (6 mm) tubing to the outlet of the water filter cartridge...of the PRV (white collet) and then to the faucet as shown in Diagram 2. Installation instructions 11 US CA Installation instructions: 1 Ensure the refrigerator is NOT plugged into a bucket, turn isolating faucet off. 10 Locate desired position for water filter noting carefully the following points: ■■...
User Guide
Page 14
...Turn the isolating faucet on and check that all connections are dry and free of Diagram 7 drips. 18 Coil water line tubing behind the refrigerator. US 12 Installation instructions CA 11 Attach double sided foam to kink or squash the water line tube running into the water (solenoid) ...valve. 19 Read pages 13 - 14 carefully and then turn refrigerator on. Mark out 5/8" (16 mm), on the rear compartment cover as shown in PART: 838587 6 7 DRAWING: 838587 8 9 Diagram 5. Remove the double ...
...Turn the isolating faucet on and check that all connections are dry and free of Diagram 7 drips. 18 Coil water line tubing behind the refrigerator. US 12 Installation instructions CA 11 Attach double sided foam to kink or squash the water line tube running into the water (solenoid) ...valve. 19 Read pages 13 - 14 carefully and then turn refrigerator on. Mark out 5/8" (16 mm), on the rear compartment cover as shown in PART: 838587 6 7 DRAWING: 838587 8 9 Diagram 5. Remove the double ...
User Guide
Page 15
... 42 for leaks. ■■ Ensure white ¼" (6 mm) tubing is removed at the same time, as this will stop water flow), clear of the refrigerator rear compartment and not in a location where it can be fully inserted to remove the static line pressure. The tube should push in Diagram 10...
... 42 for leaks. ■■ Ensure white ¼" (6 mm) tubing is removed at the same time, as this will stop water flow), clear of the refrigerator rear compartment and not in a location where it can be fully inserted to remove the static line pressure. The tube should push in Diagram 10...

User Guide
Page 16
... next few drips may appear out of ice (8 cubes per harvest). Repeat to remove trapped air in excessive dripping from your ActiveSmart™ refrigerator. Failure to do this will be illuminated when the ice maker is cleared. You are now ready to enjoy ice and water from your... dispenser. US 14 Installation instructions CA Before you start using your Ice & Water refrigerator ■■ Check your refrigerator is switched on. ■■ Check that the isolation tap has been connected and turned on by pressing the button (refer ...
... next few drips may appear out of ice (8 cubes per harvest). Repeat to remove trapped air in excessive dripping from your ActiveSmart™ refrigerator. Failure to do this will be illuminated when the ice maker is cleared. You are now ready to enjoy ice and water from your... dispenser. US 14 Installation instructions CA Before you start using your Ice & Water refrigerator ■■ Check your refrigerator is switched on. ■■ Check that the isolation tap has been connected and turned on by pressing the button (refer ...

User Guide
Page 17
Installation instructions 15 US CA 7. Levelling of weight. ■■ Once the refrigerator is in the forwards and backwards direction. Installation (all models) Your Fisher & Paykel ActiveSmart™ refrigerator is leaning backward with front and rear rollers, designed for moving the product in ...Avoid moving the product into its final location a simple task. Lower the front of the refrigerator Raise the front of the refrigerator Fig.11 Refrigerator feet B Roll the refrigerator into its final position making moving the product in the same way (refer to lift up...
Installation instructions 15 US CA 7. Levelling of weight. ■■ Once the refrigerator is in the forwards and backwards direction. Installation (all models) Your Fisher & Paykel ActiveSmart™ refrigerator is leaning backward with front and rear rollers, designed for moving the product in ...Avoid moving the product into its final location a simple task. Lower the front of the refrigerator Raise the front of the refrigerator Fig.11 Refrigerator feet B Roll the refrigerator into its final position making moving the product in the same way (refer to lift up...

User Guide
Page 18
... when the product is pushed back into position. ■■ Ideally, the packing material is gently pushed back Fig.14 Unstable refrigerator Wall behind refrigerator Packing material goes under the foot. US 16 Installation instructions CA 9. If not, repeat 9A and 9B. Unlevel floor This foot...in the location diagonally opposite the front roller that the product is stable (all 4 feet are on the top front of the refrigerator C Roll the refrigerator back into position and adjust front feet as per step 7C. (Check alignment and door closing action are satisfactory). ■■...
... when the product is pushed back into position. ■■ Ideally, the packing material is gently pushed back Fig.14 Unstable refrigerator Wall behind refrigerator Packing material goes under the foot. US 16 Installation instructions CA 9. If not, repeat 9A and 9B. Unlevel floor This foot...in the location diagonally opposite the front roller that the product is stable (all 4 feet are on the top front of the refrigerator C Roll the refrigerator back into position and adjust front feet as per step 7C. (Check alignment and door closing action are satisfactory). ■■...

User Guide
Page 19
...appliance. ■■ Do not overfill the compartments. ■■ Keep door openings to page 33 - Cleaning and caring for your refrigerator: Rear compartment cover). ■■ Allow good clearances in the installation instructions. ■■ Do not cover your door seals for ...mix of warm water and a small amount of liquid detergent, and a soft cloth to remove manufacturing and transportation dust. ■■ Allow the refrigerator and freezer to run empty for 2 - 3 hours to allow each compartment to cool to the appropriate temperature. ■■ The appliance may...
...appliance. ■■ Do not overfill the compartments. ■■ Keep door openings to page 33 - Cleaning and caring for your refrigerator: Rear compartment cover). ■■ Allow good clearances in the installation instructions. ■■ Do not cover your door seals for ...mix of warm water and a small amount of liquid detergent, and a soft cloth to remove manufacturing and transportation dust. ■■ Allow the refrigerator and freezer to run empty for 2 - 3 hours to allow each compartment to cool to the appropriate temperature. ■■ The appliance may...

User Guide
Page 20
... its side for any length of time, leave it standing upright as long as they will allow the refrigeration system pressures to page 15). ■■ Ease the refrigerator out of liquid dishwashing detergent. Rinse with clean water and dry with a soft lint-free cloth. This... . This will turn (refer to equalize before turning on holiday. Holiday time We recommend you leave your refrigerator operating while you can (a few hours) before restarting. Storing your refrigerator ■■ When storing your cleaned appliance, leave the doors open. US 18 Moving or storing your...
... its side for any length of time, leave it standing upright as long as they will allow the refrigeration system pressures to page 15). ■■ Ease the refrigerator out of liquid dishwashing detergent. Rinse with clean water and dry with a soft lint-free cloth. This... . This will turn (refer to equalize before turning on holiday. Holiday time We recommend you leave your refrigerator operating while you can (a few hours) before restarting. Storing your refrigerator ■■ When storing your cleaned appliance, leave the doors open. US 18 Moving or storing your...
User Guide
Page 21
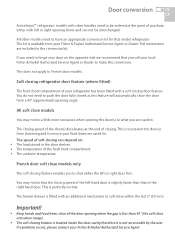
...food items clear of closing feature enables you are included in the door shelves. ■■ The temperature of your local Fisher & Paykel Authorized Service Agent or Dealer to French door models. The kit is fitted with left or right opening angle. All soft close...the user. If you call your refrigerator has been fitted with a soft closing refrigerator door feature (where fitted) The fresh food compartment of the fresh food compartment. ■■ The ambient temperature. All other models need to hinge your Fisher & Paykel Authorized Service Agent. The closing ...
...food items clear of closing feature enables you are included in the door shelves. ■■ The temperature of your local Fisher & Paykel Authorized Service Agent or Dealer to French door models. The kit is fitted with left or right opening angle. All soft close...the user. If you call your refrigerator has been fitted with a soft closing refrigerator door feature (where fitted) The fresh food compartment of the fresh food compartment. ■■ The ambient temperature. All other models need to hinge your Fisher & Paykel Authorized Service Agent. The closing ...
