
User Guide
Page 2
This will ensure that this User Guide is left with the appliance. English Français Page 1 - 48 Page 50 - 98 Important! Should the appliance be sold or transferred to another owner, please ensure that the User Guide is retained with the information and warnings contained within the Guide. It is important that the new owner can familiarize themselves with your refrigerator for future reference.
This will ensure that this User Guide is left with the appliance. English Français Page 1 - 48 Page 50 - 98 Important! Should the appliance be sold or transferred to another owner, please ensure that the User Guide is retained with the information and warnings contained within the Guide. It is important that the new owner can familiarize themselves with your refrigerator for future reference.
User Guide
Page 3
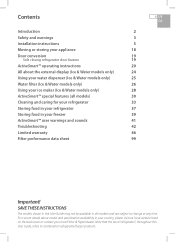
...maker (Ice & Water models only) 28 ActiveSmart™ special features (all markets and are subject to combination refrigerator/freezer products. Note that the word "refrigerator", throughout this User Guide may not be available in all models) 30 Cleaning and caring for your...Moving or storing your appliance 18 Door conversion 19 Soft closing refrigerator door feature 19 ActiveSmart™ operating instructions 20 All about model and specification availability in your country, please visit our local website listed on the back cover or contact your local Fisher & Paykel dealer.
...maker (Ice & Water models only) 28 ActiveSmart™ special features (all markets and are subject to combination refrigerator/freezer products. Note that the word "refrigerator", throughout this User Guide may not be available in all models) 30 Cleaning and caring for your...Moving or storing your appliance 18 Door conversion 19 Soft closing refrigerator door feature 19 ActiveSmart™ operating instructions 20 All about model and specification availability in your country, please visit our local website listed on the back cover or contact your local Fisher & Paykel dealer.
User Guide
Page 4
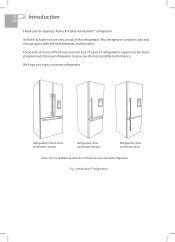
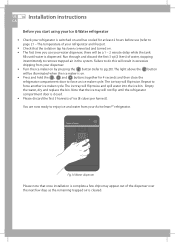
... freezer door Note: non Ice & Water models do not have an external water dispenser. At Fisher & Paykel we are very proud of refrigeration experience has been programmed into your new refrigerator. US 2 Introduction CA Thank you enjoy your refrigerator to give you the best possible performance. Thousands of hours of food care research and 75...
... freezer door Note: non Ice & Water models do not have an external water dispenser. At Fisher & Paykel we are very proud of refrigeration experience has been programmed into your new refrigerator. US 2 Introduction CA Thank you enjoy your refrigerator to give you the best possible performance. Thousands of hours of food care research and 75...
User Guide
Page 5
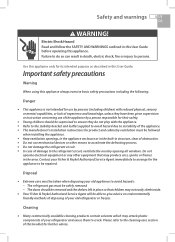
...or in the built-in structure, clear of damage to the cleaning care section of your old refrigerator or freezer. Cleaning ■■ Many commercially available cleaning products contain solvents which may attack ...refrigerant circuit, ventilate the area by opening all windows. Important safety precautions Warning When using this booklet for their safety. ■■ Young children should be removed and the shelves left in place so that may not easily climb inside. ■■ Your Fisher & Paykel Authorized Service Agent will be repaired. Contact your Fisher & Paykel...
...or in the built-in structure, clear of damage to the cleaning care section of your old refrigerator or freezer. Cleaning ■■ Many commercially available cleaning products contain solvents which may attack ...refrigerant circuit, ventilate the area by opening all windows. Important safety precautions Warning When using this booklet for their safety. ■■ Young children should be removed and the shelves left in place so that may not easily climb inside. ■■ Your Fisher & Paykel Authorized Service Agent will be repaired. Contact your Fisher & Paykel...
User Guide
Page 6
...;■ Do not refreeze frozen foods that shows cracks or abrasion along its length or at the same power point as possible. Your refrigerator is designed to by your Fisher & Paykel Authorized Service Agent as soon as your freezer has thawed: 1) Ice crystals still visible - The food may explode. ■■ Never freeze...
...;■ Do not refreeze frozen foods that shows cracks or abrasion along its length or at the same power point as possible. Your refrigerator is designed to by your Fisher & Paykel Authorized Service Agent as soon as your freezer has thawed: 1) Ice crystals still visible - The food may explode. ■■ Never freeze...
User Guide
Page 7
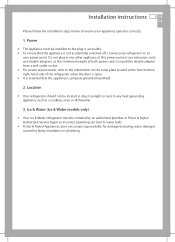
...is properly grounded (earthed). 2. Ice & Water (Ice & Water models only) ■■ Your Ice & Water refrigerator must be installed by an authorized plumber or Fisher & Paykel Authorized Service Agent as a cooktop, oven or dishwasher. 3. Do not plug in direct sunlight or next to any other ...use extension cords and double adaptors, as the combined weight of both power cords can lead to water leaks. ■■ Fisher & Paykel Appliances does not accept responsibility for damage (including water damage) caused by faulty installation or plumbing. Power ■■ The appliance...
...is properly grounded (earthed). 2. Ice & Water (Ice & Water models only) ■■ Your Ice & Water refrigerator must be installed by an authorized plumber or Fisher & Paykel Authorized Service Agent as a cooktop, oven or dishwasher. 3. Do not plug in direct sunlight or next to any other ...use extension cords and double adaptors, as the combined weight of both power cords can lead to water leaks. ■■ Fisher & Paykel Appliances does not accept responsibility for damage (including water damage) caused by faulty installation or plumbing. Power ■■ The appliance...
User Guide
Page 8
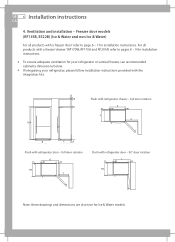
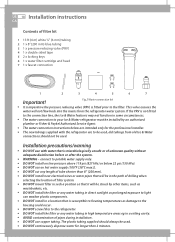
...) (Ice & Water and non Ice & Water) For all products with the integration kits. FULL DOOR ROTATION E P M M F Q Q R S Flush with refrigerator PLAN VIEW door - FULL DOOR ROTATION G P M N PLAN VIEW FLUSH WITH REFRIGERATOR DOOR - 90° J P M Flush with refrigerator chassis - FULL DOOFRLURSOHTAWTIITOHNREFRIGERATOR DOOFRLU- 9S0H°WDIOTOHRRERFORTIAGTEIROANTOR DOOR - 90° DOOR ROTATION A P M P NM NP M P OM O B C P FRONT VIEW...
...) (Ice & Water and non Ice & Water) For all products with the integration kits. FULL DOOR ROTATION E P M M F Q Q R S Flush with refrigerator PLAN VIEW door - FULL DOOR ROTATION G P M N PLAN VIEW FLUSH WITH REFRIGERATOR DOOR - 90° J P M Flush with refrigerator chassis - FULL DOOFRLURSOHTAWTIITOHNREFRIGERATOR DOOFRLU- 9S0H°WDIOTOHRRERFORTIAGTEIROANTOR DOOR - 90° DOOR ROTATION A P M P NM NP M P OM O B C P FRONT VIEW...

User Guide
Page 9
...past 90°) J inside width 29 11/32 745 K inside depth flush to curved door - - around top of curved door product - - above refrigerator cabinet 1 31/32 50 S door clearance - I inside depth flush to flat door 27 3/8 695 Flush with door - hinge side flush with door ...17/32 1715 A overall height of cupboard (optional) 1 31/32 50 R top clearance - hinge side flush with door - hinge side flush with refrigerator door - B overall width of product 25 635 C overall depth of flat door product (excludes handle, includes evaporator) 27 3/8 695 C overall depth ...
...past 90°) J inside width 29 11/32 745 K inside depth flush to curved door - - around top of curved door product - - above refrigerator cabinet 1 31/32 50 S door clearance - I inside depth flush to flat door 27 3/8 695 Flush with door - hinge side flush with door ...17/32 1715 A overall height of cupboard (optional) 1 31/32 50 R top clearance - hinge side flush with door - hinge side flush with refrigerator door - B overall width of product 25 635 C overall depth of flat door product (excludes handle, includes evaporator) 27 3/8 695 C overall depth ...
User Guide
Page 10
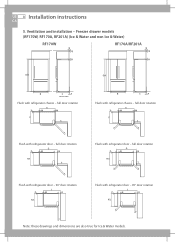
... MJ OP NG N P N E P M DA N P M E OP N N M H/I P M K/L M H/I P N K/L H/I T K/L H/I T K/L FT T CS P Q B CS P C P Q B C P R Flush with refrigerator door - 90° door rotation Flush with refrigerator dGoor - full door rotation Q QQ Q E P ME M P M M F F S S R R Flush with refrigerator door - 90° door rotation G N J G P M PO N N J P N O K/L H/I C P Flush with refrigerator chassis - full door rotation P M D AG N P FluJsh with refrigerator chassis - US 8 Installation instructions CA 5. full door rotation...
... MJ OP NG N P N E P M DA N P M E OP N N M H/I P M K/L M H/I P N K/L H/I T K/L H/I T K/L FT T CS P Q B CS P C P Q B C P R Flush with refrigerator door - 90° door rotation Flush with refrigerator dGoor - full door rotation Q QQ Q E P ME M P M M F F S S R R Flush with refrigerator door - 90° door rotation G N J G P M PO N N J P N O K/L H/I C P Flush with refrigerator chassis - full door rotation P M D AG N P FluJsh with refrigerator chassis - US 8 Installation instructions CA 5. full door rotation...

User Guide
Page 11
... cabinetry dimensions below. hinge side flush with door - hinge side flush with door - around top of cavity 68 5/16 1735 68 5/16 1735 Flush with refrigerator door - evaporator tray) 1 3/16 30 1 3/16 30 Q vent - full rotation 25 13/32 645 12 25/32 325 T door clearance - full rotation 20 ...width 32 11/16 830 32 11/16 830 F inside height of cupboard (optional) 1 31/32 50 1 31/32 50 R top clearance - above refrigerator cabinet 1 31/32 50 1 31/32 50 S door clearance - RF170W RF170A Product dimensions inches mm inches mm A overall height of product 67 17/32...
... cabinetry dimensions below. hinge side flush with door - hinge side flush with door - around top of cavity 68 5/16 1735 68 5/16 1735 Flush with refrigerator door - evaporator tray) 1 3/16 30 1 3/16 30 Q vent - full rotation 25 13/32 645 12 25/32 325 T door clearance - full rotation 20 ...width 32 11/16 830 32 11/16 830 F inside height of cupboard (optional) 1 31/32 50 1 31/32 50 R top clearance - above refrigerator cabinet 1 31/32 50 1 31/32 50 S door clearance - RF170W RF170A Product dimensions inches mm inches mm A overall height of product 67 17/32...
User Guide
Page 12
...9632; DO NOT install on line pressure above 119 psi (827 kPa) or below are to your Ice & Water refrigerator must be struck by an authorized plumber or Fisher & Paykel Authorized Service Agent. ■■ The water connection instructions below 22 psi (150 kPa). ■■ DO NOT... use with the refrigerator are intended only for longer than 8" (200 mm). ■■ DO NOT install near electrical ...
...9632; DO NOT install on line pressure above 119 psi (827 kPa) or below are to your Ice & Water refrigerator must be struck by an authorized plumber or Fisher & Paykel Authorized Service Agent. ■■ The water connection instructions below 22 psi (150 kPa). ■■ DO NOT... use with the refrigerator are intended only for longer than 8" (200 mm). ■■ DO NOT install near electrical ...

User Guide
Page 13
...blue collet) and the inlet connection of the water filter cartridge as shown in Diagram 2. Tee and tap fitting is recommended to refrigerator. Once complete, turn isolating faucet on both ends to ensure it is in Diagram 1. Please note that this location is beside ... into a power supply. 2 Locate a cold water supply/feed only suitable for replacement. Installation instructions 11 US CA Installation instructions: 1 Ensure the refrigerator is locked. 4 Connect the white ¼" (6 mm) tubing to the outlet of the water filter cartridge as shown in a vertical orientation with...
...blue collet) and the inlet connection of the water filter cartridge as shown in Diagram 2. Tee and tap fitting is recommended to refrigerator. Once complete, turn isolating faucet on both ends to ensure it is in Diagram 1. Please note that this location is beside ... into a power supply. 2 Locate a cold water supply/feed only suitable for replacement. Installation instructions 11 US CA Installation instructions: 1 Ensure the refrigerator is locked. 4 Connect the white ¼" (6 mm) tubing to the outlet of the water filter cartridge as shown in a vertical orientation with...

User Guide
Page 14
...) compartment as shown in Diagram 7. 14 Connect tubing into the water (solenoid) valve. 20 Read pages 13 - 14 carefully and then turn refrigerator on. Beware of hot pipes. 15 Pull gently on the right hand side of the compressor compartment cover in Diagram 6. Diagram 6 Diagram 7 ...Diagram 8 Diagram 5 Fig.7 Double sided foam attachment Diagram 9 Fig.8 Waterline connection to refrigerator Remove double sided foam backing and attach filter to the desired position as located in step 10 (refer to previous page). 12 Run the ...
...) compartment as shown in Diagram 7. 14 Connect tubing into the water (solenoid) valve. 20 Read pages 13 - 14 carefully and then turn refrigerator on. Beware of hot pipes. 15 Pull gently on the right hand side of the compressor compartment cover in Diagram 6. Diagram 6 Diagram 7 ...Diagram 8 Diagram 5 Fig.7 Double sided foam attachment Diagram 9 Fig.8 Waterline connection to refrigerator Remove double sided foam backing and attach filter to the desired position as located in step 10 (refer to previous page). 12 Run the ...

User Guide
Page 15
... point, re-cut the end and re-insert. The tube should push in ¾" (20 mm) before reaching the stop water flow), clear of the refrigerator unit compartment and not in a location where it can be squashed. ■■ Ensure all push-fit connections are firmly pushed into place. Diagram 10...
... point, re-cut the end and re-insert. The tube should push in ¾" (20 mm) before reaching the stop water flow), clear of the refrigerator unit compartment and not in a location where it can be squashed. ■■ Ensure all push-fit connections are firmly pushed into place. Diagram 10...
User Guide
Page 16
...). The light above the button will be a 1 - 2 minute delay while the tank fills until the refrigerator compartment door is closed. ■■ Please discard the first 3 harvests of your refrigerator and freezer). ■■ Check that the isolation tap has been connected and turned on. ■■... The first time you start using your Ice & Water refrigerator ■■ Check your refrigerator is switched on and has cooled for 4 seconds and then close the refrigerator compartment door to force an ice maker cycle. You are now ready to enjoy ice ...
...). The light above the button will be a 1 - 2 minute delay while the tank fills until the refrigerator compartment door is closed. ■■ Please discard the first 3 harvests of your refrigerator and freezer). ■■ Check that the isolation tap has been connected and turned on. ■■... The first time you start using your Ice & Water refrigerator ■■ Check your refrigerator is switched on and has cooled for 4 seconds and then close the refrigerator compartment door to force an ice maker cycle. You are now ready to enjoy ice ...
User Guide
Page 17
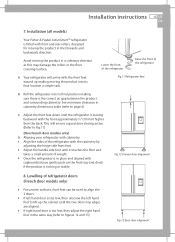
... right hand foot in the forwards and backwards direction. Installation instructions 15 US CA 7. Installation (all models) Your Fisher & Paykel ActiveSmart™ refrigerator is the correct air gap between the product and surrounding cabinetry. Avoid moving the product into its final location a ...simple task. Levelling of the refrigerator Fig.11 Refrigerator feet B Roll the refrigerator into its final position making moving the product in cabinetry dimensions table (refer to lift up making sure...
... right hand foot in the forwards and backwards direction. Installation instructions 15 US CA 7. Installation (all models) Your Fisher & Paykel ActiveSmart™ refrigerator is the correct air gap between the product and surrounding cabinetry. Avoid moving the product into its final location a ...simple task. Levelling of the refrigerator Fig.11 Refrigerator feet B Roll the refrigerator into its final position making moving the product in cabinetry dimensions table (refer to lift up making sure...

User Guide
Page 18
...to rest against the back wall so as per step 7C. (Check alignment and door closing action are on the top front of the refrigerator C Roll the refrigerator back into position and adjust front feet as to prevent it from moving when the cabinet is stable (all 4 feet are satisfactory). ...and/or damage floor coverings. Unlevel floor This foot lifts off the floor when top front is gently pushed back Fig 14.Unstable refrigerator Wall behind refrigerator Packing material goes under rear roller diagonally opposite front foot that the product is pushed into the gap under the foot. What to ...
...to rest against the back wall so as per step 7C. (Check alignment and door closing action are on the top front of the refrigerator C Roll the refrigerator back into position and adjust front feet as to prevent it from moving when the cabinet is stable (all 4 feet are satisfactory). ...and/or damage floor coverings. Unlevel floor This foot lifts off the floor when top front is gently pushed back Fig 14.Unstable refrigerator Wall behind refrigerator Packing material goes under rear roller diagonally opposite front foot that the product is pushed into the gap under the foot. What to ...

User Guide
Page 19
... sides. ■■ Allow good clearances in front of liquid detergent, and a soft cloth to remove manufacturing and transportation dust. ■■ Allow the refrigerator and freezer to run empty for 2 - 3 hours to allow each compartment to cool to a minimum. ■■ Select a temperature setting that all internal... the back of the shelves. ■■ Clean the inside of the appliance with any material that will go when the refrigerator and freezer have cooled sufficiently. Energy efficiency For the most energy efficient use of your appliance: ■■ Ensure your...
... sides. ■■ Allow good clearances in front of liquid detergent, and a soft cloth to remove manufacturing and transportation dust. ■■ Allow the refrigerator and freezer to run empty for 2 - 3 hours to allow each compartment to cool to a minimum. ■■ Select a temperature setting that all internal... the back of the shelves. ■■ Clean the inside of the appliance with any material that will go when the refrigerator and freezer have cooled sufficiently. Energy efficiency For the most energy efficient use of your appliance: ■■ Ensure your...

User Guide
Page 20
... with clean water and dry with a soft lint-free cloth. Holiday time We recommend you leave your cleaned appliance, leave the doors open. Moving your refrigerator ■■ Turn off for any reason, wait 10 minutes before turning it back on. Tuck the power cord away, tape the shelves in place.... If the cabinet needs to be placed at an angle or laid down, carefully lay it standing upright as long as they will allow the refrigeration system pressures to the right as far as you are on its position. Remove all food. ■■ Turn the adjustable feet to equalize before...
... with clean water and dry with a soft lint-free cloth. Holiday time We recommend you leave your cleaned appliance, leave the doors open. Moving your refrigerator ■■ Turn off for any reason, wait 10 minutes before turning it back on. Tuck the power cord away, tape the shelves in place.... If the cabinet needs to be placed at an angle or laid down, carefully lay it standing upright as long as they will allow the refrigeration system pressures to the right as far as you are on its position. Remove all food. ■■ Turn the adjustable feet to equalize before...
User Guide
Page 21
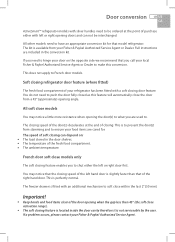
...mm). This does not apply to French door models. The freezer drawer is to prevent the door(s) from your Fisher & Paykel Authorized Service Agent. This is fitted with a soft closing refrigerator door feature (where fitted) The fresh food compartment of the fresh food compartment. ■■ The ambient ...You may notice that the closing feature enables you are used to. Door conversion 19 US CA ActiveSmart™ refrigerator models with silver handles need to be interchanged. If a problem occurs, please contact your Fisher & Paykel Authorized Service Agent or Dealer.
...mm). This does not apply to French door models. The freezer drawer is to prevent the door(s) from your Fisher & Paykel Authorized Service Agent. This is fitted with a soft closing refrigerator door feature (where fitted) The fresh food compartment of the fresh food compartment. ■■ The ambient ...You may notice that the closing feature enables you are used to. Door conversion 19 US CA ActiveSmart™ refrigerator models with silver handles need to be interchanged. If a problem occurs, please contact your Fisher & Paykel Authorized Service Agent or Dealer.
