Owner's Guide
Page 3
... not allow plug to whip when rewinding. • � Do not use extension cords or outlets with wet hands or operate without dust bag or filter in place. • � Use extra care when cleaning on stairs. • � Do not use to pick up anything that may be present. •...
... not allow plug to whip when rewinding. • � Do not use extension cords or outlets with wet hands or operate without dust bag or filter in place. • � Use extra care when cleaning on stairs. • � Do not use to pick up anything that may be present. •...
Owner's Guide
Page 6
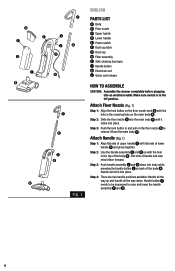
... main body A until it from the main body A . H F G I B B C E L J D A K ENGLISH PARTS LIST A Body B Floor nozzle C Upper handle D Lower handle E Power switch F Dust cup latch G Dust cup H Filter assembly I Stair cleaning hand grip J Handle button K Electrical cord L Quick cord release C D J A FIG. 1 HOW TO ASSEMBLE CAUTION: Assemble the cleaner completely before plugging into place...
... main body A until it from the main body A . H F G I B B C E L J D A K ENGLISH PARTS LIST A Body B Floor nozzle C Upper handle D Lower handle E Power switch F Dust cup latch G Dust cup H Filter assembly I Stair cleaning hand grip J Handle button K Electrical cord L Quick cord release C D J A FIG. 1 HOW TO ASSEMBLE CAUTION: Assemble the cleaner completely before plugging into place...
Owner's Guide
Page 10
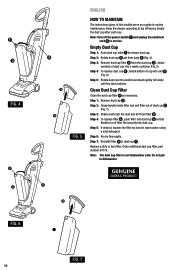
...: Turn off the power switch E and unplug the electrical cord K to release dust cup. Step 3: Remove dust cup filter H from the dust cup G , shake contents of filter fits securely into a waste container (Fig. 5). Step 5: Rotate dust cup into position and push gently into unit A (Fig. 6). ...Do not put in warm water using a mild detergent. Empty the dust cup after each use. Step 4: To replace filter H , push filter into dust cup G so that flexible rim of dust cup into dust cup. A H FIG. Step 6: Air dry thoroughly. Step 4: To replace dust...
...: Turn off the power switch E and unplug the electrical cord K to release dust cup. Step 3: Remove dust cup filter H from the dust cup G , shake contents of filter fits securely into a waste container (Fig. 5). Step 5: Rotate dust cup into position and push gently into unit A (Fig. 6). ...Do not put in warm water using a mild detergent. Empty the dust cup after each use. Step 4: To replace filter H , push filter into dust cup G so that flexible rim of dust cup into dust cup. A H FIG. Step 6: Air dry thoroughly. Step 4: To replace dust...

Owner's Guide
Page 17
... further identification assistance, you may be implied in my Eureka vacuum cleaner? Unfortunately, many of this warranty. Further Limitations and Exclusions Any warranty that require replacement under normal use, such as disposable dust bags, filters, drive belts, light bulbs, brushroll bristles, impellers and... cleaning. • � Damages or malfunctions caused by negligence, abuse, or use only Genuine Eureka paper bags, belts, and parts in connection with ...
... further identification assistance, you may be implied in my Eureka vacuum cleaner? Unfortunately, many of this warranty. Further Limitations and Exclusions Any warranty that require replacement under normal use, such as disposable dust bags, filters, drive belts, light bulbs, brushroll bristles, impellers and... cleaning. • � Damages or malfunctions caused by negligence, abuse, or use only Genuine Eureka paper bags, belts, and parts in connection with ...


