
User Manual
Page 1
Epson® PowerLite® Home Cinema 400 Series Home Theater Projector User's Guide
Epson® PowerLite® Home Cinema 400 Series Home Theater Projector User's Guide

User Manual
Page 3
...Map Optional Accessories Registration and Warranty Using This Manual Setting Up the Projector Choosing a Location Installing the Projector Connecting the Cables Making Other Connections Installing Batteries in the Remote Control Turning On the Projector Turning Off the Projector Selecting the Image Source Positioning the Image Making Basic Adjustments Correcting ...Choosing the Aspect Ratio Choosing the Color Mode Adjusting the Gamma, Color Temperature, and Skin Tones Adjusting the Gamma Setting Locking the Projector 7 8 9 10 11 11 12 13 13 16 18 19 20 21 22 22 24 25 25 26 26 28 29 30 31...
...Map Optional Accessories Registration and Warranty Using This Manual Setting Up the Projector Choosing a Location Installing the Projector Connecting the Cables Making Other Connections Installing Batteries in the Remote Control Turning On the Projector Turning Off the Projector Selecting the Image Source Positioning the Image Making Basic Adjustments Correcting ...Choosing the Aspect Ratio Choosing the Color Mode Adjusting the Gamma, Color Temperature, and Skin Tones Adjusting the Gamma Setting Locking the Projector 7 8 9 10 11 11 12 13 13 16 18 19 20 21 22 22 24 25 25 26 26 28 29 30 31...
User Manual
Page 4
... for Computer Images 40 Saving and Resetting Menu Selections 41 Creating Memory Settings 41 Recalling Memory Settings 41 Deleting Saved Memory Settings 42 Resetting the Projector 42 Customizing Projector Features 43 Image Sizing 43 Screen Options 44 Other Setup Options 45 Maintenance 47 Cleaning the Lens 47 Cleaning the...
... for Computer Images 40 Saving and Resetting Menu Selections 41 Creating Memory Settings 41 Recalling Memory Settings 41 Deleting Saved Memory Settings 42 Resetting the Projector 42 Customizing Projector Features 43 Image Sizing 43 Screen Options 44 Other Setup Options 45 Maintenance 47 Cleaning the Lens 47 Cleaning the...

User Manual
Page 7
...to quickly optimize viewing for different lighting environments and a vast array of your own home. Introduction The Epson® PowerLite® Home Cinema 400 Series projector lets you enjoy theater-quality images in optical Cinema Filter blocks out excess light for an expanded, purer color range and sophisticated grayscale...white levels of your projected content, for perfectly adjusted images all the way through your movies and game sessions ■ Epson 3LCD technology for reliable picture quality, increased contrast ratio, uniform colors, and the deepest blacks available ■ 10 bit...
...to quickly optimize viewing for different lighting environments and a vast array of your own home. Introduction The Epson® PowerLite® Home Cinema 400 Series projector lets you enjoy theater-quality images in optical Cinema Filter blocks out excess light for an expanded, purer color range and sophisticated grayscale...white levels of your projected content, for perfectly adjusted images all the way through your movies and game sessions ■ Epson 3LCD technology for reliable picture quality, increased contrast ratio, uniform colors, and the deepest blacks available ■ 10 bit...
User Manual
Page 8
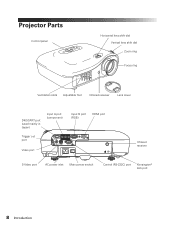
Projector Parts Control panel Horizontal lens shift dial Vertical lens shift dial Zoom ring Focus ring Ventilation slots Adjustable foot Infrared receiver Lens cover D4/SCART port (used mainly in Japan) Input A port (component) Trigger out port Input B port (RGB) HDMI port Video port Infrared receiver S-Video port AC power inlet Main power switch Control (RS-232C) port Kensington® lock port 8 Introduction
Projector Parts Control panel Horizontal lens shift dial Vertical lens shift dial Zoom ring Focus ring Ventilation slots Adjustable foot Infrared receiver Lens cover D4/SCART port (used mainly in Japan) Input A port (component) Trigger out port Input B port (RGB) HDMI port Video port Infrared receiver S-Video port AC power inlet Main power switch Control (RS-232C) port Kensington® lock port 8 Introduction

User Manual
Page 9
Mounting bracket connections Lamp cover Air filter Projector Control Panel Power light Power button Source button Switches the video input source Menu button Displays the menus Menu navigation buttons Esc button Exits the current menu item Aspect button Changes the picture's aspect ratio Warning light Keystone correction buttons Correct the shape of a non-rectangular image Select button Selects menu items or opens the line menu Introduction 9
Mounting bracket connections Lamp cover Air filter Projector Control Panel Power light Power button Source button Switches the video input source Menu button Displays the menus Menu navigation buttons Esc button Exits the current menu item Aspect button Changes the picture's aspect ratio Warning light Keystone correction buttons Correct the shape of a non-rectangular image Select button Selects menu items or opens the line menu Introduction 9
User Manual
Page 10
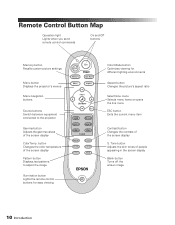
...Operation light Lights when you send remote control commands On and Off buttons Memory button Recalls custom picture settings Menu button Displays the projector's menus Menu navigation buttons Source buttons Switch between equipment connected to adjust the image Illumination button Lights the remote control buttons for... the screen display S. button Changes the color temperature of the screen display Pattern button Displays test patterns to the projector Gamma button Adjusts the gamma values of people appearing in the screen display Blank button Turns off the screen image 10 Introduction
...Operation light Lights when you send remote control commands On and Off buttons Memory button Recalls custom picture settings Menu button Displays the projector's menus Menu navigation buttons Source buttons Switch between equipment connected to adjust the image Illumination button Lights the remote control buttons for... the screen display S. button Changes the color temperature of the screen display Pattern button Displays test patterns to the projector Gamma button Adjusts the gamma values of people appearing in the screen display Blank button Turns off the screen image 10 Introduction

User Manual
Page 11
... reseller. To purchase online, visit www.epsonstore.com (U.S. Registration and Warranty The Epson PowerLite Home Cinema 400 Series projector comes with your unit to Epson. For details, see page 71. Introduction 11 See your Extra Care Home Service brochure for your projector and mail it to be repaired. In the unlikely event of an equipment failure, you a replacement unit...
... reseller. To purchase online, visit www.epsonstore.com (U.S. Registration and Warranty The Epson PowerLite Home Cinema 400 Series projector comes with your unit to Epson. For details, see page 71. Introduction 11 See your Extra Care Home Service brochure for your projector and mail it to be repaired. In the unlikely event of an equipment failure, you a replacement unit...
User Manual
Page 12
... basic setup and maintenance instructions, troubleshooting tips, important safety instructions, specifications, and warranty information. Take advantage of Epson's automated support services 24 hours a day at http://support.epson.com. Notes: Contain important information about your projector. 12 Introduction Use this site to view FAQs (Frequently Asked Questions) or product information and e-mail your...
... basic setup and maintenance instructions, troubleshooting tips, important safety instructions, specifications, and warranty information. Take advantage of Epson's automated support services 24 hours a day at http://support.epson.com. Notes: Contain important information about your projector. 12 Introduction Use this site to view FAQs (Frequently Asked Questions) or product information and e-mail your...
User Manual
Page 13
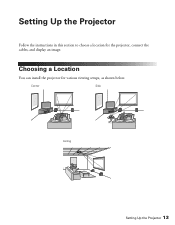
Center Side Ceiling Setting Up the Projector 13 Setting Up the Projector Follow the instructions in this section to choose a location for various viewing setups, as shown below. Choosing a Location You can install the projector for the projector, connect the cables, and display an image.
Center Side Ceiling Setting Up the Projector 13 Setting Up the Projector Follow the instructions in this section to choose a location for various viewing setups, as shown below. Choosing a Location You can install the projector for the projector, connect the cables, and display an image.
User Manual
Page 14
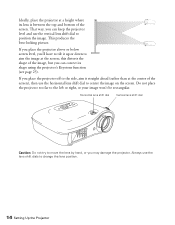
... aim the image at the screen; That way, you 'll have to tilt it straight ahead (rather than at a height where its shape using the projector's Keystone function (see page 25). Horizontal lens shift dial Vertical lens shift dial Caution: Do not try to move the lens by hand, or you... the center of the screen), then use the horizontal lens shift dial to center the image on the screen. If you place the projector above or below screen level, you can correct its lens is between the top and bottom of the screen. this distorts the shape of the ...
... aim the image at the screen; That way, you 'll have to tilt it straight ahead (rather than at a height where its shape using the projector's Keystone function (see page 25). Horizontal lens shift dial Vertical lens shift dial Caution: Do not try to move the lens by hand, or you... the center of the screen), then use the horizontal lens shift dial to center the image on the screen. If you place the projector above or below screen level, you can correct its lens is between the top and bottom of the screen. this distorts the shape of the ...
User Manual
Page 15
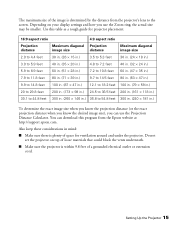
You can use the Zoom ring, the actual size may be smaller. Use this program from the projector's lens to 54.8 feet 300 in. (240 × 181 in .) 36.8 to the screen. Do not set the projector on your display settings and how you can download this table as a rough guide for ventilation... you know the desired image size), you use the Projection Distance Calculator. The maximum size of the image is determined by the distance from the Epson website at http://support...
You can use the Zoom ring, the actual size may be smaller. Use this program from the projector's lens to 54.8 feet 300 in. (240 × 181 in .) 36.8 to the screen. Do not set the projector on your display settings and how you can download this table as a rough guide for ventilation... you know the desired image size), you use the Projection Distance Calculator. The maximum size of the image is determined by the distance from the Epson website at http://support...
User Manual
Page 16
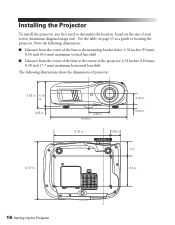
...32 inches (59 mm), 0.34 inch (8.6 mm) maximum vertical lens shift ■ Distance from the center of the lens to the center of the projector: 4.33 inches (110 mm), 0.30 inch (7.7 mm) maximum horizontal lens shift The following illustrations show the dimensions of your screen (maximum diagonal image ...size). Installing the Projector To install the projector, you first need to determine the location, based on page 15 as a guide to locating the projector. Use the table on the size of projector: 5.63 in. 5.18 in. 0.45 in. 12.17 in....
...32 inches (59 mm), 0.34 inch (8.6 mm) maximum vertical lens shift ■ Distance from the center of the lens to the center of the projector: 4.33 inches (110 mm), 0.30 inch (7.7 mm) maximum horizontal lens shift The following illustrations show the dimensions of your screen (maximum diagonal image ...size). Installing the Projector To install the projector, you first need to determine the location, based on page 15 as a guide to locating the projector. Use the table on the size of projector: 5.63 in. 5.18 in. 0.45 in. 12.17 in....

User Manual
Page 17
... picture so that it must be capable of supporting a weight of 58 pounds. If you will need a Phillips head screwdriver and a drill to the projector. Press the Menu button when done. You will need to prevent the screws from loosening and do not use any type of oil or lubricant.... Follow the instructions included with the projector, refer to open the Settings menu, then select Projection. 3. Press the Menu button on page 65. The wall or ceiling where you are planning ...
... picture so that it must be capable of supporting a weight of 58 pounds. If you will need a Phillips head screwdriver and a drill to the projector. Press the Menu button when done. You will need to prevent the screws from loosening and do not use any type of oil or lubricant.... Follow the instructions included with the projector, refer to open the Settings menu, then select Projection. 3. Press the Menu button on page 65. The wall or ceiling where you are planning ...

User Manual
Page 18
Video Use an RCA video cable: - * For details on compatible video formats, see page 63. 18 Setting Up the Projector Use a Mini D-sub, 15-pin monitor cable to connect to a desktop or laptop PC or Apple® Macintosh® system. You can also connect it ... satellite box, video game console, camcorder, or digital camera. Match corresponding colors between the cable and the ports. - Connecting the Cables You can connect the projector to the three component video ports.
Video Use an RCA video cable: - * For details on compatible video formats, see page 63. 18 Setting Up the Projector Use a Mini D-sub, 15-pin monitor cable to connect to a desktop or laptop PC or Apple® Macintosh® system. You can also connect it ... satellite box, video game console, camcorder, or digital camera. Match corresponding colors between the cable and the ports. - Connecting the Cables You can connect the projector to the three component video ports.

User Manual
Page 19
..., connect it to one of these ports Connect a computer to one of these ports If you plan to use the projector. ■ Plug the power cable into the projector and a grounded electrical outlet. Connect video equipment to the HDMI (High-Definition Multimedia Interface) port, if possible. Setting Up... the Projector 19 If your video equipment to one of the following ports (highest quality listed first): Input A (for component video), S-Video, or ...
..., connect it to one of these ports Connect a computer to one of these ports If you plan to use the projector. ■ Plug the power cable into the projector and a grounded electrical outlet. Connect video equipment to the HDMI (High-Definition Multimedia Interface) port, if possible. Setting Up... the Projector 19 If your video equipment to one of the following ports (highest quality listed first): Input A (for component video), S-Video, or ...
User Manual
Page 20
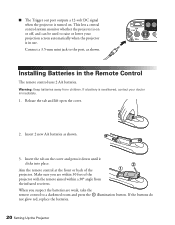
... AA batteries. Insert 2 new AA batteries as shown. If the buttons do not glow red, replace the batteries. 20 Setting Up the Projector Warning: Keep batteries away from the infrared receivers. Installing Batteries in use. Insert the tab on . Make sure you suspect the batteries are... are weak, take the remote control to raise or lower your projection screen automatically when the projector is swallowed, contact your doctor immediately. 1. This lets a central control system monitor whether the projector is on or off, and can be used to a darkened room and press the illumination ...
... AA batteries. Insert 2 new AA batteries as shown. If the buttons do not glow red, replace the batteries. 20 Setting Up the Projector Warning: Keep batteries away from the infrared receivers. Installing Batteries in use. Insert the tab on . Make sure you suspect the batteries are... are weak, take the remote control to raise or lower your projection screen automatically when the projector is swallowed, contact your doctor immediately. 1. This lets a central control system monitor whether the projector is on or off, and can be used to a darkened room and press the illumination ...

User Manual
Page 21
Turning On the Projector 1. Turn on the power switch on the projector. Press the On button on the remote control, or press the Power button on the back of the projector. Turn on any connected equipment you plan to use. 4. Power switch 5. Turn on the projector Setting Up the Projector 21 Remove the lens cap. 3. If this is your first time using the projector, remove the protective lens pad. 2.
Turning On the Projector 1. Turn on the power switch on the projector. Press the On button on the remote control, or press the Power button on the back of the projector. Turn on any connected equipment you plan to use. 4. Power switch 5. Turn on the projector Setting Up the Projector 21 Remove the lens cap. 3. If this is your first time using the projector, remove the protective lens pad. 2.
User Manual
Page 22
... damage it cool as described on the projector, you can properly cool the projector at an altitude above 4900 feet (1500 meters), turn off any equipment connected to the projector. 2. Turn off the projector's power switch on the projector twice. 3. Never unplug the projector without turning it off this product when ...not in use may need to change the image source as described above, or you 'll be using the projector at the high altitude air pressure. Press the Off button on the remote control, or press the Power button on the back. ...
... damage it cool as described on the projector, you can properly cool the projector at an altitude above 4900 feet (1500 meters), turn off any equipment connected to the projector. 2. Turn off the projector's power switch on the projector twice. 3. Never unplug the projector without turning it off this product when ...not in use may need to change the image source as described above, or you 'll be using the projector at the high altitude air pressure. Press the Off button on the remote control, or press the Power button on the back. ...

User Manual
Page 23
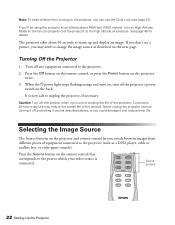
... see the Input A menu: Press the u or d button to highlight YCbCr or YPbPr, or select Auto so the projector can automatically detect the Input A source type. Setting Up the Projector 23 To temporarily turn off the image and darken the screen, press the Blank button. If you select the Input A source using...
... see the Input A menu: Press the u or d button to highlight YCbCr or YPbPr, or select Auto so the projector can automatically detect the Input A source type. Setting Up the Projector 23 To temporarily turn off the image and darken the screen, press the Blank button. If you select the Input A source using...


