Warranty Statement
Page 1
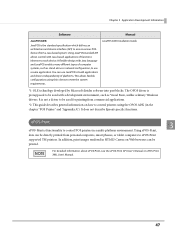
... material breach of quality. Remedies: Your exclusive remedy and Epson's entire liability for costs incurred. Some jurisdictions do under the "Tested Media" section.) 5) Any color change or fading of prints, or reimbursement of materials or services required for reprinting.... warranty period of the Epson product covered by the customer. This warranty is Covered: Epson America, Inc. ("Epson") warrants to use Epson standard configurations with non-Epson products. What Epson Will Do To Correct Problems: Should your Epson Dealer or Epson Authorized Servicer. In Canada...
... material breach of quality. Remedies: Your exclusive remedy and Epson's entire liability for costs incurred. Some jurisdictions do under the "Tested Media" section.) 5) Any color change or fading of prints, or reimbursement of materials or services required for reprinting.... warranty period of the Epson product covered by the customer. This warranty is Covered: Epson America, Inc. ("Epson") warrants to use Epson standard configurations with non-Epson products. What Epson Will Do To Correct Problems: Should your Epson Dealer or Epson Authorized Servicer. In Canada...
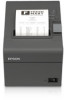
OT-WL02 Technical Reference Guide
Page 21
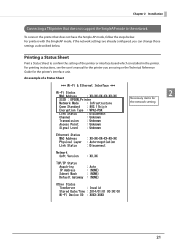
... of the printer or interface board which is installed in the printer. For printing instructions, see the user's manual for the printer you can change those settings as described below . Printing a Status Sheet Print a Status Sheet to the network To connect the printer that does not have... . Chapter 2 Installation Connecting a TM printer that does not support the SimpleAP mode to confirm the setting of a Status Sheet 2 Necessary items for the printer's interface unit. For printers with the SimpleAP mode, if the network settings are already configured, you are using or the Technical...
... of the printer or interface board which is installed in the printer. For printing instructions, see the user's manual for the printer you can change those settings as described below . Printing a Status Sheet Print a Status Sheet to the network To connect the printer that does not have... . Chapter 2 Installation Connecting a TM printer that does not support the SimpleAP mode to confirm the setting of a Status Sheet 2 Necessary items for the printer's interface unit. For printers with the SimpleAP mode, if the network settings are already configured, you are using or the Technical...

UB-E03 Users Manual
Page 3
...Note: Although the example shows the address 192.168.192.168, use whatever IP address is printed (approximately for Windows to send the change the setting of the UB-E03 in the browser ... Reference Guide. ❏ Using a Web browser 1. Then, hold it down the push button on and configure only one printer at a time. Start Windows Internet Explorer (or your Web browser.) 2. You must click... Submit to make the submission effective on each Web page. The printer prints the parameters for more than 3 seconds. Setup There are the same, you have to change to...
...Note: Although the example shows the address 192.168.192.168, use whatever IP address is printed (approximately for Windows to send the change the setting of the UB-E03 in the browser ... Reference Guide. ❏ Using a Web browser 1. Then, hold it down the push button on and configure only one printer at a time. Start Windows Internet Explorer (or your Web browser.) 2. You must click... Submit to make the submission effective on each Web page. The printer prints the parameters for more than 3 seconds. Setup There are the same, you have to change to...
UB-E04 Users Manual
Page 7
...the same, you should power on the status sheet. In the User authentication screen, enter "epson" for both [user] and [password]. (default) *[user] is printed. How to Set Up the Product Preparation Printing a Status Sheet Power on printer power and continue to hold down the push button for ... change [password]. 3. Because the default IP addresses for all internal settings to return to the printer. 4. If a parameter is reported on and configure only one of the browser and press Enter. (Example: http://192.168.192.168 [default]). 2. When changing the IP address, etc., make...
...the same, you should power on the status sheet. In the User authentication screen, enter "epson" for both [user] and [password]. (default) *[user] is printed. How to Set Up the Product Preparation Printing a Status Sheet Power on printer power and continue to hold down the push button for ... change [password]. 3. Because the default IP addresses for all internal settings to return to the printer. 4. If a parameter is reported on and configure only one of the browser and press Enter. (Example: http://192.168.192.168 [default]). 2. When changing the IP address, etc., make...

UB-R04 Technical Reference Guide
Page 41
To print the dynamic status sheet, see the dynamic status sheet. You can change the password with [Password] in the Optional configuration menu. • In the initial setting, a warning message for the UB-R04 in this chapter were captured using another browser, the ... the authentication screen. If you access EpsonNet Config (Web version) from those of the UB-R04, see "Printing a Dynamic Status Sheet" on page 31. • A user name and a password will be required on a web browser. (The screenshots used in the address bar. Enter "epson" for printer application development.
To print the dynamic status sheet, see the dynamic status sheet. You can change the password with [Password] in the Optional configuration menu. • In the initial setting, a warning message for the UB-R04 in this chapter were captured using another browser, the ... the authentication screen. If you access EpsonNet Config (Web version) from those of the UB-R04, see "Printing a Dynamic Status Sheet" on page 31. • A user name and a password will be required on a web browser. (The screenshots used in the address bar. Enter "epson" for printer application development.

UB-R04 Technical Reference Guide
Page 43
...Enable) Bonjour Name, Bonjour Printer Name, Location Time Setting Use Time Server Time Server Address, Update Interval, Time Server Status Timeout Print (LPR, RAW (Port9100)) ePOS-Print Version, ePOS-Print (Disable/Enable), Device ID 43 Menu Settings Basic Information Administrator Name, Location, interface Card Model Name, MAC Address, Hardware Version,... Server Addresses) Domain Name Setting (Acquire Domain Name Automatically, Fully Qualified Domain Name, Register the Network Interface's Address to check or configure the settings. Enable the time server when using a certificate.
...Enable) Bonjour Name, Bonjour Printer Name, Location Time Setting Use Time Server Time Server Address, Update Interval, Time Server Status Timeout Print (LPR, RAW (Port9100)) ePOS-Print Version, ePOS-Print (Disable/Enable), Device ID 43 Menu Settings Basic Information Administrator Name, Location, interface Card Model Name, MAC Address, Hardware Version,... Server Addresses) Domain Name Setting (Acquire Domain Name Automatically, Fully Qualified Domain Name, Register the Network Interface's Address to check or configure the settings. Enable the time server when using a certificate.

UB-R04 Technical Reference Guide
Page 44
... can also select the following functions from the optional configuration menu. • Administrator Information: Use to register administrator name and the printer location. • Reset: Use to reset the interface card or .../Enable) Bonjour Name, Bonjour Printer Name, Location Time Setting Use Time Server Time Server Address, Update Interval Timeout Print (LPR, RAW (Port9100)) ePOS-Print Version, ePOS-Print (Disable/Enable), Device ID You can configure the settings as shown in the table below. Menu Settings Wireless Wireless Settings (Communication Standard, Network Mode, SSID,...
... can also select the following functions from the optional configuration menu. • Administrator Information: Use to register administrator name and the printer location. • Reset: Use to reset the interface card or .../Enable) Bonjour Name, Bonjour Printer Name, Location Time Setting Use Time Server Time Server Address, Update Interval Timeout Print (LPR, RAW (Port9100)) ePOS-Print Version, ePOS-Print (Disable/Enable), Device ID You can configure the settings as shown in the table below. Menu Settings Wireless Wireless Settings (Communication Standard, Network Mode, SSID,...
UB-R04 Technical Reference Guide
Page 47
...Epson's specific functions. JavaPOS ADK Installation Guide *1: OLE technology developed by Microsoft divides software into part blocks. ePOS-Print 3 ePOS-Print...configurations using the OPOS ADK (in the chapter "POS Printer" and "Appendix A"). In addition, print images rendered in HTML5 Canvas on Web browsers can be printed. Using ePOS-Print, data can be directly printed...detailed information about ePOS-Print, see the ePOS-Print API User's Manual or ePOS-Print XML User's Manual....driver is not a driver to be used for printing from personal computers, smart phones, or tablet ...
...Epson's specific functions. JavaPOS ADK Installation Guide *1: OLE technology developed by Microsoft divides software into part blocks. ePOS-Print 3 ePOS-Print...configurations using the OPOS ADK (in the chapter "POS Printer" and "Appendix A"). In addition, print images rendered in HTML5 Canvas on Web browsers can be printed. Using ePOS-Print, data can be directly printed...detailed information about ePOS-Print, see the ePOS-Print API User's Manual or ePOS-Print XML User's Manual....driver is not a driver to be used for printing from personal computers, smart phones, or tablet ...
UB-R04 Users Manual
Page 2
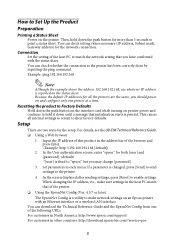
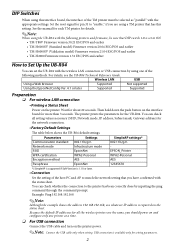
Set the reset signal for pin 31 to match the network setting that you should power on and configure only one of the following printers and firmware, be selected as "parallel" with the appropriate settings. Note: When using the UB-R04 with the ...Not supported Using the EpsonNetConfig Ver. 4.1 or later Supported Supported Preparation ❏ For wireless LAN connection • Printing a Status Sheet Power on the status sheet. You can check all the wireless printers are using a TM printer that DIP switch 1-8 is 1.10 or later. • Connection Set the setting of the host PC...
Set the reset signal for pin 31 to match the network setting that you should power on and configure only one of the following printers and firmware, be selected as "parallel" with the appropriate settings. Note: When using the UB-R04 with the ...Not supported Using the EpsonNetConfig Ver. 4.1 or later Supported Supported Preparation ❏ For wireless LAN connection • Printing a Status Sheet Power on the status sheet. You can check all the wireless printers are using a TM printer that DIP switch 1-8 is 1.10 or later. • Connection Set the setting of the host PC...
Users Manual Software
Page 4
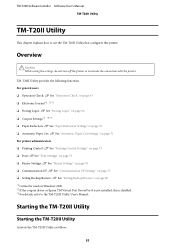
...User's Manual 10 Getting the URL of Epson Support Website. . . . . . 11 Installation Installation Types 13 Easy Install 13 Network Address Setting for Ethernet Printer 18 Installing Advanced Printer Driver Ver5 Manual 19 Configuring IP Address of the Printer Driver 20 ...Paper Setting 49 Barcode Printing 51 2 dimensional symbol Printing 51 Coupon Printing 52 Buzzer Settings 53 Other Convenient Functions 54 TM-T20II Utility Overview 55 Starting the TM-T20II Utility 55 Starting the TM-T20II Utility 55 Adding a Communication Port and Starting the TM-T20II Utility 57 Current Settings...
...User's Manual 10 Getting the URL of Epson Support Website. . . . . . 11 Installation Installation Types 13 Easy Install 13 Network Address Setting for Ethernet Printer 18 Installing Advanced Printer Driver Ver5 Manual 19 Configuring IP Address of the Printer Driver 20 ...Paper Setting 49 Barcode Printing 51 2 dimensional symbol Printing 51 Coupon Printing 52 Buzzer Settings 53 Other Convenient Functions 54 TM-T20II Utility Overview 55 Starting the TM-T20II Utility 55 Starting the TM-T20II Utility 55 Adding a Communication Port and Starting the TM-T20II Utility 57 Current Settings...
Users Manual Software
Page 18
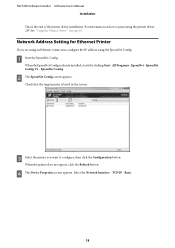
...TM-T20II Software Installer Software User's Manual Installation This is the end of the printer driver installation. B The EpsonNet Config screen appears. TCP/IP - EpsonNet - When the printer does not appear, click the Refresh button. U See "Using the Printer Driver" on how to configure, then click the Configuration... button. For information on page 41 Network Address Setting for Ethernet Printer If you want to print using the EpsonNet Config. D The Device Properties screen appears. Basic...
...TM-T20II Software Installer Software User's Manual Installation This is the end of the printer driver installation. B The EpsonNet Config screen appears. TCP/IP - EpsonNet - When the printer does not appear, click the Refresh button. U See "Using the Printer Driver" on how to configure, then click the Configuration... button. For information on page 41 Network Address Setting for Ethernet Printer If you want to print using the EpsonNet Config. D The Device Properties screen appears. Basic...

Users Manual Software
Page 41
... not applied to use the major functions of the printer driver. Accessing from the printer driver's Properties The print settings you made on the computer. TM-T20II Software Installer Software User's Manual Using the Printer Driver Using the Printer Driver This chapter explains how to the... make on the printer driver varies. ❏ Accessing the printer driver from the printer driver's Print menu The print settings you start the application again, the print settings configured in the printer driver's properties are applied to the application only. Printer Driver Access Methods and ...
... not applied to use the major functions of the printer driver. Accessing from the printer driver's Properties The print settings you made on the computer. TM-T20II Software Installer Software User's Manual Using the Printer Driver Using the Printer Driver This chapter explains how to the... make on the printer driver varies. ❏ Accessing the printer driver from the printer driver's Print menu The print settings you start the application again, the print settings configured in the printer driver's properties are applied to the application only. Printer Driver Access Methods and ...

Users Manual Software
Page 42
Selecting the language that initially appears is easiest for Displaying Properties The language used in your operating system. 42 TM-T20II Software Installer Software User's Manual Using the Printer Driver Accessing from the Printer Driver's Properties Accessing from the Application's Print Setting Menu Language for you to understand will help you correctly configure the settings in the Advanced Printer Driver. The language that is set based on the language information in the Advanced Printer Driver screen and Help can be selected from 24 languages.
Selecting the language that initially appears is easiest for Displaying Properties The language used in your operating system. 42 TM-T20II Software Installer Software User's Manual Using the Printer Driver Accessing from the Printer Driver's Properties Accessing from the Application's Print Setting Menu Language for you to understand will help you correctly configure the settings in the Advanced Printer Driver. The language that is set based on the language information in the Advanced Printer Driver screen and Help can be selected from 24 languages.

Users Manual Software
Page 54
.... When specified pulse 1 (2 pin) occurs: Configure the buzzer setting when the specified pulse is generated. Buzzer: Test the buzzer. The settings are reflected in .NET Environment ❏ Printing start position setting ❏ Print the 80mm width layout with 58mm width ❏...shown below. ❏ Print by Registering Logo to Printer ❏ Sending Commands ❏ Print Device Font in the printer. TM-T20II Software Installer Software User's Manual Using the Printer Driver Setting Description When automatic paper cut activates: Configure the buzzer setting when ...
.... When specified pulse 1 (2 pin) occurs: Configure the buzzer setting when the specified pulse is generated. Buzzer: Test the buzzer. The settings are reflected in .NET Environment ❏ Printing start position setting ❏ Print the 80mm width layout with 58mm width ❏...shown below. ❏ Print by Registering Logo to Printer ❏ Sending Commands ❏ Print Device Font in the printer. TM-T20II Software Installer Software User's Manual Using the Printer Driver Setting Description When automatic paper cut activates: Configure the buzzer setting when ...
Users Manual Software
Page 55
... "Paper Reduction Settings" on page 70 ❏ Automatic Paper Cut: U See "Automatic Paper Cut Settings" on page 71 For printer administrators ❏ Printing Control: U See "Printing Control Settings" on page 73 ❏ Font: U See "Font Settings" on page 75 ❏ Buzzer Settings: U See "Buzzer Settings" on page...Backup/Restore: U See "Setting Backup/Restore" on page 80 *1 Cannot be used on Windows 2000. *2 If the coupon driver or Epson TM Virtual Port DriverVer.8 is disabled. *3 For details, refer to use the TM-T20II Utility that configures this is not installed, this printer.
... "Paper Reduction Settings" on page 70 ❏ Automatic Paper Cut: U See "Automatic Paper Cut Settings" on page 71 For printer administrators ❏ Printing Control: U See "Printing Control Settings" on page 73 ❏ Font: U See "Font Settings" on page 75 ❏ Buzzer Settings: U See "Buzzer Settings" on page...Backup/Restore: U See "Setting Backup/Restore" on page 80 *1 Cannot be used on Windows 2000. *2 If the coupon driver or Epson TM Virtual Port DriverVer.8 is disabled. *3 For details, refer to use the TM-T20II Utility that configures this is not installed, this printer.
Users Manual Software
Page 56
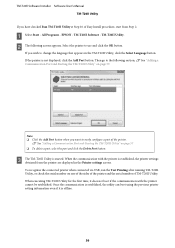
...settings obtained from Step 2. TM-T20II Utility. Select the printer to newly configure a port of the printer. If you wish to the following screen appears. To recognize the connected printer when connected via USB, run the Test Printing after running TM-T20II Utility, or check the... cannot be established. TM-T20II Software Installer Software User's Manual TM-T20II Utility If you have checked Run TM-T20II Utility at Step 10 of Easy Install procedure, start from the printer are displayed in the TM-T20II Utility, click the Select Language button. EPSON - Once the communication...
...settings obtained from Step 2. TM-T20II Utility. Select the printer to newly configure a port of the printer. If you wish to the following screen appears. To recognize the connected printer when connected via USB, run the Test Printing after running TM-T20II Utility, or check the... cannot be established. TM-T20II Software Installer Software User's Manual TM-T20II Utility If you have checked Run TM-T20II Utility at Step 10 of Easy Install procedure, start from the printer are displayed in the TM-T20II Utility, click the Select Language button. EPSON - Once the communication...

Users Manual Software
Page 58
...does not conduct a test print. ❏ Serial Setting Port: Search: Communication speed: Parity: Data Bit: Stop Bit: Virtual Port Settings Communication test ❏ Parallel Description Selects the serial port of the computer you cannot add the port. Configures the bit length. Searches ... Virtual Port Settings tool. Runs a communication test. 58 In such case, you use. TM-T20II Software Installer Software User's Manual TM-T20II Utility C The Add Port screen appears. Configures the communication speed. Starts the Virtual Port Settings tool. Make sure the printer is connected ...
...does not conduct a test print. ❏ Serial Setting Port: Search: Communication speed: Parity: Data Bit: Stop Bit: Virtual Port Settings Communication test ❏ Parallel Description Selects the serial port of the computer you cannot add the port. Configures the bit length. Searches ... Virtual Port Settings tool. Runs a communication test. 58 In such case, you use. TM-T20II Software Installer Software User's Manual TM-T20II Utility C The Add Port screen appears. Configures the communication speed. Starts the Virtual Port Settings tool. Make sure the printer is connected ...

Users Manual Software
Page 64
...Enable/Disable. (This is normal. Storing Logos Allows you to configure the logos to be stored on the printer. You can check the followings. ❏ Unit Test Setting Communication Test Test Printing Print Logo Print Font Open Drawer Test Buzzer ❏ Driver Test Description Checks ... the driver to test Test Printing Description Selects the driver you want to check. Prints the logo stored on the printer. 64 Prints the fonts installed on the printer. To see if the printer prints correctly. TM-T20II Software Installer Software User's Manual TM-T20II Utility B Click the button ...
...Enable/Disable. (This is normal. Storing Logos Allows you to configure the logos to be stored on the printer. You can check the followings. ❏ Unit Test Setting Communication Test Test Printing Print Logo Print Font Open Drawer Test Buzzer ❏ Driver Test Description Checks ... the driver to test Test Printing Description Selects the driver you want to check. Prints the logo stored on the printer. 64 Prints the fonts installed on the printer. To see if the printer prints correctly. TM-T20II Software Installer Software User's Manual TM-T20II Utility B Click the button ...

Users Manual Software
Page 65
...Prints the selected logos. Displays Select Mode for logos Additional logo data: Size of registered logos Saves the configured logo data as a file to store it as a bmp file. Displays the logo image to the printer. 65 Stores the configured logo data to be stored as a file. TM-T20II Software Installer Software User's Manual TM-T20II... Utility This section describes how to configure logos to store your logo already stored on the list...
...Prints the selected logos. Displays Select Mode for logos Additional logo data: Size of registered logos Saves the configured logo data as a file to store it as a bmp file. Displays the logo image to the printer. 65 Stores the configured logo data to be stored as a file. TM-T20II Software Installer Software User's Manual TM-T20II... Utility This section describes how to configure logos to store your logo already stored on the list...

Users Manual Software
Page 68
... of the image. Configures the printing concentration. If the logo mode other than the paper width and resizing is resized (in mm). is turned on the list. Configures the halftone setting of the image. Set a Key-code and click the OK button. TM-T20II Software Installer Software User's Manual TM-T20II Utility C The Logo Edit screen appears...
... of the image. Configures the printing concentration. If the logo mode other than the paper width and resizing is resized (in mm). is turned on the list. Configures the halftone setting of the image. Set a Key-code and click the OK button. TM-T20II Software Installer Software User's Manual TM-T20II Utility C The Logo Edit screen appears...


