UB-R04 Technical Reference Guide
Page 17
...USB connector to set and the power supply is turned on the power supply. Be sure to use the USB connector only for printing (paper is set the internal parameters. • Set the internal parameters by connecting with a computer installed with the dedicated utility (EpsonNet Config)... via a USB cable. • Set the parameters of TM printers by connecting with a computer installed with the dedicated utility (TM Automatic Restore Utility) via a USB cable. the network parameter status is printed. All settings are reset to ...
...USB connector to set and the power supply is turned on the power supply. Be sure to use the USB connector only for printing (paper is set the internal parameters. • Set the internal parameters by connecting with a computer installed with the dedicated utility (EpsonNet Config)... via a USB cable. • Set the parameters of TM printers by connecting with a computer installed with the dedicated utility (TM Automatic Restore Utility) via a USB cable. the network parameter status is printed. All settings are reset to ...
UB-R04 Technical Reference Guide
Page 21
...implied warranty of each printer's IP address. 21 The list of open source software programs included with a USB cable. • The TM printer is off-line. (No paper or cover open source software programs are described on under the following URL. The open , etc.) Unplug the USB cable or correct ...off-line condition at the TM printer to the computer with this printer product and the whole license agreements of each license ...
...implied warranty of each printer's IP address. 21 The list of open source software programs included with a USB cable. • The TM printer is off-line. (No paper or cover open source software programs are described on under the following URL. The open , etc.) Unplug the USB cable or correct ...off-line condition at the TM printer to the computer with this printer product and the whole license agreements of each license ...
UB-R04 Technical Reference Guide
Page 24
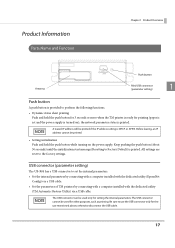
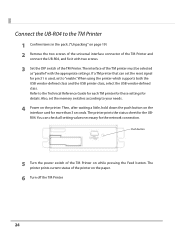
... vendor-defined class. Then, after waiting a little, hold down the push button on the paper. 6 Turn off the TM Printer. 24 Push button 5 Turn the power switch of the TM Printer. Connect the UB-R04 to the TM Printer 1 Confirm items in the pack. ("Unpacking" on page 19) 2 Remove the two... screws of the universal interface connector of the TM Printer and connect the UB-R04, and fix it with the appropriate settings. If a TM printer that can check all setting values necessary for the network connection. The printer prints current status of...
... vendor-defined class. Then, after waiting a little, hold down the push button on the paper. 6 Turn off the TM Printer. 24 Push button 5 Turn the power switch of the TM Printer. Connect the UB-R04 to the TM Printer 1 Confirm items in the pack. ("Unpacking" on page 19) 2 Remove the two... screws of the universal interface connector of the TM Printer and connect the UB-R04, and fix it with the appropriate settings. If a TM printer that can check all setting values necessary for the network connection. The printer prints current status of...
UB-R04 Technical Reference Guide
Page 27
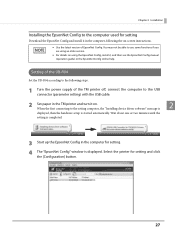
..."EpsonNet Config" window is started automatically. Wait about one or two minutes until the setting is completed. 3 Start up the EpsonNet Config in the TM printer and turn it on. Chapter 2 Installation Installing the EpsonNet Config to the computer used for setting Download the EpsonNet Config and install it , ...) or the EpsonNet Config online help. You may not be able to the USB connector (parameter setting) with the USB cable. 2 Set paper in the computer for setting and click the [Configuration] button. 27 Setting of the UB-R04 Set the UB-R04 according to the following the...
..."EpsonNet Config" window is started automatically. Wait about one or two minutes until the setting is completed. 3 Start up the EpsonNet Config in the TM printer and turn it on. Chapter 2 Installation Installing the EpsonNet Config to the computer used for setting Download the EpsonNet Config and install it , ...) or the EpsonNet Config online help. You may not be able to the USB connector (parameter setting) with the USB cable. 2 Set paper in the computer for setting and click the [Configuration] button. 27 Setting of the UB-R04 Set the UB-R04 according to the following the...
UB-R04 Technical Reference Guide
Page 31
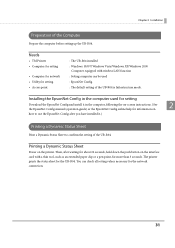
...Config in the computer used : EpsonNet Config : The default setting of the Computer Prepare the computer before setting up the UB-R04. Needs • TM Printer • Computer for setting • Computer for network • Utility for information on the printer. Chapter 2 Installation Preparation of the UB-... point : The UB-R04 installed : Windows 10/8/7/Windows Vista/Windows XP/Windows 2000 Computer equipped with a thin tool, such as an extended paper clip or a pen point, for the UB-R04. Printing a Dynamic Status Sheet Power on how to confirm the setting of the UB-R04.
...Config in the computer used : EpsonNet Config : The default setting of the Computer Prepare the computer before setting up the UB-R04. Needs • TM Printer • Computer for setting • Computer for network • Utility for information on the printer. Chapter 2 Installation Preparation of the UB-... point : The UB-R04 installed : Windows 10/8/7/Windows Vista/Windows XP/Windows 2000 Computer equipped with a thin tool, such as an extended paper clip or a pen point, for the UB-R04. Printing a Dynamic Status Sheet Power on how to confirm the setting of the UB-R04.

UB-R04 Technical Reference Guide
Page 36
...button, turn the TM printer on. A receipt as follows. Communication standard: 802.11b/g/n Network mode: Infrastructure mode SSID: EpsonNet Encryption Type: WPA-PSK(AES) Passphrase: EpsonNet IP address: 192.168.192.168 Subnet mask: 255.255.255.0 * You can be reset to the default using an extended paper clip or a ...pen point. 4 Wait for the TM printer to a WPA2-PSK (AES) access point using the settings above. 1 Set the roll...
...button, turn the TM printer on. A receipt as follows. Communication standard: 802.11b/g/n Network mode: Infrastructure mode SSID: EpsonNet Encryption Type: WPA-PSK(AES) Passphrase: EpsonNet IP address: 192.168.192.168 Subnet mask: 255.255.255.0 * You can be reset to the default using an extended paper clip or a ...pen point. 4 Wait for the TM printer to a WPA2-PSK (AES) access point using the settings above. 1 Set the roll...
UB-R04 Technical Reference Guide
Page 46
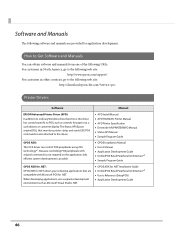
...go to the following web site: http://download.epson-biz.com/?service=pos Printer Drivers Software Manual EPSON Advanced Printer Driver (APD): In addition to ordinary Windows driver functions, this driver. • APD Install Manual • APD TM/BA/EU Printer Manual • APD Printer ...software and manuals are compatible with Microsoft POS for .NET. When developing applications, use a separate development environment such as controls for paper cut, a cash drawer, or customer display. Because controlling POS peripherals with original commands is not required on the application side,...
...go to the following web site: http://download.epson-biz.com/?service=pos Printer Drivers Software Manual EPSON Advanced Printer Driver (APD): In addition to ordinary Windows driver functions, this driver. • APD Install Manual • APD TM/BA/EU Printer Manual • APD Printer ...software and manuals are compatible with Microsoft POS for .NET. When developing applications, use a separate development environment such as controls for paper cut, a cash drawer, or customer display. Because controlling POS peripherals with original commands is not required on the application side,...

UB-R04 Technical Reference Guide
Page 63
The parameter sheet of a parameter sheet Necessary items for more than 3 seconds by using an extended paper clip or a pen point. Power on the parameter sheet. The setting value necessary to 6 seconds, hold down the push button of the UB-R03 for ...the network setting WEP key The WEP key is not printed on the TM Printer, and after printing the parameter sheet of the UB-R03 is printed. Appendix Exchange from the network administrator. 63 Push button An example of...
The parameter sheet of a parameter sheet Necessary items for more than 3 seconds by using an extended paper clip or a pen point. Power on the parameter sheet. The setting value necessary to 6 seconds, hold down the push button of the UB-R03 for ...the network setting WEP key The WEP key is not printed on the TM Printer, and after printing the parameter sheet of the UB-R03 is printed. Appendix Exchange from the network administrator. 63 Push button An example of...
Users Manual Hardware
Page 4
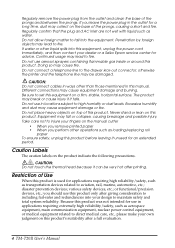
...; Penetration by foreign objects may be very hot after a full evaluation. 4 TM-T20II User's Manual otherwise the printer and the telephone line may lead to injure your dealer or a Seiko Epson service center for applications requiring high reliability/safety, such as water. Never stand or...to maintain safety and total system reliability. Caution Labels The caution labels on the manual cutter • When you remove printed paper • When you perform other operations such as aerospace equipment, main communication equipment, nuclear power control equipment, or medical ...
...; Penetration by foreign objects may be very hot after a full evaluation. 4 TM-T20II User's Manual otherwise the printer and the telephone line may lead to injure your dealer or a Seiko Epson service center for applications requiring high reliability/safety, such as water. Never stand or...to maintain safety and total system reliability. Caution Labels The caution labels on the manual cutter • When you remove printed paper • When you perform other operations such as aerospace equipment, main communication equipment, nuclear power control equipment, or medical ...
Users Manual Hardware
Page 5
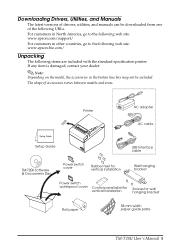
...Control panel label for vertical installation Screws for wall hanging bracket Roll paper 58-mm width paper guide plate TM-T20II User's Manual 5 Note: Depending on the model, the accessories in other countries, go to the following web site: www.epson-biz.com/ Unpacking The following URLs. If any item is damaged,... latest versions of drivers, utilities, and manuals can be included. For customers in North America, go to the following web site: www.epson.com/support/ For customers in the broken line box may not be downloaded from one of accessories varies between models and areas.
...Control panel label for vertical installation Screws for wall hanging bracket Roll paper 58-mm width paper guide plate TM-T20II User's Manual 5 Note: Depending on the model, the accessories in other countries, go to the following web site: www.epson-biz.com/ Unpacking The following URLs. If any item is damaged,... latest versions of drivers, utilities, and manuals can be included. For customers in North America, go to the following web site: www.epson.com/support/ For customers in the broken line box may not be downloaded from one of accessories varies between models and areas.

Users Manual Hardware
Page 6
Flashing indicates standby. Paper LED On indicates a paper out. Feed button This button feeds paper. 6 TM-T20II User's Manual Part Names Roll paper cover Control panel Cutter cover Cover open lever Power switch Control Panel (Power) LED This LED is on when the printer is on. Error LED This indicates an error.
Flashing indicates standby. Paper LED On indicates a paper out. Feed button This button feeds paper. 6 TM-T20II User's Manual Part Names Roll paper cover Control panel Cutter cover Cover open lever Power switch Control Panel (Power) LED This LED is on when the printer is on. Error LED This indicates an error.

Users Manual Hardware
Page 9
...rubber feet within the scribed line on top) or vertically (with the paper exit at the front). Installing the Printer You can install the printer horizontally on a flat surface (with the paper exit on the hanging bracket. Installing the Printer Vertically When installing the ... Affixing tape is upright to prevent the printer from moving by vibration during paper cutting and when using the included accessories. Attach the control panel label for vertical installation on the roll paper cover. 2. TM-T20II User's Manual 9 CAUTION: Take measures to the mounting surface using 2 ...
...rubber feet within the scribed line on top) or vertically (with the paper exit at the front). Installing the Printer You can install the printer horizontally on a flat surface (with the paper exit on the hanging bracket. Installing the Printer Vertically When installing the ... Affixing tape is upright to prevent the printer from moving by vibration during paper cutting and when using the included accessories. Attach the control panel label for vertical installation on the roll paper cover. 2. TM-T20II User's Manual 9 CAUTION: Take measures to the mounting surface using 2 ...

Users Manual Hardware
Page 13
Remove the used roll paper core if any, and insert the roll paper. The correct direction of the paper is shown in the illustration below to open lever 2. Use the cover open lever to install the roll paper. 1. TM-T20II User's Manual 13 Cover open the roll paper cover. Installing Roll Paper Follow the steps below .
Remove the used roll paper core if any, and insert the roll paper. The correct direction of the paper is shown in the illustration below to open lever 2. Use the cover open lever to install the roll paper. 1. TM-T20II User's Manual 13 Cover open the roll paper cover. Installing Roll Paper Follow the steps below .

Users Manual Hardware
Page 14
When the printer power is on, the roll paper is automatically cut. 2 1 14 TM-T20II User's Manual 3. Pull out some paper, and close the roll paper cover.
When the printer power is on, the roll paper is automatically cut. 2 1 14 TM-T20II User's Manual 3. Pull out some paper, and close the roll paper cover.

Users Manual Hardware
Page 15
... back to 80 mm. Align 3 projections on the 58-mm width paper guide plate with the utility software for the TM-T20II. 1. Close the roll paper cover. Changing the Paper Width You can change the paper width from 80 to 58 mm, you change the paper width from 80 to 58 mm by installing the included 58...
... back to 80 mm. Align 3 projections on the 58-mm width paper guide plate with the utility software for the TM-T20II. 1. Close the roll paper cover. Changing the Paper Width You can change the paper width from 80 to 58 mm, you change the paper width from 80 to 58 mm by installing the included 58...

Users Manual Hardware
Page 16
...10063; For other cases, turn the power switch on and off , and after 10 seconds, back on. 16 TM-T20II User's Manual If paper is correctly installed and any roll paper remains. You can turn the printer off by inserting a sharp-pointed object in the holes in the illustration below...switch is not pressed accidentally. Power switch cover Power switch waterproof cover Troubleshooting No lights on with no printing ❏ Check whether a paper jam has occurred. Error LED flashing with the power switch cover attached, unplug the power cord immediately. Error LED on the control ...
...10063; For other cases, turn the power switch on and off , and after 10 seconds, back on. 16 TM-T20II User's Manual If paper is correctly installed and any roll paper remains. You can turn the printer off by inserting a sharp-pointed object in the holes in the illustration below...switch is not pressed accidentally. Power switch cover Power switch waterproof cover Troubleshooting No lights on with no printing ❏ Check whether a paper jam has occurred. Error LED flashing with the power switch cover attached, unplug the power cord immediately. Error LED on the control ...

Users Manual Hardware
Page 17
... the operating instructions on the back of the cutter cover, and slide it toward the arrow in the opening. Open the roll paper cover and remove the jammed paper. Triangle Knob 4. TM-T20II User's Manual 17 This returns the cutter blade to remove it can be very hot after printing. When... a paper jam occurs When a paper jam occurs, never pull out the paper forcibly. If the roll paper cover does not open, follow the steps below to...
... the operating instructions on the back of the cutter cover, and slide it toward the arrow in the opening. Open the roll paper cover and remove the jammed paper. Triangle Knob 4. TM-T20II User's Manual 17 This returns the cutter blade to remove it can be very hot after printing. When... a paper jam occurs When a paper jam occurs, never pull out the paper forcibly. If the roll paper cover does not open, follow the steps below to...

Users Manual Hardware
Page 18
...the printer, open the roll paper cover, and clean the thermal elements of plastic and rubber. Do not damage the thermal head by touching it with alcohol, benzine, thinner, or other such solvents. Be careful not to touch it . Thermal head 18 TM-T20II User's Manual Cleaning the Thermal...with a cotton swab moistened with a dry cloth or a damp cloth. Turn off the printer case with an alcohol solvent (ethanol or IPA). Epson recommends cleaning the thermal head periodically (generally every 3 months) to let it cool before you clean it and to maintain receipt print quality. CAUTION:...
...the printer, open the roll paper cover, and clean the thermal elements of plastic and rubber. Do not damage the thermal head by touching it with alcohol, benzine, thinner, or other such solvents. Be careful not to touch it . Thermal head 18 TM-T20II User's Manual Cleaning the Thermal...with a cotton swab moistened with a dry cloth or a damp cloth. Turn off the printer case with an alcohol solvent (ethanol or IPA). Epson recommends cleaning the thermal head periodically (generally every 3 months) to let it cool before you clean it and to maintain receipt print quality. CAUTION:...
Users Manual Hardware
Page 19
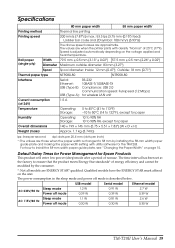
... mode and power off mode 1.1 W 0.30 W 0.81 W 0.30 W 2.6 W 0.30 W TM-T20II User's Manual 19 Speed is described below. Default Delay Times for Power Management for Epson Products This product will enter low power (sleep) mode after a period of energy efficiency and cannot be modified...-80 NTP058-80 Interface Serial: RS-232 Ethernet: 10BASE-T/100BASE-TX USB (Type B): Compliance: USB 2.0 Communication speed: Full-speed (12 Mbps) USB (Type A): for paper Overall dimensions 140 × 199 × 146 mm {5.75 × 5.51 × 7.83"} (W × D × H) Weight (mass) Approx. ...
... mode and power off mode 1.1 W 0.30 W 0.81 W 0.30 W 2.6 W 0.30 W TM-T20II User's Manual 19 Speed is described below. Default Delay Times for Power Management for Epson Products This product will enter low power (sleep) mode after a period of energy efficiency and cannot be modified...-80 NTP058-80 Interface Serial: RS-232 Ethernet: 10BASE-T/100BASE-TX USB (Type B): Compliance: USB 2.0 Communication speed: Full-speed (12 Mbps) USB (Type A): for paper Overall dimensions 140 × 199 × 146 mm {5.75 × 5.51 × 7.83"} (W × D × H) Weight (mass) Approx. ...
Users Manual Software
Page 4
... Uninstallation 36 Uninstalling the Windows Printer Driver. . . . . . 36 Uninstalling the TM-T20II Utility 37 Uninstall the EpsonNet Config 38 Uninstalling the Epson TM Virtual Port Driver 38 Uninstalling the EPSON Monitoring Tool. . . . . 38 Uninstalling the OPOS ADK 39 Uninstalling the OPOS ADK...TM-T20II Utility Overview 55 Starting the TM-T20II Utility 55 Starting the TM-T20II Utility 55 Adding a Communication Port and Starting the TM-T20II Utility 57 Current Settings 61 Details 61 Operation Check 63 Storing Logos 64 Adding a Logo 67 Paper Reduction Settings 70 Automatic Paper...
... Uninstallation 36 Uninstalling the Windows Printer Driver. . . . . . 36 Uninstalling the TM-T20II Utility 37 Uninstall the EpsonNet Config 38 Uninstalling the Epson TM Virtual Port Driver 38 Uninstalling the EPSON Monitoring Tool. . . . . 38 Uninstalling the OPOS ADK 39 Uninstalling the OPOS ADK...TM-T20II Utility Overview 55 Starting the TM-T20II Utility 55 Starting the TM-T20II Utility 55 Adding a Communication Port and Starting the TM-T20II Utility 57 Current Settings 61 Details 61 Operation Check 63 Storing Logos 64 Adding a Logo 67 Paper Reduction Settings 70 Automatic Paper...

