
ESC/VP Level 21 Communication Manual (Home Projectors)
Page 1
... do not agree to print out and use this downloading service. Please read carefully the following "LICENSE AGREEMENT" before using the EPSON projector. LICENSE AGREEMENT 1. Downloading the User's Guide indicates your own risk. I AGREE I DO NOT AGREE You expressly acknowledge and agree that...before downloading "ESC/VP21 Command User's Guide". If you could use only 1 set of the user's guide only for any damage such as EPSON). EPSON shall not be downloaded until you to the "LICENSE AGREEMENT", please do not utilize this user's guide. The User's Guide shall not be ...
... do not agree to print out and use this downloading service. Please read carefully the following "LICENSE AGREEMENT" before using the EPSON projector. LICENSE AGREEMENT 1. Downloading the User's Guide indicates your own risk. I AGREE I DO NOT AGREE You expressly acknowledge and agree that...before downloading "ESC/VP21 Command User's Guide". If you could use only 1 set of the user's guide only for any damage such as EPSON). EPSON shall not be downloaded until you to the "LICENSE AGREEMENT", please do not utilize this user's guide. The User's Guide shall not be ...

User's Guide - PowerLite Home Cinema 720
Page 1
PowerLite® Home Cinema 720 Home Theater Projector User's Guide
PowerLite® Home Cinema 720 Home Theater Projector User's Guide
User's Guide - PowerLite Home Cinema 720
Page 3
...Map Optional Accessories Registration and Warranty Using This Manual Setting Up the Projector Choosing a Location Installing the Projector Connecting the Cables Making Other Connections Installing Batteries in the Remote Control Turning On the Projector Turning Off the Projector Selecting the Image Source Positioning the Image Making Basic Adjustments Correcting ...Choosing the Aspect Ratio Choosing the Color Mode Adjusting the Gamma, Color Temperature, and Skin Tones Adjusting the Gamma Setting Locking the Projector 7 8 9 10 11 11 12 13 13 16 18 19 20 21 22 22 24 25 25 26 26 28 29 30 31...
...Map Optional Accessories Registration and Warranty Using This Manual Setting Up the Projector Choosing a Location Installing the Projector Connecting the Cables Making Other Connections Installing Batteries in the Remote Control Turning On the Projector Turning Off the Projector Selecting the Image Source Positioning the Image Making Basic Adjustments Correcting ...Choosing the Aspect Ratio Choosing the Color Mode Adjusting the Gamma, Color Temperature, and Skin Tones Adjusting the Gamma Setting Locking the Projector 7 8 9 10 11 11 12 13 13 16 18 19 20 21 22 22 24 25 25 26 26 28 29 30 31...
User's Guide - PowerLite Home Cinema 720
Page 4
...Adjustments for Computer Images 40 Selecting Memory Settings and Resetting the Projector 41 Selecting Memory Settings 41 Creating Memory Settings 41 Deleting Saved Memory Settings 42 Resetting the Projector 42 Customizing Projector Features 43 Image Sizing 43 Screen Options 44 Other Setup ...Options 45 Maintenance 47 Cleaning the Lens 47 Cleaning the Projector Case 48 Cleaning and Replacing the Air Filter ...
...Adjustments for Computer Images 40 Selecting Memory Settings and Resetting the Projector 41 Selecting Memory Settings 41 Creating Memory Settings 41 Deleting Saved Memory Settings 42 Resetting the Projector 42 Customizing Projector Features 43 Image Sizing 43 Screen Options 44 Other Setup ...Options 45 Maintenance 47 Cleaning the Lens 47 Cleaning the Projector Case 48 Cleaning and Replacing the Air Filter ...
User's Guide - PowerLite Home Cinema 720
Page 7
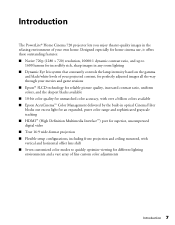
... based on the gamma and black/white levels of fine custom color adjustments Introduction 7 Introduction The PowerLite® Home Cinema 720 projector lets you enjoy theater-quality images in the relaxing environment of your movies and game sessions ■ Epson® 3LCD technology for reliable picture quality, increased contrast ratio, uniform colors, and the deepest blacks...
... based on the gamma and black/white levels of fine custom color adjustments Introduction 7 Introduction The PowerLite® Home Cinema 720 projector lets you enjoy theater-quality images in the relaxing environment of your movies and game sessions ■ Epson® 3LCD technology for reliable picture quality, increased contrast ratio, uniform colors, and the deepest blacks...
User's Guide - PowerLite Home Cinema 720
Page 8
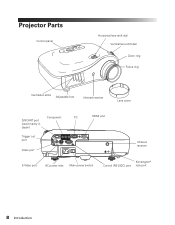
Projector Parts Control panel Horizontal lens shift dial Vertical lens shift dial Zoom ring Focus ring Ventilation slots Adjustable foot Infrared receiver Lens cover Component PC D/SCART port (used mainly in Japan) Trigger out port Video port HDMI port Infrared receiver S-Video port AC power inlet Main power switch Kensington® Control (RS-232C) port lock port 8 Introduction
Projector Parts Control panel Horizontal lens shift dial Vertical lens shift dial Zoom ring Focus ring Ventilation slots Adjustable foot Infrared receiver Lens cover Component PC D/SCART port (used mainly in Japan) Trigger out port Video port HDMI port Infrared receiver S-Video port AC power inlet Main power switch Kensington® Control (RS-232C) port lock port 8 Introduction
User's Guide - PowerLite Home Cinema 720
Page 9
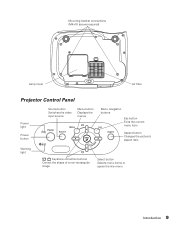
Mounting bracket connections (M4x10 screws required) Lamp cover Air filter Projector Control Panel Power light Power button Source button Switches the video input source Menu button Displays the menus Menu navigation buttons Esc button Exits the current menu item Aspect button Changes the picture's aspect ratio Warning light Keystone correction buttons Correct the shape of a non-rectangular image Select button Selects menu items or opens the line menu Introduction 9
Mounting bracket connections (M4x10 screws required) Lamp cover Air filter Projector Control Panel Power light Power button Source button Switches the video input source Menu button Displays the menus Menu navigation buttons Esc button Exits the current menu item Aspect button Changes the picture's aspect ratio Warning light Keystone correction buttons Correct the shape of a non-rectangular image Select button Selects menu items or opens the line menu Introduction 9
User's Guide - PowerLite Home Cinema 720
Page 10
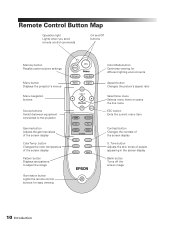
... light Lights when you send remote control commands On and Off buttons Memory button Recalls custom picture settings Menu button Displays the projector's menus Menu navigation buttons Source buttons Switch between equipment connected to adjust the image Illumination button Lights the remote control buttons for... the screen display S. button Changes the color temperature of the screen display Pattern button Displays test patterns to the projector Gamma button Adjusts the gamma values of people appearing in the screen display Blank button Turns off the screen image 10 Introduction
... light Lights when you send remote control commands On and Off buttons Memory button Recalls custom picture settings Menu button Displays the projector's menus Menu navigation buttons Source buttons Switch between equipment connected to adjust the image Illumination button Lights the remote control buttons for... the screen display S. button Changes the color temperature of the screen display Pattern button Displays test patterns to the projector Gamma button Adjusts the gamma values of people appearing in the screen display Blank button Turns off the screen image 10 Introduction
User's Guide - PowerLite Home Cinema 720
Page 11
... via overnight delivery. Registration and Warranty The PowerLite Home Cinema 720 comes with your projector and mail it to be repaired. In addition, for details. Or you receive special updates on new accessories, products, and service. Optional Accessories Epson provides the following optional accessories for your unit to Epson. Registering also lets you can purchase accessories from...
... via overnight delivery. Registration and Warranty The PowerLite Home Cinema 720 comes with your projector and mail it to be repaired. In addition, for details. Or you receive special updates on new accessories, products, and service. Optional Accessories Epson provides the following optional accessories for your unit to Epson. Registering also lets you can purchase accessories from...
User's Guide - PowerLite Home Cinema 720
Page 12
...instructions, specifications, and warranty information. If you need to use the Epson PrivateLine® Support service. Call (800) 637-7661 and enter the PIN on the PrivateLine support card that came with your projector. Please follow these guidelines as you read through the manual: Warnings...: Must be observed to avoid damage to Epson support. Take advantage of Epson's automated support services 24 hours a day at epson.com/support. Using This Manual This book contains all the information you can use the projector, in addition to avoid bodily injury. Need additional ...
...instructions, specifications, and warranty information. If you need to use the Epson PrivateLine® Support service. Call (800) 637-7661 and enter the PIN on the PrivateLine support card that came with your projector. Please follow these guidelines as you read through the manual: Warnings...: Must be observed to avoid damage to Epson support. Take advantage of Epson's automated support services 24 hours a day at epson.com/support. Using This Manual This book contains all the information you can use the projector, in addition to avoid bodily injury. Need additional ...
User's Guide - PowerLite Home Cinema 720
Page 13
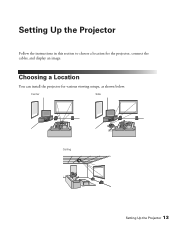
Choosing a Location You can install the projector for the projector, connect the cables, and display an image. Center Side Ceiling Setting Up the Projector 13 Setting Up the Projector Follow the instructions in this section to choose a location for various viewing setups, as shown below.
Choosing a Location You can install the projector for the projector, connect the cables, and display an image. Center Side Ceiling Setting Up the Projector 13 Setting Up the Projector Follow the instructions in this section to choose a location for various viewing setups, as shown below.
User's Guide - PowerLite Home Cinema 720
Page 14
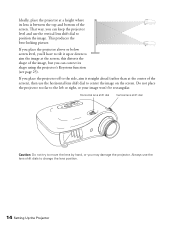
... or down to position the image. Always use the horizontal lens shift dial to change the lens position. 14 Setting Up the Projector That way, you can keep the projector level and use the vertical lens shift dial to aim the image at the center of the screen. this distorts the shape... shift dial Vertical lens shift dial Caution: Do not try to the left or right, or your image won't be rectangular. Do not place the projector too far to move the lens by hand, or you 'll have to tilt it straight ahead (rather than at the screen; If you place...
... or down to position the image. Always use the horizontal lens shift dial to change the lens position. 14 Setting Up the Projector That way, you can keep the projector level and use the vertical lens shift dial to aim the image at the center of the screen. this distorts the shape... shift dial Vertical lens shift dial Caution: Do not try to the left or right, or your image won't be rectangular. Do not place the projector too far to move the lens by hand, or you 'll have to tilt it straight ahead (rather than at the screen; If you place...
User's Guide - PowerLite Home Cinema 720
Page 15
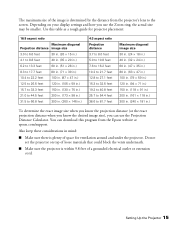
...The maximum size of the image is determined by the distance from the Epson website at epson.com/support. Depending on top of loose materials that could block the vents underneath. ■ Make sure the projector is within 9.8 feet of a grounded electrical outlet or extension cord. Setting... Up the Projector 15 Use this program from the projector's lens to 81.7 feet Maximum diagonal...
...The maximum size of the image is determined by the distance from the Epson website at epson.com/support. Depending on top of loose materials that could block the vents underneath. ■ Make sure the projector is within 9.8 feet of a grounded electrical outlet or extension cord. Setting... Up the Projector 15 Use this program from the projector's lens to 81.7 feet Maximum diagonal...
User's Guide - PowerLite Home Cinema 720
Page 16
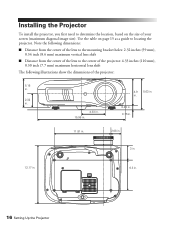
... first need to determine the location, based on page 15 as a guide to the center of the projector: 4.33 inches (110 mm), 0.30 inch (7.7 mm) maximum horizontal lens shift The following illustrations show the dimensions of your screen (maximum diagonal image size). in. 0.....81 in. 2.08 in. 3 in. 12.17 in. 6.3 in . Use the table on the size of the projector: 5.18 in. 2.32 in. 15.98 in. 4.33 in. 4.9 5.63 in . 16 Setting Up the Projector Note the following dimensions: ■ Distance from the center of the lens to the mounting bracket holes: 2.32...
... first need to determine the location, based on page 15 as a guide to the center of the projector: 4.33 inches (110 mm), 0.30 inch (7.7 mm) maximum horizontal lens shift The following illustrations show the dimensions of your screen (maximum diagonal image size). in. 0.....81 in. 2.08 in. 3 in. 12.17 in. 6.3 in . Use the table on the size of the projector: 5.18 in. 2.32 in. 15.98 in. 4.33 in. 4.9 5.63 in . 16 Setting Up the Projector Note the following dimensions: ■ Distance from the center of the lens to the mounting bracket holes: 2.32...
User's Guide - PowerLite Home Cinema 720
Page 17
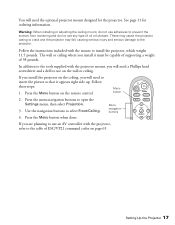
...or ceiling. In addition to the tools supplied with the mount to use any type of oil or lubricant. See page 11 for the projector. Use the navigation buttons to prevent the screws from loosening and do not use on page 65. Menu navigation buttons If you install ...side up. Press the Menu button on the ceiling, you will need a Phillips head screwdriver and a drill to install the projector, which weighs 11.5 pounds. If you install the projector on the remote control. Warning: When installing or adjusting the ceiling mount, do not use adhesives to select Front/Ceiling. ...
...or ceiling. In addition to the tools supplied with the mount to use any type of oil or lubricant. See page 11 for the projector. Use the navigation buttons to prevent the screws from loosening and do not use on page 65. Menu navigation buttons If you install ...side up. Press the Menu button on the ceiling, you will need a Phillips head screwdriver and a drill to install the projector, which weighs 11.5 pounds. If you install the projector on the remote control. Warning: When installing or adjusting the ceiling mount, do not use adhesives to select Front/Ceiling. ...
User's Guide - PowerLite Home Cinema 720
Page 18
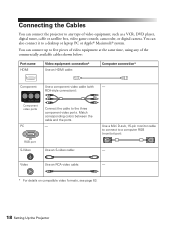
Connecting the Cables You can connect the projector to any of video equipment, such as a VCR, DVD player, digital tuner, cable or satellite box, video game console, camcorder, or digital camera. Match corresponding ... cable to a computer RGB (monitor) port: - Video Use an RCA video cable: - * For details on compatible video formats, see page 63. 18 Setting Up the Projector You can also connect it to five pieces of video equipment at the same time, using any type of the commercially available cables shown below...
Connecting the Cables You can connect the projector to any of video equipment, such as a VCR, DVD player, digital tuner, cable or satellite box, video game console, camcorder, or digital camera. Match corresponding ... cable to a computer RGB (monitor) port: - Video Use an RCA video cable: - * For details on compatible video formats, see page 63. 18 Setting Up the Projector You can also connect it to five pieces of video equipment at the same time, using any type of the commercially available cables shown below...
User's Guide - PowerLite Home Cinema 720
Page 19
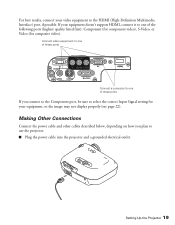
... HDMI, connect it to select the correct Input Signal setting for composite video). Setting Up the Projector 19 For best results, connect your video equipment to use the projector. ■ Plug the power cable into the projector and a grounded electrical outlet. Connect video equipment to one of these ports Connect a computer to one...
... HDMI, connect it to select the correct Input Signal setting for composite video). Setting Up the Projector 19 For best results, connect your video equipment to use the projector. ■ Plug the power cable into the projector and a grounded electrical outlet. Connect video equipment to one of these ports Connect a computer to one...
User's Guide - PowerLite Home Cinema 720
Page 20
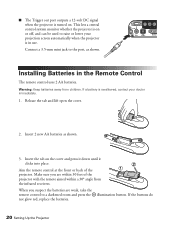
... Control The remote control uses 2 AA batteries. Installing Batteries in use. ■ The Trigger out port outputs a 12-volt DC signal when the projector is turned on the cover and press it down until it clicks into place. Connect a 3.5-mm mini jack to raise or lower your projection screen... automatically when the projector is swallowed, contact your doctor immediately. 1. Release the tab and lift open the cover. 2. Aim the remote control at the front or back ...
... Control The remote control uses 2 AA batteries. Installing Batteries in use. ■ The Trigger out port outputs a 12-volt DC signal when the projector is turned on the cover and press it down until it clicks into place. Connect a 3.5-mm mini jack to raise or lower your projection screen... automatically when the projector is swallowed, contact your doctor immediately. 1. Release the tab and lift open the cover. 2. Aim the remote control at the front or back ...
User's Guide - PowerLite Home Cinema 720
Page 21
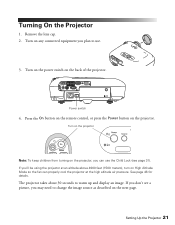
... 4. Press the On button on the remote control, or press the Power button on the back of the projector. Turning On the Projector 1. Turn on the projector Note: To keep children from turning on the projector, you may need to change the image source as described on High Altitude Mode so the fan can... use . 3. If you don't see page 31). Turn on any connected equipment you 'll be using the projector at an altitude above 4900 feet (1500 meters), turn on the next page. Turn on the power switch on the...
... 4. Press the On button on the remote control, or press the Power button on the back of the projector. Turning On the Projector 1. Turn on the projector Note: To keep children from turning on the projector, you may need to change the image source as described on High Altitude Mode so the fan can... use . 3. If you don't see page 31). Turn on any connected equipment you 'll be using the projector at an altitude above 4900 feet (1500 meters), turn on the next page. Turn on the power switch on the...
User's Guide - PowerLite Home Cinema 720
Page 22
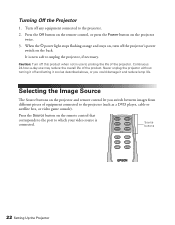
... turning it off this product when not in use may reduce the overall life of the projector. Turn off the projector's power switch on the projector twice. 3. Source buttons g an image from different pieces of equipment connected to prolong the life of the product. Press the Off button on the remote ... the Image Source The Source buttons on the remote control that corresponds to the port to which your video source is now safe to the projector. 2. When the Ppower light stops flashing orange and stays on, turn off any equipment connected to unplug the...
... turning it off this product when not in use may reduce the overall life of the projector. Turn off the projector's power switch on the projector twice. 3. Source buttons g an image from different pieces of equipment connected to prolong the life of the product. Press the Off button on the remote ... the Image Source The Source buttons on the remote control that corresponds to the port to which your video source is now safe to the projector. 2. When the Ppower light stops flashing orange and stays on, turn off any equipment connected to unplug the...


