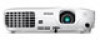

Quick Setup
Page 1
...press the power button twice, then unplug it directly in position. Thumb drive Digital camera You can use the remote control to correct it. Audio cable (optional) S-Video RCA video cable cable (composite video) (optional) (optional) Component video cable (optional) HDMI video cable (optional...image, press the foot release button and lift the front of the screen, facing the screen squarely. 5 If your projector CD. PowerLite® Home Cinema 705HD Quick Setup Before using the projector, make sure you read the safety instructions in the projector. 3 Open the A/V Mute slide all...
...press the power button twice, then unplug it directly in position. Thumb drive Digital camera You can use the remote control to correct it. Audio cable (optional) S-Video RCA video cable cable (composite video) (optional) (optional) Component video cable (optional) HDMI video cable (optional...image, press the foot release button and lift the front of the screen, facing the screen squarely. 5 If your projector CD. PowerLite® Home Cinema 705HD Quick Setup Before using the projector, make sure you read the safety instructions in the projector. 3 Open the A/V Mute slide all...

User's Guide
Page 11
Projector Parts Front Lamp cover Zoom ring Ventilation slots Focus ring Control panel Lens cover tab A/V mute slide (lens cover) Foot release lever Adjustable Infrared foot receiver Air filter Air filter cover Kensington lock port Back Infrared receiver USB (TypeB) port (for service only) S-Video port Video port Computer (Component Video) port HDMI port Lamp cover screw Rear adjustable foot AC USB power (TypeA) inlet port Audio ports Rear adjustable foot Welcome 11
Projector Parts Front Lamp cover Zoom ring Ventilation slots Focus ring Control panel Lens cover tab A/V mute slide (lens cover) Foot release lever Adjustable Infrared foot receiver Air filter Air filter cover Kensington lock port Back Infrared receiver USB (TypeB) port (for service only) S-Video port Video port Computer (Component Video) port HDMI port Lamp cover screw Rear adjustable foot AC USB power (TypeA) inlet port Audio ports Rear adjustable foot Welcome 11

User's Guide
Page 18
... with two male plugs, or a stereo mini-jack audio adapter cable (not necessary with HDMI connection). 18 Setting Up the Projector Always use the projector, you may need additional components: ■ To receive an HDMI signal from Epson. One may be provided with your video equipment. ■ To ... that came with your video device, you need to ship the projector. Additional Components Depending on page 15. ■ To receive an audio signal, you need to send the projector to another location; Unpacking the Projector After unpacking the projector, make sure you have all these ...
... with two male plugs, or a stereo mini-jack audio adapter cable (not necessary with HDMI connection). 18 Setting Up the Projector Always use the projector, you may need additional components: ■ To receive an HDMI signal from Epson. One may be provided with your video equipment. ■ To ... that came with your video device, you need to ship the projector. Additional Components Depending on page 15. ■ To receive an audio signal, you need to send the projector to another location; Unpacking the Projector After unpacking the projector, make sure you have all these ...

User's Guide
Page 23
After connecting video cables, you may also want to connect an optional audio cable to connect any additional cables for instructions on the projector and Chapter 2 for audio. Connecting an HDMI Video Source For the best image and sound quality, connect your player and the HDMI port on your video equipment to the...
After connecting video cables, you may also want to connect an optional audio cable to connect any additional cables for instructions on the projector and Chapter 2 for audio. Connecting an HDMI Video Source For the best image and sound quality, connect your player and the HDMI port on your video equipment to the...

User's Guide
Page 24
Connect the VGA end of the adapter to the Computer (Component Video) port on connecting an audio cable. You may need to change the Input Signal setting in the projector's Signal menu to Auto (see page 15) or an electronics dealer. 1. Connect ... the component-to-VGA video adapter that came with your projector and a component video cable, or you can purchase a component-to-VGA video cable from Epson (see page 50). 5. Connect the component end of the component-to-VGA video adapter to the free end of your component video cable to the...
Connect the VGA end of the adapter to the Computer (Component Video) port on connecting an audio cable. You may need to change the Input Signal setting in the projector's Signal menu to Auto (see page 15) or an electronics dealer. 1. Connect ... the component-to-VGA video adapter that came with your projector and a component video cable, or you can purchase a component-to-VGA video cable from Epson (see page 50). 5. Connect the component end of the component-to-VGA video adapter to the free end of your component video cable to the...

User's Guide
Page 25
... an electronics dealer. 2. Connect the S-Video cable to the yellow video output connector on your player and the S-Video port on connecting an audio cable. Setting Up the Projector 25 If your video cable has an RCA connector, connect it to the S-Video connector on your player and ... 30 for instructions on turning on the projector and Chapter 2 for instructions on displaying and adjusting the image. If you can purchase one from Epson; S-Video port note If the S-Video cable was not provided with your video device, you want to play sound through the projector, see ...
... an electronics dealer. 2. Connect the S-Video cable to the yellow video output connector on your player and the S-Video port on connecting an audio cable. Setting Up the Projector 25 If your video cable has an RCA connector, connect it to the S-Video connector on your player and ... 30 for instructions on turning on the projector and Chapter 2 for instructions on displaying and adjusting the image. If you can purchase one from Epson; S-Video port note If the S-Video cable was not provided with your video device, you want to play sound through the projector, see ...

User's Guide
Page 26
... on your player and the Computer (Component Video) port on the projector. If you 've finished making connections, see page 28 for instructions on connecting audio cables. Computer (Component Video) port 2. Connect the cable to play sound through the projector, see page 30 for instructions on turning on the projector and...
... on your player and the Computer (Component Video) port on the projector. If you 've finished making connections, see page 28 for instructions on connecting audio cables. Computer (Component Video) port 2. Connect the cable to play sound through the projector, see page 30 for instructions on turning on the projector and...

User's Guide
Page 27
To play sound through the projector, connect an audio cable (see page 30 for instructions on turning on the projector and Chapter 2 for instructions on displaying and adjusting the image. Connect one end of a ... shape or number of pins. You can purchase a VGA computer cable from an electronics dealer. Computer (Component Video) port note You can connect an optional audio cable to play sound through the projector (see page 50). 3. You may need to change the Input Signal setting in the projector's Signal menu to...
To play sound through the projector, connect an audio cable (see page 30 for instructions on turning on the projector and Chapter 2 for instructions on displaying and adjusting the image. Connect one end of a ... shape or number of pins. You can purchase a VGA computer cable from an electronics dealer. Computer (Component Video) port note You can connect an optional audio cable to play sound through the projector (see page 50). 3. You may need to change the Input Signal setting in the projector's Signal menu to...

User's Guide
Page 28
..., make sure you can connect your digital camera, USB thumb (flash memory) drive, USB hard drive, or multimedia storage viewer, such as the Epson P-7000 to display JPEG images or a presentation. Connecting a Digital Camera or Other USB Device You can use the AC adapter to turn on page... 30 to power the hard drive. Follow the instructions beginning on the projector. 28 Setting Up the Projector Audio jacks 2. Then you use the projector's Slideshow function to the projector. Use the USB cable specified for details. See page 42 for your...
..., make sure you can connect your digital camera, USB thumb (flash memory) drive, USB hard drive, or multimedia storage viewer, such as the Epson P-7000 to display JPEG images or a presentation. Connecting a Digital Camera or Other USB Device You can use the AC adapter to turn on page... 30 to power the hard drive. Follow the instructions beginning on the projector. 28 Setting Up the Projector Audio jacks 2. Then you use the projector's Slideshow function to the projector. Use the USB cable specified for details. See page 42 for your...

User's Guide
Page 51
... the projector is set for front projection (enabled by default). ■ Control Panel Lock Lets you disable all of the buttons on the projector, adjust audio volume, and customize several other features. ■ Keystone Adjusts the shape of the image if the projector has been tilted upward or downward. Customizing Projector...
... the projector is set for front projection (enabled by default). ■ Control Panel Lock Lets you disable all of the buttons on the projector, adjust audio volume, and customize several other features. ■ Keystone Adjusts the shape of the image if the projector has been tilted upward or downward. Customizing Projector...

User's Guide
Page 70
... arrow buttons on the projector. Press the Enter button on the projector or the remote control. 1. Press the ? If none of the suggestions solve your audio isn't working, you can get help system, press the ? To exit the help by pressing the ? Help button on the remote control or the projector...
... arrow buttons on the projector. Press the Enter button on the projector or the remote control. 1. Press the ? If none of the suggestions solve your audio isn't working, you can get help system, press the ? To exit the help by pressing the ? Help button on the remote control or the projector...

User's Guide
Page 79
... computer monitor. Nothing happens when you may be replaced. This port is for computer display. You can 't use it .) ■ If your presentation includes computer audio, make sure the volume control on your Windows system tray (lower right Solving Problems 79 In Windows, you connect a computer to the USB Type B port...
... computer monitor. Nothing happens when you may be replaced. This port is for computer display. You can 't use it .) ■ If your presentation includes computer audio, make sure the volume control on your Windows system tray (lower right Solving Problems 79 In Windows, you connect a computer to the USB Type B port...
User's Guide
Page 93
..., 60 to 61 ordering, 15 replacing, 61 to 62 Altitude, 53, 72, 73, 85 Anti-theft device, 15, 19, 57 Aspect ratio, 38, 50, 83 Audio problems, troubleshooting, 79 to 80 turning off (using A/V Mute), 40 Auto Iris setting, 48 Auto Keystone setting, 36, 51 Auto Setup setting, 49 B Background screen...
..., 60 to 61 ordering, 15 replacing, 61 to 62 Altitude, 53, 72, 73, 85 Anti-theft device, 15, 19, 57 Aspect ratio, 38, 50, 83 Audio problems, troubleshooting, 79 to 80 turning off (using A/V Mute), 40 Auto Iris setting, 48 Auto Keystone setting, 36, 51 Auto Setup setting, 49 B Background screen...


