

User Manual
Page 3
Control Panel ...19 Projector Parts - Base...18 Projector Parts - Remote Control 20 Setting Up the Projector ...23 Projector Placement...23 Projector Setup and Installation Options 23 Projection Distance...25 Projector Connections...29 Removing ...VGA Video 34 Connecting to Go for HDMI Video and Audio 35 3 Rear ...17 Projector Parts - Front/Top ...16 Projector Parts - Contents PowerLite Home Cinema 3000/3500/3510/3600e User's Guide 9 Introduction to Your Projector ...10 Projector Features...10 Product Box Contents...11 Additional Components ...12 Optional Equipment and Replacement ...
Control Panel ...19 Projector Parts - Base...18 Projector Parts - Remote Control 20 Setting Up the Projector ...23 Projector Placement...23 Projector Setup and Installation Options 23 Projection Distance...25 Projector Connections...29 Removing ...VGA Video 34 Connecting to Go for HDMI Video and Audio 35 3 Rear ...17 Projector Parts - Front/Top ...16 Projector Parts - Contents PowerLite Home Cinema 3000/3500/3510/3600e User's Guide 9 Introduction to Your Projector ...10 Projector Features...10 Product Box Contents...11 Additional Components ...12 Optional Equipment and Replacement ...
User Manual
Page 4
... Network Projection ...41 Installing the Wireless LAN Module...41 Selecting Wireless Network Settings Manually 42 Wireless LAN Menu Settings ...44 Selecting Wireless Network Settings in Windows 46 Selecting Wireless Network Settings in OS X 46 Setting Up Wireless Network Security 46 Wireless Security Menu Settings 47 Using Basic Projector Features ...48 Turning On the Projector ...48 Turning...
... Network Projection ...41 Installing the Wireless LAN Module...41 Selecting Wireless Network Settings Manually 42 Wireless LAN Menu Settings ...44 Selecting Wireless Network Settings in Windows 46 Selecting Wireless Network Settings in OS X 46 Setting Up Wireless Network Security 46 Wireless Security Menu Settings 47 Using Basic Projector Features ...48 Turning On the Projector ...48 Turning...
User Manual
Page 5
...Display Options ...74 Adjusting Projector Features ...76 Shutting Off the Picture and Sound Temporarily 76 Adjusting the Color Convergence (Panel Alignment 76 Saving Settings to Memory and Using Saved Settings 80 Projector Security Features...81 Locking the Projector's Buttons ...82 Unlocking the Projector's Buttons 83 Installing a Security Cable ...83 Using WirelessHD ... the WirelessHD Transmitter 85 Viewing WirelessHD Content ...87 Switching WirelessHD Sources...88 Using the WirelessHD Picture in Picture Feature 89 Adjusting the Menu Settings ...90 Using the Projector's Menus...90 5
...Display Options ...74 Adjusting Projector Features ...76 Shutting Off the Picture and Sound Temporarily 76 Adjusting the Color Convergence (Panel Alignment 76 Saving Settings to Memory and Using Saved Settings 80 Projector Security Features...81 Locking the Projector's Buttons ...82 Unlocking the Projector's Buttons 83 Installing a Security Cable ...83 Using WirelessHD ... the WirelessHD Transmitter 85 Viewing WirelessHD Content ...87 Switching WirelessHD Sources...88 Using the WirelessHD Picture in Picture Feature 89 Adjusting the Menu Settings ...90 Using the Projector's Menus...90 5
User Manual
Page 6
... 98 Projector Memory Options - Info Menu 106 Event ID Code List...108 Projector Reset Options - Image Quality Settings - Image Menu 92 Input Signal Settings - Signal Menu...94 Projector Feature Settings - Network Menu 104 Projector Information Display - Reset Menu 109 Maintaining and Transporting the Projector 111 Projector Maintenance ...111 Cleaning the Lens...111 Cleaning...
... 98 Projector Memory Options - Info Menu 106 Event ID Code List...108 Projector Reset Options - Image Quality Settings - Image Menu 92 Input Signal Settings - Signal Menu...94 Projector Feature Settings - Network Menu 104 Projector Information Display - Reset Menu 109 Maintaining and Transporting the Projector 111 Projector Maintenance ...111 Cleaning the Lens...111 Cleaning...
User Manual
Page 21
... sources) 4 HDMI Link button (displays the settings menu for HDMI Link) Link Menu button (displays the main menu of the connected device) Control buttons (control playback and other features of images and enhances image contrast; PowerLite Home Cinema 3500/3510/3600e) 21 Color Mode button (selects display modes) 21 PowerLite Home Cinema 3500/3510/3600e) 16 Aspect button (selects...
... sources) 4 HDMI Link button (displays the settings menu for HDMI Link) Link Menu button (displays the main menu of the connected device) Control buttons (control playback and other features of images and enhances image contrast; PowerLite Home Cinema 3500/3510/3600e) 21 Color Mode button (selects display modes) 21 PowerLite Home Cinema 3500/3510/3600e) 16 Aspect button (selects...
User Manual
Page 23
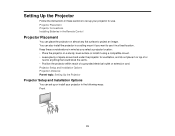
... the Projector Projector Setup and Installation Options You can place the projector on top of or next to project an image. Setting Up the Projector Follow the instructions in these considerations in mind as you want to use . You can also install the projector ...in the Remote Control Projector Placement You can set up or install your projector for ventilation, and do not place it in a fixed location. Projector Placement Projector Connections Installing Batteries in a ...
... the Projector Projector Setup and Installation Options You can place the projector on top of or next to project an image. Setting Up the Projector Follow the instructions in these considerations in mind as you want to use . You can also install the projector ...in the Remote Control Projector Placement You can set up or install your projector for ventilation, and do not place it in a fixed location. Projector Placement Projector Connections Installing Batteries in a ...
User Manual
Page 24
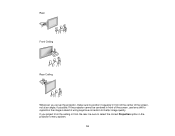
Rear Front Ceiling Rear Ceiling Wherever you project from the ceiling or from the rear, be centered in front of the screen, use lens shift to reposition the image instead of the screen, not at an angle, if possible. If the projector cannot be sure to position it squarely in the projector's menu system. 24 If you set up the projector, make sure to select the correct Projection option in front of the center of using keystone correction for better image quality.
Rear Front Ceiling Rear Ceiling Wherever you project from the ceiling or from the rear, be centered in front of the screen, use lens shift to reposition the image instead of the screen, not at an angle, if possible. If the projector cannot be sure to position it squarely in the projector's menu system. 24 If you set up the projector, make sure to select the correct Projection option in front of the center of using keystone correction for better image quality.
User Manual
Page 25
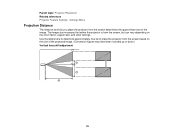
... here to determine approximately how far to place the projector from the screen based on the zoom factor, aspect ratio, and other settings. Settings Menu Projection Distance The distance at which you place the projector from the screen, but can vary depending on the size of the... image. Parent topic: Projector Placement Related references Projector Feature Settings - The image size increases the farther the projector is from the screen determines the approximate size of the projected image. (Conversion figures...
... here to determine approximately how far to place the projector from the screen based on the zoom factor, aspect ratio, and other settings. Settings Menu Projection Distance The distance at which you place the projector from the screen, but can vary depending on the size of the... image. Parent topic: Projector Placement Related references Projector Feature Settings - The image size increases the farther the projector is from the screen determines the approximate size of the projected image. (Conversion figures...
User Manual
Page 29
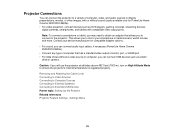
...Settings Menu 29 Projector Connections You can connect USB devices such as DVD players, gaming consoles, streaming devices, digital cameras, smartphones, and tablets with or without sound (audio available only for compatible adapter options. • For sound, you can connect audio input cables, if necessary (PowerLite Home Cinema 3500...of computer, video, and audio sources to the projector. Caution: If you to mirror your device manufacturer for PowerLite Home Cinema 3500/3510/3600e). • For video projection, connect devices such as a flash drive or camera. Removing and ...
...Settings Menu 29 Projector Connections You can connect USB devices such as DVD players, gaming consoles, streaming devices, digital cameras, smartphones, and tablets with or without sound (audio available only for compatible adapter options. • For sound, you can connect audio input cables, if necessary (PowerLite Home Cinema 3500...of computer, video, and audio sources to the projector. Caution: If you to mirror your device manufacturer for PowerLite Home Cinema 3500/3510/3600e). • For video projection, connect devices such as a flash drive or camera. Removing and ...

User Manual
Page 31
... may take a few seconds for instructions. If you have an MHL-compatible smartphone or tablet, you have a device with a device-compatible MHL adapter (PowerLite Home Cinema 3500/3510/3600e). If you switch to reduce lag time. Connect the other end to one of the linked device by pressing the HDMI Link button...it to the projector or WirelessHD transmitter using either an MHL cable or an HDMI cable with a built-in response time to game commands, set your image to an MHL-compatible HDMI cable. 31 Note: When an audio/video source that meets the HDMI CEC standard is connected to the...
... may take a few seconds for instructions. If you have an MHL-compatible smartphone or tablet, you have a device with a device-compatible MHL adapter (PowerLite Home Cinema 3500/3510/3600e). If you switch to reduce lag time. Connect the other end to one of the linked device by pressing the HDMI Link button...it to the projector or WirelessHD transmitter using either an MHL cable or an HDMI cable with a built-in response time to game commands, set your image to an MHL-compatible HDMI cable. 31 Note: When an audio/video source that meets the HDMI CEC standard is connected to the...

User Manual
Page 33
... your game console's output format to a progressive signal of 480p, 720p, or higher. Settings Menu Related tasks Connecting to a Video Source for Sound Connecting to a Composite Video Source If your video source has a composite video port, you can connect... game console documentation for Sound You can also select the Fast Image Processing setting to reduce lag time. Connect the cable with the yellow connector to your video source has audio output ports (PowerLite Home Cinema 3500/3510/3600e). Parent topic: Connecting to the projector's Video port. Note: If you switch to the game console...
... your game console's output format to a progressive signal of 480p, 720p, or higher. Settings Menu Related tasks Connecting to a Video Source for Sound Connecting to a Composite Video Source If your video source has a composite video port, you can connect... game console documentation for Sound You can also select the Fast Image Processing setting to reduce lag time. Connect the cable with the yellow connector to your video source has audio output ports (PowerLite Home Cinema 3500/3510/3600e). Parent topic: Connecting to the projector's Video port. Note: If you switch to the game console...
User Manual
Page 40
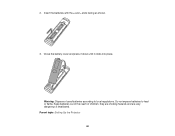
ends facing as shown. 3. Parent topic: Setting Up the Projector 40 Warning: Dispose of children; Do not expose batteries to local regulations. Insert the batteries with the + and - Keep batteries out of the reach of used batteries according to heat or flame. they are choking hazards and are very dangerous if swallowed. Close the battery cover and press it down until it clicks into place. 2.
ends facing as shown. 3. Parent topic: Setting Up the Projector 40 Warning: Dispose of children; Do not expose batteries to local regulations. Insert the batteries with the + and - Keep batteries out of the reach of used batteries according to heat or flame. they are choking hazards and are very dangerous if swallowed. Close the battery cover and press it down until it clicks into place. 2.

User Manual
Page 41
...other type of wireless module. 41 To do this, you must install the Epson 802.11b/g/n wireless LAN module, and then set up, control, and monitor wireless projection: • EasyMP Network Projection software sets up your wireless network by configuring the connection manually using the projector's Network... menus. Note: The wireless LAN module is not included with the wireless LAN module and free Epson iProjection app; After installing the module and setting up your projector. You can download the latest software and documentation from iOS or Android devices with your ...
...other type of wireless module. 41 To do this, you must install the Epson 802.11b/g/n wireless LAN module, and then set up, control, and monitor wireless projection: • EasyMP Network Projection software sets up your wireless network by configuring the connection manually using the projector's Network... menus. Note: The wireless LAN module is not included with the wireless LAN module and free Epson iProjection app; After installing the module and setting up your projector. You can download the latest software and documentation from iOS or Android devices with your ...
User Manual
Page 42
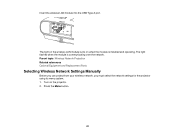
Turn on when the module is communicating over the network. Press the Menu button. 42 The light on the wireless LAN module turns on the projector. 2. The light flashes when the module is installed and operating. Parent topic: Wireless Network Projection Related references Optional Equipment and Replacement Parts Selecting Wireless Network Settings Manually Before you can project from your wireless network, you must select the network settings for the projector using its menu system. 1. Insert the wireless LAN module into the USB Type A port.
Turn on when the module is communicating over the network. Press the Menu button. 42 The light on the wireless LAN module turns on the projector. 2. The light flashes when the module is installed and operating. Parent topic: Wireless Network Projection Related references Optional Equipment and Replacement Parts Selecting Wireless Network Settings Manually Before you can project from your wireless network, you must select the network settings for the projector using its menu system. 1. Insert the wireless LAN module into the USB Type A port.

User Manual
Page 43
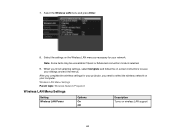
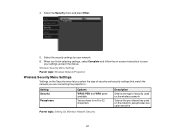
Select Network Configuration and press Enter. 5. Press the arrow buttons on the remote control to highlight characters and press Enter to identify the projector over the network. Select the Projector Name setting and enter a name up to 16 alphanumeric characters long to select them. 43 3. Note: Use the displayed keyboard to enter the name. Select the Basic menu and press Enter. 6. Select the Network menu and press Enter. 4.
Select Network Configuration and press Enter. 5. Press the arrow buttons on the remote control to highlight characters and press Enter to identify the projector over the network. Select the Projector Name setting and enter a name up to 16 alphanumeric characters long to select them. 43 3. Note: Use the displayed keyboard to enter the name. Select the Basic menu and press Enter. 6. Select the Network menu and press Enter. 4.
User Manual
Page 44
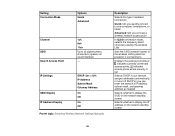
... Advanced connection mode is selected. 9. Select the Wireless LAN menu and press Enter. 8. 7. When you need to save your settings and exit the menus. Wireless LAN Menu Settings Parent topic: Wireless Network Projection Wireless LAN Menu Settings Setting Wireless LAN Power Options On Off Description Turns on your network. After you complete the wireless...
... Advanced connection mode is selected. 9. Select the Wireless LAN menu and press Enter. 8. 7. When you need to save your settings and exit the menus. Wireless LAN Menu Settings Parent topic: Wireless Network Projection Wireless LAN Menu Settings Setting Wireless LAN Power Options On Off Description Turns on your network. After you complete the wireless...
User Manual
Page 45
... Off) IP Address Subnet Mask Gateway Address On Off On Off Parent topic: Selecting Wireless Network Settings Manually Description Selects the type of the wireless LAN system the projector is set Selects DHCP if your network assigns addresses automatically, or turns off DHCP so you connect a wireless... network access point In Quick connection mode, selects the frequency band (channel) used by the wireless LAN Sets the SSID (network name) of wireless connection: Quick: lets you quickly connect to one computer, smartphone, or tablet Advanced: lets you can ...
... Off) IP Address Subnet Mask Gateway Address On Off On Off Parent topic: Selecting Wireless Network Settings Manually Description Selects the type of the wireless LAN system the projector is set Selects DHCP if your network assigns addresses automatically, or turns off DHCP so you connect a wireless... network access point In Quick connection mode, selects the frequency band (channel) used by the wireless LAN Sets the SSID (network name) of wireless connection: Quick: lets you quickly connect to one computer, smartphone, or tablet Advanced: lets you can ...
User Manual
Page 46
... select the correct wireless network on an existing network (Advanced mode), select the network name (SSID). • If your projector is set up on your computer. 1. Select Network Configuration and press Enter. 46 Select the Network menu and press Enter. 3. Parent topic: ...Wireless Network Projection Selecting Wireless Network Settings in OS X. 1. Set up one of the following security options to use on the Windows taskbar. 2. Press the Menu button. 2. Do one of the...
... select the correct wireless network on an existing network (Advanced mode), select the network name (SSID). • If your projector is set up on your computer. 1. Select Network Configuration and press Enter. 46 Select the Network menu and press Enter. 3. Parent topic: ...Wireless Network Projection Selecting Wireless Network Settings in OS X. 1. Set up one of the following security options to use on the Windows taskbar. 2. Press the Menu button. 2. Do one of the...
User Manual
Page 47
... Complete and follow the on the network; Select the security settings for your settings and exit the menus. Wireless Security Menu Settings Parent topic: Wireless Network Projection Wireless Security Menu Settings Settings on the Security menu let you are case-sensitive Parent topic: Setting Up Wireless Network Security 47 passphrases are connecting the projector to 32...
... Complete and follow the on the network; Select the security settings for your settings and exit the menus. Wireless Security Menu Settings Parent topic: Wireless Network Projection Wireless Security Menu Settings Settings on the Security menu let you are case-sensitive Parent topic: Setting Up Wireless Network Security 47 passphrases are connecting the projector to 32...
User Manual
Page 50
... image right away, try the following : • Press the power button on the remote control. Parent topic: Using Basic Projector Features Related references Projector Feature Settings - Settings Menu Related tasks Selecting an Image Source Turning Off the Projector Before turning off the projector. 1. When you do not see the confirmation screen, press...
... image right away, try the following : • Press the power button on the remote control. Parent topic: Using Basic Projector Features Related references Projector Feature Settings - Settings Menu Related tasks Selecting an Image Source Turning Off the Projector Before turning off the projector. 1. When you do not see the confirmation screen, press...

