
Installation Guide
Page 2
...• stud finder ("edge to edge" stud finder is intended for wood studs Table of Contents Parts List ...3 Installation to Suspended Ceiling ...4 Anchoring Ceiling Plate ...5 Warranty Information ...6 Visit the Peerless Web Site at www.peerlessmounts.com 2 of 6 ISSUED: 02-13-08 SHEET #:... and warnings contained in this product outdoors could lead to product failure and personal injury. • When installing or adjusting the ceiling mount, do not overtighten. Overtightening can damage the items, greatly reducing their holding power. NOTE: Read entire instruction sheet ...
...• stud finder ("edge to edge" stud finder is intended for wood studs Table of Contents Parts List ...3 Installation to Suspended Ceiling ...4 Anchoring Ceiling Plate ...5 Warranty Information ...6 Visit the Peerless Web Site at www.peerlessmounts.com 2 of 6 ISSUED: 02-13-08 SHEET #:... and warnings contained in this product outdoors could lead to product failure and personal injury. • When installing or adjusting the ceiling mount, do not overtighten. Overtightening can damage the items, greatly reducing their holding power. NOTE: Read entire instruction sheet ...
Installation Guide
Page 3
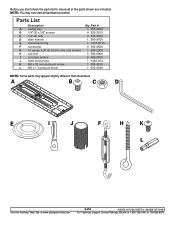
... Some parts may not need all of 6 ISSUED: 02-13-08 SHEET #: 128-9029-2 07-10-08 For Technical Support Contact Peerless Mounts at 1-800-729-0307 or 708-865-8870. Before you start check the parts list to insure all hardware provided. NOTE: You may ...appear slightly different than illustrated. Parts List Description A ceiling tray B 1/4"-20 x 3/8" screws C 1/4"-20 nuts D allen wrench E escutcheon ring F turnbuckle G 12 gauge x 20' (6.1m) tie wire (not shown) H eye bolt I J F H K ...
... Some parts may not need all of 6 ISSUED: 02-13-08 SHEET #: 128-9029-2 07-10-08 For Technical Support Contact Peerless Mounts at 1-800-729-0307 or 708-865-8870. Before you start check the parts list to insure all hardware provided. NOTE: You may ...appear slightly different than illustrated. Parts List Description A ceiling tray B 1/4"-20 x 3/8" screws C 1/4"-20 nuts D allen wrench E escutcheon ring F turnbuckle G 12 gauge x 20' (6.1m) tie wire (not shown) H eye bolt I J F H K ...

Installation Guide
Page 4
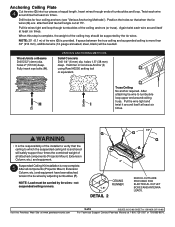
...COLUMN (SOLD SEPARATELY) (UL LISTED EXT OR ADJ SERIES) 3 Snap escutcheon ring (E) around flush mount tube or extension column and slide up through retaining collar in adjustable collar mount plate. Hook turnbuckles (F) into position and tighten all carriage bolts and nylock nuts using M5 x 10...knobs until flush with hole in collar and fasten using a 7/16" wrench. Slide collar mount plate out of ceiling tray (A) rests on ceiling runners as shown in grid above 24" x 48" conventional suspended ceiling. Ceiling runners (see DETAIL 2, page 5) should have a "T" cross section and a minimum ...
...COLUMN (SOLD SEPARATELY) (UL LISTED EXT OR ADJ SERIES) 3 Snap escutcheon ring (E) around flush mount tube or extension column and slide up through retaining collar in adjustable collar mount plate. Hook turnbuckles (F) into position and tighten all carriage bolts and nylock nuts using M5 x 10...knobs until flush with hole in collar and fasten using a 7/16" wrench. Slide collar mount plate out of ceiling tray (A) rests on ceiling runners as shown in grid above 24" x 48" conventional suspended ceiling. Ceiling runners (see DETAIL 2, page 5) should have a "T" cross section and a minimum ...
Installation Guide
Page 5
...2" (51mm) deep. Hammer in Concrete Anchor (I twist it around ceiling truss. After all attached components (Projector Mount, Extension Column, etc.) and equipment. 5 Suspended Ceiling Kit installation is more than 36" (914 mm), additional wire (12...ceiling to which the suspended ceiling kit is the responsibility of the installer to turnbuckle loop upper end around itself at least six times. When this step is provided. NOTE: Load must be carried by adjusting turnbuckles (F). Visit the Peerless Web Site at www.peerlessmounts.com 5 of all components (Projector Mount...
...2" (51mm) deep. Hammer in Concrete Anchor (I twist it around ceiling truss. After all attached components (Projector Mount, Extension Column, etc.) and equipment. 5 Suspended Ceiling Kit installation is more than 36" (914 mm), additional wire (12...ceiling to which the suspended ceiling kit is the responsibility of the installer to turnbuckle loop upper end around itself at least six times. When this step is provided. NOTE: Load must be carried by adjusting turnbuckles (F). Visit the Peerless Web Site at www.peerlessmounts.com 5 of all components (Projector Mount...