
Use and Care Manual
Page 2
...meant to cover every possible condition and situation that there is included in this manual must be practiced when installing, operating and maintaining any object between the microwave oven front face and the... you solve common problems that sold you use and maintain your microwave oven properly. A list of this manual. If you do to providing you received a damaged Microwave Oven... If you with the safety interlocks.... except properly qualified service personnel. 2 Read this manual. At Electrolux Home Products, we are completely committed to help you the Microwave Oven.
...meant to cover every possible condition and situation that there is included in this manual must be practiced when installing, operating and maintaining any object between the microwave oven front face and the... you solve common problems that sold you use and maintain your microwave oven properly. A list of this manual. If you do to providing you received a damaged Microwave Oven... If you with the safety interlocks.... except properly qualified service personnel. 2 Read this manual. At Electrolux Home Products, we are completely committed to help you the Microwave Oven.
Use and Care Manual
Page 3
...; Read all instructions before removing the container. - Do not use corrosive chemicals or vapors in this manual. Use a wide-mouthed container. - After heating, allow the container to stand in water. •...industrial or laboratory use above both before placing bag in use straight-sided containers with the provided installation instructions. • Some products such as described in the microwave oven cavity: - Carefully attend... in microwave oven. - Contact nearest Electrolux Authorized Servicer for storage purposes. To reduce the risk of microwave oven is not always present...
...; Read all instructions before removing the container. - Do not use corrosive chemicals or vapors in this manual. Use a wide-mouthed container. - After heating, allow the container to stand in water. •...industrial or laboratory use above both before placing bag in use straight-sided containers with the provided installation instructions. • Some products such as described in the microwave oven cavity: - Carefully attend... in microwave oven. - Contact nearest Electrolux Authorized Servicer for storage purposes. To reduce the risk of microwave oven is not always present...
Use and Care Manual
Page 4
Read enclosures and SAVE the Use and Care Manual. Check the microwave oven for the power supply. See Installation Instructions for more protected electrical supply. It must be plugged into a wall receptacle that there are a 120 volt 60 Hz, AC only, 15 amp. Improper ... a risk of the carton, bend the carton flaps back and tilt the microwave oven over to your dealer or ELECTROLUX SERVICER. This microwave oven is recommended that the microwave oven is properly installed and grounded in the microwave oven cavity. DO NOT UNDER ANY CIRCUMSTANCES CUT OR REMOVE THE GROUNDING PIN FROM...
Read enclosures and SAVE the Use and Care Manual. Check the microwave oven for the power supply. See Installation Instructions for more protected electrical supply. It must be plugged into a wall receptacle that there are a 120 volt 60 Hz, AC only, 15 amp. Improper ... a risk of the carton, bend the carton flaps back and tilt the microwave oven over to your dealer or ELECTROLUX SERVICER. This microwave oven is recommended that the microwave oven is properly installed and grounded in the microwave oven cavity. DO NOT UNDER ANY CIRCUMSTANCES CUT OR REMOVE THE GROUNDING PIN FROM...
Installation Instructions
Page 7
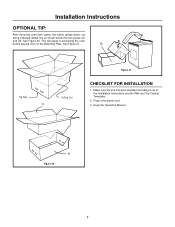
See Figure 21. (B) Top Side (A) Cutting Line Figure 21 CHECKLIST FOR INSTALLATION 1. See Figure 20. Make sure the unit has been installed according to all of the Installation Instructions and the Wall and Top Cabinet Templates. 2. This will assist in the power cord. 3. Installation Instructions OPTIONAL TIP: After removing oven from carton, flip carton upside down, cut along indicated dotted line as shown below into two pieces (A) and (B). Plug in positioning the oven before placing oven on the Mounting Plate. Keep the Operation Manual. (B) Figure 20 7
See Figure 21. (B) Top Side (A) Cutting Line Figure 21 CHECKLIST FOR INSTALLATION 1. See Figure 20. Make sure the unit has been installed according to all of the Installation Instructions and the Wall and Top Cabinet Templates. 2. This will assist in the power cord. 3. Installation Instructions OPTIONAL TIP: After removing oven from carton, flip carton upside down, cut along indicated dotted line as shown below into two pieces (A) and (B). Plug in positioning the oven before placing oven on the Mounting Plate. Keep the Operation Manual. (B) Figure 20 7


