
Use and Care Manual
Page 1
Over-the-Range Microwave Oven CGLMV169, GLMV169 CPLMV169, PLMV169 Visit the Frigidaire Web Site at: http://www.frigidaire.com READ AND SAVE THESE INSTRUCTIONS Welcome & Congratulation ...... 2 Important Safety Instructions .. 2-6 Part Names 7 Before Operating 8 Manual Operation 8 Operating Instructions 9-17 Cleaning and Care 18-19 Specifications 20 Service Call Check 20 Warranty 21 p/n 316137231 TINSEB380MRR0
Over-the-Range Microwave Oven CGLMV169, GLMV169 CPLMV169, PLMV169 Visit the Frigidaire Web Site at: http://www.frigidaire.com READ AND SAVE THESE INSTRUCTIONS Welcome & Congratulation ...... 2 Important Safety Instructions .. 2-6 Part Names 7 Before Operating 8 Manual Operation 8 Operating Instructions 9-17 Cleaning and Care 18-19 Specifications 20 Service Call Check 20 Warranty 21 p/n 316137231 TINSEB380MRR0

Use and Care Manual
Page 5
... and stir, if possible. Condensation is opaque and flakes easily with no pinkness. - It should be used to absorb the microwave energy. Fish is a normal part of such foods as whole eggs and sealed containers-for example, closed jars-will cause it to be heated in narrownecked containers such as needed...
... and stir, if possible. Condensation is opaque and flakes easily with no pinkness. - It should be used to absorb the microwave energy. Fish is a normal part of such foods as whole eggs and sealed containers-for example, closed jars-will cause it to be heated in narrownecked containers such as needed...
Use and Care Manual
Page 7
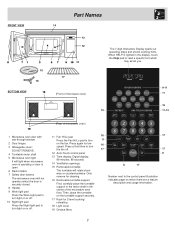
... the Night light pad to read a specific hint which there are a feature description and usage information. 7 Then, place the turntable on the fan. FRONT VIEW Part Names 14 13 12 15 16 BOTTOM VIEW 17 (Front of microwave oven) 1 Microwave oven door with see-through window 2 Door hinges 3 Waveguide cover: DO...
... the Night light pad to read a specific hint which there are a feature description and usage information. 7 Then, place the turntable on the fan. FRONT VIEW Part Names 14 13 12 15 16 BOTTOM VIEW 17 (Front of microwave oven) 1 Microwave oven door with see-through window 2 Door hinges 3 Waveguide cover: DO...
Use and Care Manual
Page 9
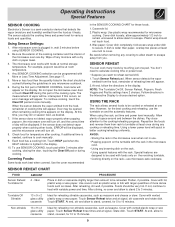
...Pay close attention to secure. At end, stir and allow steam to stand, covered, for various foods and quantities. During the first part of space around and between the dishes. If the sensor does not detect vapor properly when popping popcorn, the microwave oven will appear...want to choose desired option. At end, allow to stand 2 to turntable at least once during this part of cooking time will appear. 2. Operating Instructions Special Features SENSOR COOKING Electrolux's Sensor is a semi-conductor device that detects the vapor (moisture and humidity) emitted from the food ...
...Pay close attention to secure. At end, stir and allow steam to stand, covered, for various foods and quantities. During the first part of space around and between the dishes. If the sensor does not detect vapor properly when popping popcorn, the microwave oven will appear...want to choose desired option. At end, allow to stand 2 to turntable at least once during this part of cooking time will appear. 2. Operating Instructions Special Features SENSOR COOKING Electrolux's Sensor is a semi-conductor device that detects the vapor (moisture and humidity) emitted from the food ...
Use and Care Manual
Page 18
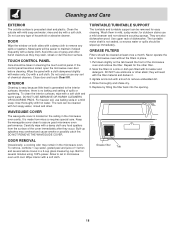
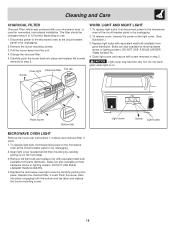
... oven until cool. DO NOT use any spills or spatters. DOOR Wipe the window on both sides with hot soapy water, rinsed and dried. Metal parts will react with a soft cloth. Boil for easy cleaning. Do not use ammonia or other alkali; therefore, there is located on the tab toward the...
... oven until cool. DO NOT use any spills or spatters. DOOR Wipe the window on both sides with hot soapy water, rinsed and dried. Metal parts will react with a soft cloth. Boil for easy cleaning. Do not use ammonia or other alkali; therefore, there is located on the tab toward the...
Use and Care Manual
Page 19
... light bulb, first disconnect power to the microwave oven at the circuit breaker panel or by unplugging. 2. Pull the louver away from parts distributor. Carefully push the louver back into place and replace the screws removed in step 2. Oven light Charcoal filter Top tab Screw WORK... 1. Replace light bulbs with equivalent watt bulb available from the unit. 4. Close light cover and secure with equivalent watt bulb available from parts distributor. Remove old light bulb and replace only with screw removed in step 2. Replace the microwave oven light cover by carefully pulling up...
... light bulb, first disconnect power to the microwave oven at the circuit breaker panel or by unplugging. 2. Pull the louver away from parts distributor. Carefully push the louver back into place and replace the screws removed in step 2. Oven light Charcoal filter Top tab Screw WORK... 1. Replace light bulbs with equivalent watt bulb available from the unit. 4. Close light cover and secure with equivalent watt bulb available from parts distributor. Remove old light bulb and replace only with screw removed in step 2. Replace the microwave oven light cover by carefully pulling up...
Use and Care Manual
Page 21
.... 4. LIMITED 2nd - 10th YEAR WARRANTY (Magnetron Tube) Second through tenth years Provide a replacement for any part of the microwave oven which are made by Electrolux Home Products, Inc. Proper use , and the consumer is responsible for the items listed below apply. The ...required. and all labor and service charges. In the U.S.A., your appliance is warranted by servicers other than genuine Electrolux parts; Our obligations for service and parts under this warranty must be performed by us or an authorized servicer. *NORMAL RESPONSIBILITIES OF THE CONSUMER This ...
.... 4. LIMITED 2nd - 10th YEAR WARRANTY (Magnetron Tube) Second through tenth years Provide a replacement for any part of the microwave oven which are made by Electrolux Home Products, Inc. Proper use , and the consumer is responsible for the items listed below apply. The ...required. and all labor and service charges. In the U.S.A., your appliance is warranted by servicers other than genuine Electrolux parts; Our obligations for service and parts under this warranty must be performed by us or an authorized servicer. *NORMAL RESPONSIBILITIES OF THE CONSUMER This ...
Installation Instructions
Page 2
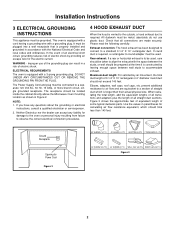
... must be connected to -round adapter must be used , care should be plugged into a wall receptacle that all straight duct sections. Neither Electrolux nor the dealer can result in accordance with the space between wall studs to be used . Check that is required, a rectangular-to a...or more branch circuit, single grounded receptacle. If round duct is properly installed and grounded in a risk of some typical ductwork parts. present additional resistance to air flow and are made securely. Figure 3 shows the approximate feet of equivalent length of electric shock.
... must be connected to -round adapter must be used , care should be plugged into a wall receptacle that all straight duct sections. Neither Electrolux nor the dealer can result in accordance with the space between wall studs to be used . Check that is required, a rectangular-to a...or more branch circuit, single grounded receptacle. If round duct is properly installed and grounded in a risk of some typical ductwork parts. present additional resistance to air flow and are made securely. Figure 3 shows the approximate feet of equivalent length of electric shock.
Installation Instructions
Page 3
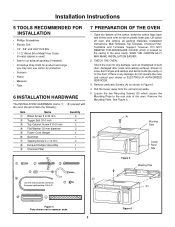
... on the door. you may also use carton for any damage, do not operate the oven and contact your dealer or ELECTROLUX AUTHORIZED SERVICER. 3. SAVE THE CARTON AS IT MAY MAKE INSTALLATION EASIER. 2. Loosen the two Mounting Screws (D) which is used...scale. 3 Figure 6 Remove the Mounting Plate. See Figure 6. (A) (A) (A) (A) Mounting Plate Control Panel Side Figure 5 Mounting Plate (D) (D) Figure 4 Parts shown not to rest on plastic foam pad. Installation Instructions 5 TOOLS RECOMMENDED FOR INSTALLATION • Phillips Screwdriver • Electric Drill • 1/2", 5/8" and ...
... on the door. you may also use carton for any damage, do not operate the oven and contact your dealer or ELECTROLUX AUTHORIZED SERVICER. 3. SAVE THE CARTON AS IT MAY MAKE INSTALLATION EASIER. 2. Loosen the two Mounting Screws (D) which is used...scale. 3 Figure 6 Remove the Mounting Plate. See Figure 6. (A) (A) (A) (A) Mounting Plate Control Panel Side Figure 5 Mounting Plate (D) (D) Figure 4 Parts shown not to rest on plastic foam pad. Installation Instructions 5 TOOLS RECOMMENDED FOR INSTALLATION • Phillips Screwdriver • Electric Drill • 1/2", 5/8" and ...
Parts Catalog
Page 3
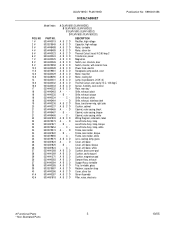
...21 21 21 22 23 23 23 24 24 24 25 26 26 26 27 28 29 36 37 38 39 40 41 # 42 # PART NO. 5304440019 5303319549 5304448488 5304448489 5304440023 5304440024 5304440025 5304440026 5303319559 5304440028 5303319561 5304440029 5304448490 5304440031 5304440032 5304440033 5304440232 5304445463 5304440235 5304440234 5304445464 5304440236 5304440237 5304445465... Assy, exhaust Support Assy, turntable Tray, turntable, glass Retainer, capacitor strap Cover, stirrer fan Stirrer Assembly Filter, noise, electronic Publication No: 5995451456 # Functional Parts 3 * Non-Illustrated Parts 10/05 C- - - B- - -
...21 21 21 22 23 23 23 24 24 24 25 26 26 26 27 28 29 36 37 38 39 40 41 # 42 # PART NO. 5304440019 5303319549 5304448488 5304448489 5304440023 5304440024 5304440025 5304440026 5303319559 5304440028 5303319561 5304440029 5304448490 5304440031 5304440032 5304440033 5304440232 5304445463 5304440235 5304440234 5304445464 5304440236 5304440237 5304445465... Assy, exhaust Support Assy, turntable Tray, turntable, glass Retainer, capacitor strap Cover, stirrer fan Stirrer Assembly Filter, noise, electronic Publication No: 5995451456 # Functional Parts 3 * Non-Illustrated Parts 10/05 C- - - B- - -
Parts Catalog
Page 5
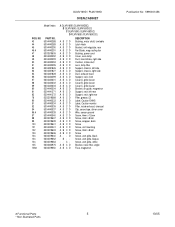
..., vent grille, black Screw, vent grille, bisque Screw, vent grille, white Bracket, noise filter, angle Fuse, magnetron Publication No: 5995451456 # Functional Parts 5 * Non-Illustrated Parts 10/05 NO 43 44 45 46 # 47 48 49 50 51 52 53 54 55 57 58 59 60 61 62 78 90... 91 92 94 96 # 97 98 99 100 101 102 103 104 104 104 105 106# PART NO. 5304440288 5304440289 5304440290 5304440291 5303319605 5304440292 5304440293 5304440294 5304440295 5304451826 5304451827 5304451828 5304440299 5304440301 5304440302 5304440303 5304440304 5304441371 5304441372 5303319568 5304440333 5304440334 ...
..., vent grille, black Screw, vent grille, bisque Screw, vent grille, white Bracket, noise filter, angle Fuse, magnetron Publication No: 5995451456 # Functional Parts 5 * Non-Illustrated Parts 10/05 NO 43 44 45 46 # 47 48 49 50 51 52 53 54 55 57 58 59 60 61 62 78 90... 91 92 94 96 # 97 98 99 100 101 102 103 104 104 104 105 106# PART NO. 5304440288 5304440289 5304440290 5304440291 5303319605 5304440292 5304440293 5304440294 5304440295 5304451826 5304451827 5304451828 5304440299 5304440301 5304440302 5304440303 5304440304 5304441371 5304441372 5303319568 5304440333 5304440334 ...

Parts Catalog
Page 7
...72 73 73 73 73 74 75 76 77 78 79 80 81 82 83 86 87 88 # 89 # 95 97 PART NO. 5304440245 5304445604 5304440247 5304440248 5304448491 5304443989 5304443990 5304443991 5304440281 5303319584 5304440282 5304440300 5304441374 5304441376 5304441375 5304448492 5304440305 5304440307 5304440306 5304440308 5304440310 ..., 30mm, (2) Template, installation, top Template, installation, wall Wire, high voltage-A Wiring Harness, main-A Rack, microwave oven, wire Screw, 4mm x 12mm # Functional Parts 7 * Non-Illustrated Parts 10/05 GLMV169D / PLMV169D CONTROL PANEL,DOOR,MISC. C- - - CA- - -
...72 73 73 73 73 74 75 76 77 78 79 80 81 82 83 86 87 88 # 89 # 95 97 PART NO. 5304440245 5304445604 5304440247 5304440248 5304448491 5304443989 5304443990 5304443991 5304440281 5303319584 5304440282 5304440300 5304441374 5304441376 5304441375 5304448492 5304440305 5304440307 5304440306 5304440308 5304440310 ..., 30mm, (2) Template, installation, top Template, installation, wall Wire, high voltage-A Wiring Harness, main-A Rack, microwave oven, wire Screw, 4mm x 12mm # Functional Parts 7 * Non-Illustrated Parts 10/05 GLMV169D / PLMV169D CONTROL PANEL,DOOR,MISC. C- - - CA- - -


