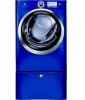
Use and Care Guide
Page 34
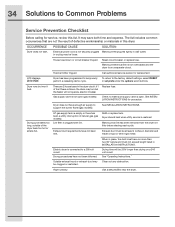
.... When in place, the duct must have enough air supply to Common Problems Service Prevention Checklist Before calling for service, review this dryer. OCCURRENCE Dryer does not start. There are not the result of defective workmanship or materials in diameter and made of the 2 fuses ...plug fits tightly in the dryer circuit. 34 Solutions to support the burner flame (gas models). It may be clogged or restricted. Thermal limiter tripped. Refill or replace tank. Electric dryer is empty or there has been a utility interruption of the dryer feels too hot or smells ...
.... When in place, the duct must have enough air supply to Common Problems Service Prevention Checklist Before calling for service, review this dryer. OCCURRENCE Dryer does not start. There are not the result of defective workmanship or materials in diameter and made of the 2 fuses ...plug fits tightly in the dryer circuit. 34 Solutions to support the burner flame (gas models). It may be clogged or restricted. Thermal limiter tripped. Refill or replace tank. Electric dryer is empty or there has been a utility interruption of the dryer feels too hot or smells ...
Installation Instructions
Page 17
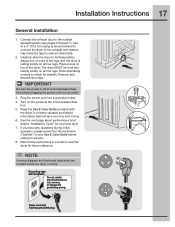
...final position. Place these instructions in your new dryer. 7. Grounding type wall receptacle Do not, under any questions during initial operation, please review the "Avoid Service Checklist" in a location near the dryer for future reference. Carefully slide the dryer to seal all four legs. Rock alternating ..., or bypass the grounding prong. Turn on all other joints. 2. Connect the exhaust duct to check for service. 8. Use of the dryer. The dryer MUST be level and resting solidly on top of a 4" (10.2 cm) clamp is resting solidly on the power at a circuit breaker...
...final position. Place these instructions in your new dryer. 7. Grounding type wall receptacle Do not, under any questions during initial operation, please review the "Avoid Service Checklist" in a location near the dryer for future reference. Carefully slide the dryer to seal all four legs. Rock alternating ..., or bypass the grounding prong. Turn on all other joints. 2. Connect the exhaust duct to check for service. 8. Use of the dryer. The dryer MUST be level and resting solidly on top of a 4" (10.2 cm) clamp is resting solidly on the power at a circuit breaker...
Installation Instructions
Page 18
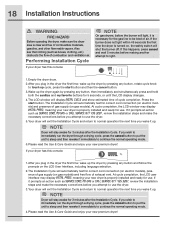
... 3287, review the installation steps and make the necessary corrections before the burner will light, it prompts an action such as boxes, clothing, etc.) obstructs the flow of gas supply (on gas models). NOTE Dryer will stay awake for correct cord connection (on electric models), ...favorite buttons for correct cord connection (on electric models) and presence of combustion and ventilation air. Performing Installation Cycle If your dryer has this happens, press cancel and wait 5 minutes before you attempt to use the dryer. 3.Your dryer will exit the Installation Cycle and return ...
... 3287, review the installation steps and make the necessary corrections before the burner will light, it prompts an action such as boxes, clothing, etc.) obstructs the flow of gas supply (on gas models). NOTE Dryer will stay awake for correct cord connection (on electric models), ...favorite buttons for correct cord connection (on electric models) and presence of combustion and ventilation air. Performing Installation Cycle If your dryer has this happens, press cancel and wait 5 minutes before you attempt to use the dryer. 3.Your dryer will exit the Installation Cycle and return ...