
Use and Care Guide
Page 2
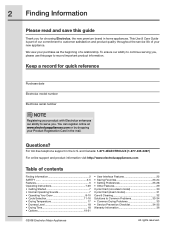
...of contents Finding information 2 SAFETY 3-5 Features 6 Operating Instructions 7-29 • Getting Started 7 • Normal Operating Sounds 7 • Operating Your Dryer 8-10 • Cycle Selection 11-16 • Drying Temperature 17 • Dryness Level 18 • Drying Time 18 • Options 19-...25-28 • Other Features 29 Cycle Chart (non-steam model 30 Cycle Chart (steam model 31 Care & Cleaning 32 Solutions to serve you for quick reference Purchase date Electrolux model number Electrolux serial number NOTE Registering your new appliance. To ensure ...
...of contents Finding information 2 SAFETY 3-5 Features 6 Operating Instructions 7-29 • Getting Started 7 • Normal Operating Sounds 7 • Operating Your Dryer 8-10 • Cycle Selection 11-16 • Drying Temperature 17 • Dryness Level 18 • Drying Time 18 • Options 19-...25-28 • Other Features 29 Cycle Chart (non-steam model 30 Cycle Chart (steam model 31 Care & Cleaning 32 Solutions to serve you for quick reference Purchase date Electrolux model number Electrolux serial number NOTE Registering your new appliance. To ensure ...
Use and Care Guide
Page 3
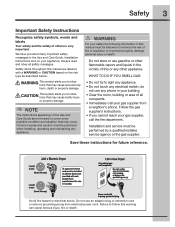
... building or area of this Use and Care Guide are labeled with a WARNING or CAUTION based on electric dryers (not provided with 3-prong grounded plug Avoid fire hazard or electrical shock. Installation and service must be followed to minimize the risk of others is very important. Safety...these instructions for sale in the vicinity of all safety messages. Power cord with unit except those manufactured for future reference. 240 v Electric Dryer 120 v Gas Dryer 10-30R 3-wire (fused 30 amp) 14-30R 4-wire (fused 30 amp) UL-approved service cord must be practiced when ...
... building or area of this Use and Care Guide are labeled with a WARNING or CAUTION based on electric dryers (not provided with 3-prong grounded plug Avoid fire hazard or electrical shock. Installation and service must be followed to minimize the risk of others is very important. Safety...these instructions for sale in the vicinity of all safety messages. Power cord with unit except those manufactured for future reference. 240 v Electric Dryer 120 v Gas Dryer 10-30R 3-wire (fused 30 amp) 14-30R 4-wire (fused 30 amp) UL-approved service cord must be practiced when ...
Use and Care Guide
Page 4
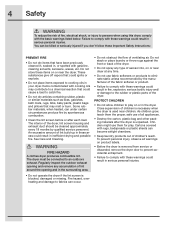
... chambers. • Keep laundry products out of children's reach. 4 Safety WARNING To reduce the risk of fire, electrical shock, or injury to persons when using this dryer, comply with gasoline, cleaning solvents, kerosene, waxes, etc. You can under certain circumstances produce fire by spontaneous combustion....• Failure to comply with these warnings could ignite or explode. • Do not place items exposed to cooking oils in your dryer. These substances give off vapors that may contribute to a chemical reaction that could cause a load to an outdoors exhaust. Some rubber ...
... chambers. • Keep laundry products out of children's reach. 4 Safety WARNING To reduce the risk of fire, electrical shock, or injury to persons when using this dryer, comply with gasoline, cleaning solvents, kerosene, waxes, etc. You can under certain circumstances produce fire by spontaneous combustion....• Failure to comply with these warnings could ignite or explode. • Do not place items exposed to cooking oils in your dryer. These substances give off vapors that may contribute to a chemical reaction that could cause a load to an outdoors exhaust. Some rubber ...
Use and Care Guide
Page 5
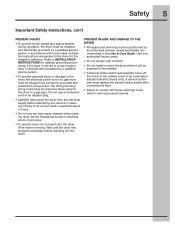
.... Use only authorized factory parts. • Do not tamper with local codes. Hazardous fumes or electrical shock could result in serious personal injuries. If the dryer is moving. Failure to INSTALLATION INSTRUCTIONS for the installer's reference. Safety 5 Important Safety Instructions, con...'t PREVENT INJURY • To prevent shock hazard and assure stability during operation, the dryer must be installed and electrically grounded by an authorized servicer unless specifically recommended in this Use & Care Guide. Refer to do not reach ...
.... Use only authorized factory parts. • Do not tamper with local codes. Hazardous fumes or electrical shock could result in serious personal injuries. If the dryer is moving. Failure to INSTALLATION INSTRUCTIONS for the installer's reference. Safety 5 Important Safety Instructions, con...'t PREVENT INJURY • To prevent shock hazard and assure stability during operation, the dryer must be installed and electrically grounded by an authorized servicer unless specifically recommended in this Use & Care Guide. Refer to do not reach ...
Use and Care Guide
Page 7
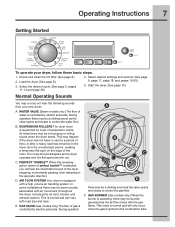
... temporary flat spot on the edge of suspension rollers. C. PERFECT TUMBLE™ When the reversingaction option of perfect tumble™ is supported by a set of the roller. E. B. AIR FLOW SYSTEM Your dryer is normal and can vary with a high volume air handling ... may be a thumping or rolling sound when the dryer starts. WATER VALVE (Steam models only.) The flow of gas is controlled by electric solenoids. During operation there may be some installations there may not hear the following sounds from your dryer, follow these basic steps: 1. D. The noise ...
... temporary flat spot on the edge of suspension rollers. C. PERFECT TUMBLE™ When the reversingaction option of perfect tumble™ is supported by a set of the roller. E. B. AIR FLOW SYSTEM Your dryer is normal and can vary with a high volume air handling ... may be a thumping or rolling sound when the dryer starts. WATER VALVE (Steam models only.) The flow of gas is controlled by electric solenoids. During operation there may be some installations there may not hear the following sounds from your dryer, follow these basic steps: 1. D. The noise ...
Use and Care Guide
Page 8
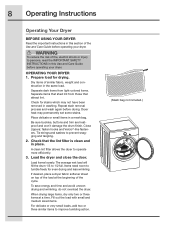
...important instructions in this Use and Care Guide before operating your dryer. WARNING To reduce the risk of similar fabric, weight and construction in place. Prepare load for even drying and less wrinkling. Dry items of fire, electric shock or injury to tumble freely for drying. To save ...energy and time and avoid uneven drying and wrinkling, do not overload the dryer. Check that attract lint. Load the dryer and close the door. If desired, place a dryer fabric softener sheet on top ...
...important instructions in this Use and Care Guide before operating your dryer. WARNING To reduce the risk of similar fabric, weight and construction in place. Prepare load for even drying and less wrinkling. Dry items of fire, electric shock or injury to tumble freely for drying. To save ...energy and time and avoid uneven drying and wrinkling, do not overload the dryer. Check that attract lint. Load the dryer and close the door. If desired, place a dryer fabric softener sheet on top ...
Use and Care Guide
Page 9
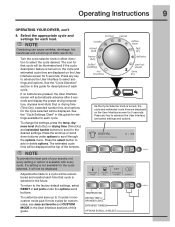
...to the factory default settings, select RESET in this guide. Press the select button to the desired settings. Operating Instructions 9 OPERATING YOUR DRYER, con't 4. If a setting is turned on, the cycle and estimated cycle time are pressed, the User Interface screen will automatically ... save up to a cycle will be remembered and recalled each load. The estimated cycle time will be displayed at the top of static electricity. Adjustments made to 3 cycles in noncustom mode plus 9 more cycles for 5 seconds. NOTE Overdrying can cause wrinkles, shrinkage, lint, ...
...to the factory default settings, select RESET in this guide. Press the select button to the desired settings. Operating Instructions 9 OPERATING YOUR DRYER, con't 4. If a setting is turned on, the cycle and estimated cycle time are pressed, the User Interface screen will automatically ... save up to a cycle will be remembered and recalled each load. The estimated cycle time will be displayed at the top of static electricity. Adjustments made to 3 cycles in noncustom mode plus 9 more cycles for 5 seconds. NOTE Overdrying can cause wrinkles, shrinkage, lint, ...
Use and Care Guide
Page 10
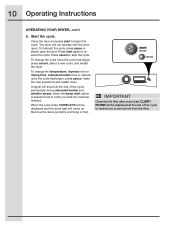
...load. Press start to stop the cycle. To change the cycle once the cycle has begun, press cancel, select a new cycle, and restart the dryer To change the temperature, dryness level or drying time, extended tumble time or options once the cycle has begun, press pause, make the new selections... and restart dryer. When the cycle ends, COMPLETE will come on. Start the cycle. Remove the items promptly and hang or fold. 10 Operating Instructions OPERATING YOUR...
...load. Press start to stop the cycle. To change the cycle once the cycle has begun, press cancel, select a new cycle, and restart the dryer To change the temperature, dryness level or drying time, extended tumble time or options once the cycle has begun, press pause, make the new selections... and restart dryer. When the cycle ends, COMPLETE will come on. Start the cycle. Remove the items promptly and hang or fold. 10 Operating Instructions OPERATING YOUR...
Use and Care Guide
Page 11
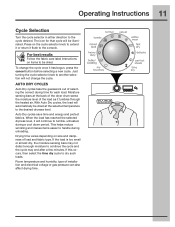
... With Auto Dry cycles, the load will continue to handle during a cool down period. Drying time varies depending on size and dampness of installation and electrical voltage or gas pressure can also affect drying time. The icon for each load. Just turning the cycle selector knob to the console. AUTO DRY...CYCLES Auto Dry cycles take the guesswork out of the load as it flush to another selection will be dried at the back of the dryer drum sense the moisture level of selecting the correct drying time for that cycle will not change the cycle once it will automatically be ...
... With Auto Dry cycles, the load will continue to handle during a cool down period. Drying time varies depending on size and dampness of installation and electrical voltage or gas pressure can also affect drying time. The icon for each load. Just turning the cycle selector knob to the console. AUTO DRY...CYCLES Auto Dry cycles take the guesswork out of the load as it flush to another selection will be dried at the back of the dryer drum sense the moisture level of selecting the correct drying time for that cycle will not change the cycle once it will automatically be ...
Use and Care Guide
Page 14
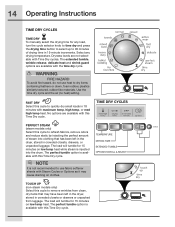
... with this cycle to remove wrinkles from clean, dry items that has been left in the dryer, stored in crowded closets, drawers, or unpacked luggage. TIME DRY CYCLES PERFECT STEAM (steam models only) Select this cycle to quickly dry small loads in 15-minute increments. The... perfect tumble option is available with this Time Dry cycle. TEMPERATURE DRYING TIME EXTENDED TUMBLE OPTIONS SCROLL & SELECT TOUCH UP (non-steam models only) Select this...
... with this cycle to remove wrinkles from clean, dry items that has been left in the dryer, stored in crowded closets, drawers, or unpacked luggage. TIME DRY CYCLES PERFECT STEAM (steam models only) Select this cycle to quickly dry small loads in 15-minute increments. The... perfect tumble option is available with this Time Dry cycle. TEMPERATURE DRYING TIME EXTENDED TUMBLE OPTIONS SCROLL & SELECT TOUCH UP (non-steam models only) Select this...
Use and Care Guide
Page 16
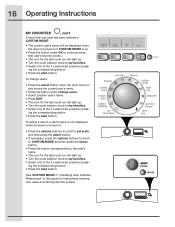
...to my favorites. • Select one of the 3 customized cycles by press- To select a user if a user's name is not displayed when the dryer is on : • Press the options buttons to scroll to set prefs and then press the select button. • If necessary, press the options ... Press the start button. (See CUSTOM MODE in "Operating User Interface Preferences" in CUSTOM MODE: • The current user's name will be displayed when the dryer is turned on if CUSTOM MODE is turned on . • Press the button under change users. • Select another user's name. • Press EXIT...
...to my favorites. • Select one of the 3 customized cycles by press- To select a user if a user's name is not displayed when the dryer is on : • Press the options buttons to scroll to set prefs and then press the select button. • If necessary, press the options ... Press the start button. (See CUSTOM MODE in "Operating User Interface Preferences" in CUSTOM MODE: • The current user's name will be displayed when the dryer is turned on if CUSTOM MODE is turned on . • Press the button under change users. • Select another user's name. • Press EXIT...
Use and Care Guide
Page 21
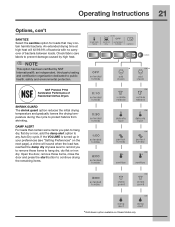
... items, close the door and press the start button to continue drying the remaining items. * * *Add steam option available on the next page), a chime will kill 99.9% of bacteria with no carryover of Residential Clothes Dryers SHRINK GUARD The shrink guard option reduces the initial drying temperature and gradually lowers the drying...
... items, close the door and press the start button to continue drying the remaining items. * * *Add steam option available on the next page), a chime will kill 99.9% of bacteria with no carryover of Residential Clothes Dryers SHRINK GUARD The shrink guard option reduces the initial drying temperature and gradually lowers the drying...
Use and Care Guide
Page 25
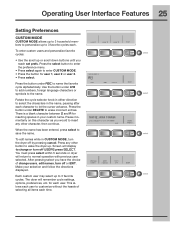
... until you would to 3 favorite cycles each time. Press any other button to customize without the hassle of change or turn the dryer off USERS press SELECT. Make your custom name. After pressing select you have the choice of selecting all items each . for inserting... symbols to 3 favorite cycles. There is a blank character between Z and A for each character to name the favorite cycle alphabetically. The dryer will return to save the name. Rotate the cycle selector knob in either direction to select the characters in CUSTOM MODE, turn off by pressing...
... until you would to 3 favorite cycles each time. Press any other button to customize without the hassle of change or turn the dryer off USERS press SELECT. Make your custom name. After pressing select you have the choice of selecting all items each . for inserting... symbols to 3 favorite cycles. There is a blank character between Z and A for each character to name the favorite cycle alphabetically. The dryer will return to save the name. Rotate the cycle selector knob in either direction to select the characters in CUSTOM MODE, turn off by pressing...
Use and Care Guide
Page 26
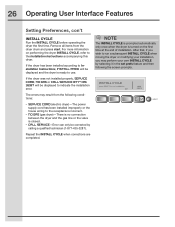
...CYCLE, refer to Installation Instructions, INSTALL PASS! Repeat the INSTALL CYCLE when corrections are completed. If the dryer has been installed according to the Installation Instructions accompanying this dryer. For more information on the first time at the end of installation. The errors may perform your installation..., you wish to use. Remove all items from the following conditions: • SERVICE CORD (electric dryer)-The power supply cord has been installed improperly or the house wiring to indicate the installation error. If the...
...CYCLE, refer to Installation Instructions, INSTALL PASS! Repeat the INSTALL CYCLE when corrections are completed. If the dryer has been installed according to the Installation Instructions accompanying this dryer. For more information on the first time at the end of installation. The errors may perform your installation..., you wish to use. Remove all items from the following conditions: • SERVICE CORD (electric dryer)-The power supply cord has been installed improperly or the house wiring to indicate the installation error. If the...
Use and Care Guide
Page 27
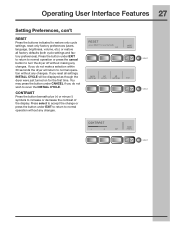
... select to accept the change or press the button under EXIT to return to normal operation or press the cancel button to turn the dryer off without making any changes. CONTRAST Press the button beneath plus (+) or minus (-) symbols to increase or decrease the contrast of the... display. Press the button under EXIT to return to normal operation without any changes. Operating User Interface Features 27 Setting Preferences, con't RESET Press the buttons indicated to restore only cycle settings, reset only factory preferences (users, language, brightness, volume, ...
... select to accept the change or press the button under EXIT to return to normal operation or press the cancel button to turn the dryer off without making any changes. CONTRAST Press the button beneath plus (+) or minus (-) symbols to increase or decrease the contrast of the... display. Press the button under EXIT to return to normal operation without any changes. Operating User Interface Features 27 Setting Preferences, con't RESET Press the buttons indicated to restore only cycle settings, reset only factory preferences (users, language, brightness, volume, ...
Use and Care Guide
Page 29
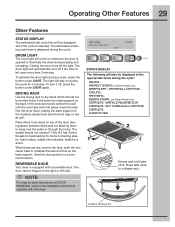
...cycle time will be displayed when the cycle is left side. The drum light will come on whenever the door is equipped with this dryer. The light will also be tumble dried. Insert the rack into place. The weight should not be displayed at the appropriate times ..., feathers or down to collapse rack. When items are dry, remove the rack, push the two center tabs to be hinged on Steam Model only) COMPLETE - PERFECT STEAM (on during the cycle. DRYING WILL CONTINUE... To activate the drum light during loading and unloading. SANITIZING... Closing the door turns off...
...cycle time will be displayed when the cycle is left side. The drum light will come on whenever the door is equipped with this dryer. The light will also be tumble dried. Insert the rack into place. The weight should not be displayed at the appropriate times ..., feathers or down to collapse rack. When items are dry, remove the rack, push the two center tabs to be hinged on Steam Model only) COMPLETE - PERFECT STEAM (on during the cycle. DRYING WILL CONTINUE... To activate the drum light during loading and unloading. SANITIZING... Closing the door turns off...
Use and Care Guide
Page 30
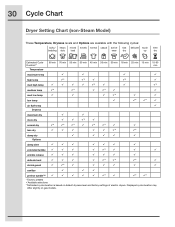
30 Cycle Chart Dryer Setting Chart (non-Steam Model) These Temperature, Dryness levels and Options are available with the following cycles: bulky/ heavy mixed towels normal...; * * * shrink guard * sanitize perfect tumble™ * * * * Factory presets Available selections **Estimated cycle duration is based on gas models. Displayed...
30 Cycle Chart Dryer Setting Chart (non-Steam Model) These Temperature, Dryness levels and Options are available with the following cycles: bulky/ heavy mixed towels normal...; * * * shrink guard * sanitize perfect tumble™ * * * * Factory presets Available selections **Estimated cycle duration is based on gas models. Displayed...
Use and Care Guide
Page 31
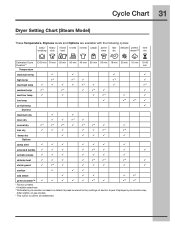
...electric dryers. Cycle Chart 31 Dryer Setting Chart (Steam Model) These Temperature, Dryness levels and Options are available with the following cycles: bulky/ heavy mixed towels normal casual active bedding duty load wear fast delicate perfect time dry steam...guard * sanitize add steam ¹ perfect tumble™ * * * * Factory presets &#...
...electric dryers. Cycle Chart 31 Dryer Setting Chart (Steam Model) These Temperature, Dryness levels and Options are available with the following cycles: bulky/ heavy mixed towels normal casual active bedding duty load wear fast delicate perfect time dry steam...guard * sanitize add steam ¹ perfect tumble™ * * * * Factory presets &#...
Use and Care Guide
Page 32
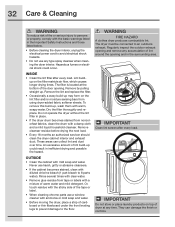
... persons or property, comply with the basic warnings listed in the Important Safety Instructions and those listed below. • Before cleaning the dryer interior, unplug the electrical power cord to avoid electrical shock hazards. • Do not use any accumulation of lint around the opening and in the surrounding area. Hazardous fumes or...
... persons or property, comply with the basic warnings listed in the Important Safety Instructions and those listed below. • Before cleaning the dryer interior, unplug the electrical power cord to avoid electrical shock hazards. • Do not use any accumulation of lint around the opening and in the surrounding area. Hazardous fumes or...
Use and Care Guide
Page 33
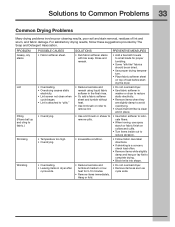
...Pilling (Fibers ball up and cling to fabric.) Shrinking Wrinkling POSSIBLE CAUSES • Fabric softener sheet. • Overloading. • Overdrying causes static electricity. • Lint screen not clean when cycle began. • Lint is a concern, check load often. • Remove items while slightly damp...and tumble without heat. • Use lint brush or roller to remove lint. • Do not overload dryer. • Use fabric softener in washer or dryer to reduce static electricity. • Remove items when they are slightly damp to avoid overdrying. • Check that lint filter ...
...Pilling (Fibers ball up and cling to fabric.) Shrinking Wrinkling POSSIBLE CAUSES • Fabric softener sheet. • Overloading. • Overdrying causes static electricity. • Lint screen not clean when cycle began. • Lint is a concern, check load often. • Remove items while slightly damp...and tumble without heat. • Use lint brush or roller to remove lint. • Do not overload dryer. • Use fabric softener in washer or dryer to reduce static electricity. • Remove items when they are slightly damp to avoid overdrying. • Check that lint filter ...


