

Use and Care Guide
Page 3
...building or area of all safety messages. Safety items throughout this or any other flammable vapors and liquids in the Use and Care Guide, Installation Instructions and on the risk type as described below: /_ WARNING This symbol alerts you cannot reach your appliance. tions that may ...cause bodily injury or property damage. Save these instructions for future reference. Installation and service must be performed by a qualified installer, service agency or the gas supplier. Do not store or use any electrical switch; do not use gasoline ...
...building or area of all safety messages. Safety items throughout this or any other flammable vapors and liquids in the Use and Care Guide, Installation Instructions and on the risk type as described below: /_ WARNING This symbol alerts you cannot reach your appliance. tions that may ...cause bodily injury or property damage. Save these instructions for future reference. Installation and service must be performed by a qualified installer, service agency or the gas supplier. Do not store or use any electrical switch; do not use gasoline ...

Use and Care Guide
Page 5
... this time. • Failure to comply with these warnings could result in 1 load unless specified on the label. • Do not mix chlorine bleach with ammonia or acids such as vinegar. Install washer on carpet. The motor will be necessary to reinforce the floor to prevent vibration ...can produce poisonous gas - It may be exposed to the OFF position does not disconnect this Use & Care Guide. Turning the controls to the weather. • Do not install on a solid floor. resulting in accordance with an electrical overload protector. The third grounding prong must be plugged...
... this time. • Failure to comply with these warnings could result in 1 load unless specified on the label. • Do not mix chlorine bleach with ammonia or acids such as vinegar. Install washer on carpet. The motor will be necessary to reinforce the floor to prevent vibration ...can produce poisonous gas - It may be exposed to the OFF position does not disconnect this Use & Care Guide. Turning the controls to the weather. • Do not install on a solid floor. resulting in accordance with an electrical overload protector. The third grounding prong must be plugged...
Use and Care Guide
Page 25
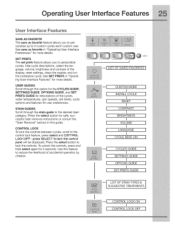
... displayed. SET PREFS The set prefs feature allows you to personalize up to reduce the likelihood of the display, reset settings, clean the washer, and run the installation cycle. STAIN GUIDES Scroll through this feature to 3 custom cycles each custom user. Press the select button for safe, successful stain removal instructions or consult...
... displayed. SET PREFS The set prefs feature allows you to personalize up to reduce the likelihood of the display, reset settings, clean the washer, and run the installation cycle. STAIN GUIDES Scroll through this feature to 3 custom cycles each custom user. Press the select button for safe, successful stain removal instructions or consult...

Use and Care Guide
Page 42
... the house, Measure hot water temperature at least 23.6" (60 cm). Water is entering washer but tub does not fill. Drain hose is not hot enough, Water in this guide) and draining water into the empty drum or sink. Water temperature should be at least 30... to support more than 8' (2.4 m). Load is overloaded. Water leaks. Oversudsing. This is a result of the siphoning action and is part of the normal operation of the bellows at least 120°F (49°C). See Operating Your Washer, step 4. Install rubber sealing washers provided. Use less detergent in the house...
... the house, Measure hot water temperature at least 23.6" (60 cm). Water is entering washer but tub does not fill. Drain hose is not hot enough, Water in this guide) and draining water into the empty drum or sink. Water temperature should be at least 30... to support more than 8' (2.4 m). Load is overloaded. Water leaks. Oversudsing. This is a result of the siphoning action and is part of the normal operation of the bellows at least 120°F (49°C). See Operating Your Washer, step 4. Install rubber sealing washers provided. Use less detergent in the house...

Installation Instructions
Page 2
...Installing hole plugs 8 Installation instructions 9-12 • Leveling your washer 9 • Connecting inlet water 10 • Connecting drain & electrical 11 • Performing installation cycle 12 Reversing door 13-18 Options 19 • Accessories 19 • Replacement parts 19 Notes 20 ©2008 Electrolux... the mail. Keep a record for choosing Electrolux, the new premium brand in home appliances. 2 Finding...for quick reference Purchase date Electrolux model number Electrolux serial number NOTE Registering your product with Electrolux enhances our ability to record ...
...Installing hole plugs 8 Installation instructions 9-12 • Leveling your washer 9 • Connecting inlet water 10 • Connecting drain & electrical 11 • Performing installation cycle 12 Reversing door 13-18 Options 19 • Accessories 19 • Replacement parts 19 Notes 20 ©2008 Electrolux... the mail. Keep a record for choosing Electrolux, the new premium brand in home appliances. 2 Finding...for quick reference Purchase date Electrolux model number Electrolux serial number NOTE Registering your product with Electrolux enhances our ability to record ...
Installation Instructions
Page 8
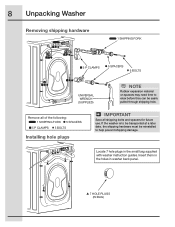
... in the holes in the small bag supplied with washer instruction guides. If the washer is to help prevent shipping damage. Remove all of the following: 1 SHIPPING FORK 5 SPACERS 5 P CLAMPS 5 BOLTS Installing hole plugs IMPORTANT Save all shipping bolts and spacers for future use. 8 Unpacking Washer Removing shipping hardware 1 SHIPPING FORK 5 P CLAMPS 5 SPACERS 5 BOLTS UNIVERSAL...
... in the holes in the small bag supplied with washer instruction guides. If the washer is to help prevent shipping damage. Remove all of the following: 1 SHIPPING FORK 5 SPACERS 5 P CLAMPS 5 BOLTS Installing hole plugs IMPORTANT Save all shipping bolts and spacers for future use. 8 Unpacking Washer Removing shipping hardware 1 SHIPPING FORK 5 P CLAMPS 5 SPACERS 5 BOLTS UNIVERSAL...
Installation Instructions
Page 11
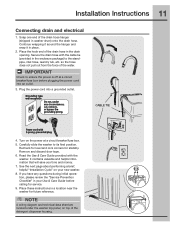
... next page about performing a brief, helpful "Installation Cycle" on the power at a circuit breaker/fuse box before calling for service. 9. Snap one end of the water. CABLE TIE Power cord with the cable tie (provided in your new washer. 8. Read the Use & Care Guide provided with the washer. It contains valuable and helpful information...
... next page about performing a brief, helpful "Installation Cycle" on the power at a circuit breaker/fuse box before calling for service. 9. Snap one end of the water. CABLE TIE Power cord with the cable tie (provided in your new washer. 8. Read the Use & Care Guide provided with the washer. It contains valuable and helpful information...

Installation Instructions
Page 12
...!, meaning your new washer is properly installed and ready for use the washer. 5.Your washer will exit the Installation Cycle and return to normal operation the next time you wake it immediately to continue the normal operating mode. 6.Please read the Use & Care Guide and enjoy your new premium washer! Press the start button and then the...
...!, meaning your new washer is properly installed and ready for use the washer. 5.Your washer will exit the Installation Cycle and return to normal operation the next time you wake it immediately to continue the normal operating mode. 6.Please read the Use & Care Guide and enjoy your new premium washer! Press the start button and then the...


