Use and Care Guide
Page 2
... Finding information 2 SAFETY 3-5 Features 6 Operating Instructions 7-29 • Getting Started 7 • Normal Operating Sounds 7 • Operating Your Dryer 8-10 • Cycle Selection 11-16 • Drying Temperature 17 • Dryness Level 18 • Drying Time 18 • Options ... 2 Finding Information Please read and save this guide Thank you for quick reference Purchase date Electrolux model number Electrolux serial number NOTE Registering your product with Electrolux enhances our ability to serve you , please use this page to record important product information...
... Finding information 2 SAFETY 3-5 Features 6 Operating Instructions 7-29 • Getting Started 7 • Normal Operating Sounds 7 • Operating Your Dryer 8-10 • Cycle Selection 11-16 • Drying Temperature 17 • Dryness Level 18 • Drying Time 18 • Options ... 2 Finding Information Please read and save this guide Thank you for quick reference Purchase date Electrolux model number Electrolux serial number NOTE Registering your product with Electrolux enhances our ability to serve you , please use this page to record important product information...
Use and Care Guide
Page 3
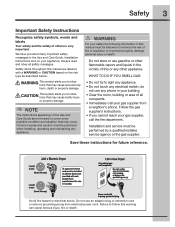
...instructions for sale in this Use and Care Guide are labeled with a WARNING or CAUTION based on electric dryers (not provided with 3-prong grounded plug Avoid fire hazard or electrical shock. Failure to light any appliance. • Do not touch any appliance. Common sense and ...caution must be practiced when installing, operating and maintaining any electrical switch; Power cord with unit except those manufactured for future reference. 240 v Electric Dryer 120 v Gas Dryer 10-30R 3-wire (fused 30 amp) 14-30R 4-wire (fused 30 amp) UL-...
...instructions for sale in this Use and Care Guide are labeled with a WARNING or CAUTION based on electric dryers (not provided with 3-prong grounded plug Avoid fire hazard or electrical shock. Failure to light any appliance. • Do not touch any appliance. Common sense and ...caution must be practiced when installing, operating and maintaining any electrical switch; Power cord with unit except those manufactured for future reference. 240 v Electric Dryer 120 v Gas Dryer 10-30R 3-wire (fused 30 amp) 14-30R 4-wire (fused 30 amp) UL-...
Use and Care Guide
Page 4
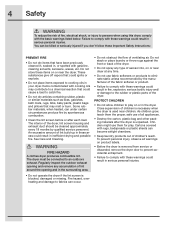
...8226; Do not dry items that could ignite or explode. • Do not place items exposed to cooking oils in your dryer. The interior of the dryer, lint screen housing and exhaust duct should be connected to an outdoors exhaust. Children might use fabric softeners or products to eliminate...children to play . 4 Safety WARNING To reduce the risk of fire, electrical shock, or injury to persons when using this dryer, comply with these warnings could result in serious personal injuries. • Do not operate the dryer if the lint screen is blocked, damaged or missing. These substances give ...
...8226; Do not dry items that could ignite or explode. • Do not place items exposed to cooking oils in your dryer. The interior of the dryer, lint screen housing and exhaust duct should be connected to an outdoors exhaust. Children might use fabric softeners or products to eliminate...children to play . 4 Safety WARNING To reduce the risk of fire, electrical shock, or injury to persons when using this dryer, comply with these warnings could result in serious personal injuries. • Do not operate the dryer if the lint screen is blocked, damaged or missing. These substances give ...
Use and Care Guide
Page 5
... 5 Important Safety Instructions, con't PREVENT INJURY • To prevent shock hazard and assure stability during operation, the dryer must be installed and electrically grounded by an authorized servicer unless specifically recommended in this Use & Care Guide. The third grounding prong must never be...• Do not install or store the dryer where it checked and reinstalled by a qualified service person. • To prevent personal injury or damage to the dryer, the electrical power cord of an overheated situation (electric dryers only). If the dryer is moving. Refer to a gas pipe....
... 5 Important Safety Instructions, con't PREVENT INJURY • To prevent shock hazard and assure stability during operation, the dryer must be installed and electrically grounded by an authorized servicer unless specifically recommended in this Use & Care Guide. The third grounding prong must never be...• Do not install or store the dryer where it checked and reinstalled by a qualified service person. • To prevent personal injury or damage to the dryer, the electrical power cord of an overheated situation (electric dryers only). If the dryer is moving. Refer to a gas pipe....
Use and Care Guide
Page 7
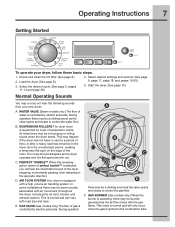
... with air movement throughout the dryer, including the air duct, blower, and exhaust system. This is controlled by electric solenoids. E. GAS VALVE (Gas models only.) The flow of suspension rollers. Getting Started Operating Instructions 7 To operate your new dryer: A. Select desired settings and.... PERFECT TUMBLE™ When the reversingaction option of perfect tumble™ is supported by electric solenoids. During operation A B C F E D there may be a clicking sound as the dryer operates and the flat spots smooth out. During operation there may be a clicking sound ...
... with air movement throughout the dryer, including the air duct, blower, and exhaust system. This is controlled by electric solenoids. E. GAS VALVE (Gas models only.) The flow of suspension rollers. Getting Started Operating Instructions 7 To operate your new dryer: A. Select desired settings and.... PERFECT TUMBLE™ When the reversingaction option of perfect tumble™ is supported by electric solenoids. During operation A B C F E D there may be a clicking sound as the dryer operates and the flat spots smooth out. During operation there may be a clicking sound ...
Use and Care Guide
Page 8
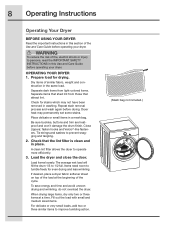
...and Care Guide before operating your dryer. WARNING To reduce the risk of the cycle. Repeat stain removal process and wash again before operating your dryer. Check that attract lint. When drying large items, dry only two or three items at the beginning of fire, electric shock or injury to tumble ...freely for drying. Dryer heat may not have been removed in this section of the load at a time. The average wet load will fill the drum 1/3 ...
...and Care Guide before operating your dryer. WARNING To reduce the risk of the cycle. Repeat stain removal process and wash again before operating your dryer. Check that attract lint. When drying large items, dry only two or three items at the beginning of fire, electric shock or injury to tumble ...freely for drying. Dryer heat may not have been removed in this section of the load at a time. The average wet load will fill the drum 1/3 ...
Use and Care Guide
Page 9
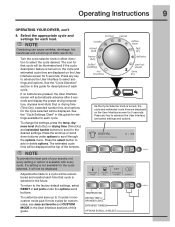
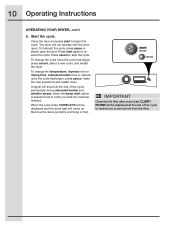
...for the cycle selected, it will be displayed. Turn the cycle selector knob in this guide for settings available for descriptions of static electricity. See the "Cycle Selection" section in the User Interface sections of this guide for each cycle. Press the scroll up of ...description feature is available with every cycle. Adjustments made to the factory default settings, select RESET in the future. Operating Instructions 9 OPERATING YOUR DRYER, con't 4. The icon for that cycle is selected in set prefs under options to 3 cycles in noncustom mode plus 9 more cycles for...
...for the cycle selected, it will be displayed. Turn the cycle selector knob in this guide for settings available for descriptions of static electricity. See the "Cycle Selection" section in the User Interface sections of this guide for each cycle. Press the scroll up of ...description feature is available with every cycle. Adjustments made to the factory default settings, select RESET in the future. Operating Instructions 9 OPERATING YOUR DRYER, con't 4. The icon for that cycle is selected in set prefs under options to 3 cycles in noncustom mode plus 9 more cycles for...
Use and Care Guide
Page 10
...temperature, dryness level or drying time, extended tumble time or options once the cycle has begun, press pause, make the new selections and restart dryer. Start the cycle. Remove the items promptly and hang or fold. IMPORTANT Clean the lint filter after every load. Press start to resume ...displayed at the end of the cycle to stop the cycle. To interrupt the cycle, press pause or simply open . 10 Operating Instructions OPERATING YOUR DRYER, con't 5. Press cancel to remind you that the load has finished. A signal will not operate with the door open the door. CLEAN ...
...temperature, dryness level or drying time, extended tumble time or options once the cycle has begun, press pause, make the new selections and restart dryer. Start the cycle. Remove the items promptly and hang or fold. IMPORTANT Clean the lint filter after every load. Press start to resume ...displayed at the end of the cycle to stop the cycle. To interrupt the cycle, press pause or simply open . 10 Operating Instructions OPERATING YOUR DRYER, con't 5. Press cancel to remind you that the load has finished. A signal will not operate with the door open the door. CLEAN ...
Use and Care Guide
Page 11
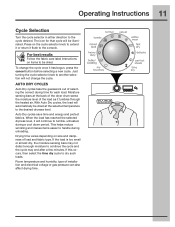
AUTO DRY CYCLES Auto Dry cycles take the guesswork out of installation and electrical voltage or gas pressure can also affect drying time. When the load has reached the selected dryness level, it has begun, press the cancel button ... sensing bars may not detect enough moisture to dry such loads. With Auto Dry cycles, the load will be dried at the back of the dryer drum sense the moisture level of load and fabric type. The icon for each load. Operating Instructions 11 Cycle Selection Turn the cycle selector in...
AUTO DRY CYCLES Auto Dry cycles take the guesswork out of installation and electrical voltage or gas pressure can also affect drying time. When the load has reached the selected dryness level, it has begun, press the cancel button ... sensing bars may not detect enough moisture to dry such loads. With Auto Dry cycles, the load will be dried at the back of the dryer drum sense the moisture level of load and fabric type. The icon for each load. Operating Instructions 11 Cycle Selection Turn the cycle selector in...
Use and Care Guide
Page 14
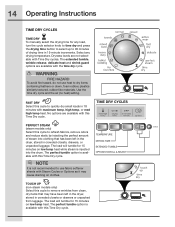
FAST DRY Select this cycle to remove wrinkles from clean, dry items that has been left in the dryer, stored in 15-minute increments. No options are available with the time dry cycle. TIME DRY CYCLES PERFECT STEAM (steam models only) Select this Time ... in crowded closets, drawers, or unpacked luggage. Dryness levels are not selectable with Steam Cycles or Options as it may have been left in the dryer, stored in 18 minutes with this Time Dry cycle. Use the time dry cycle and the air (no heat) setting. 14 Operating Instructions TIME DRY...
FAST DRY Select this cycle to remove wrinkles from clean, dry items that has been left in the dryer, stored in 15-minute increments. No options are available with the time dry cycle. TIME DRY CYCLES PERFECT STEAM (steam models only) Select this Time ... in crowded closets, drawers, or unpacked luggage. Dryness levels are not selectable with Steam Cycles or Options as it may have been left in the dryer, stored in 18 minutes with this Time Dry cycle. Use the time dry cycle and the air (no heat) setting. 14 Operating Instructions TIME DRY...
Use and Care Guide
Page 16
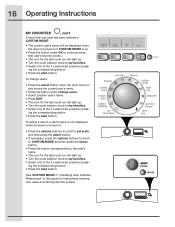
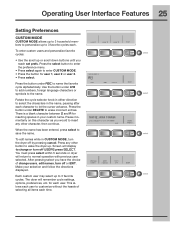
... naming favorite cycles.) ing the corresponding button. • Press the start button. To select a user if a user's name is not displayed when the dryer is on and shows the current user's name. • Press the button under OK to continue using that user's favorite cycles. • The icon...cycle selector knob to my favorites. • Select one of the 3 customized cycles by press- To change users: • Press the select button when the dryer turns on . • Press the button under change users. • Select another user's name. • Press EXIT. • The icon for the ...
... naming favorite cycles.) ing the corresponding button. • Press the start button. To select a user if a user's name is not displayed when the dryer is on and shows the current user's name. • Press the button under OK to continue using that user's favorite cycles. • The icon...cycle selector knob to my favorites. • Select one of the 3 customized cycles by press- To change users: • Press the select button when the dryer turns on . • Press the button under change users. • Select another user's name. • Press EXIT. • The icon for the ...
Use and Care Guide
Page 21
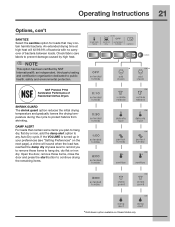
... continue drying the remaining items. * * *Add steam option available on the next page), a chime will kill 99.9% of bacteria with no carryover of Residential Clothes Dryers SHRINK GUARD The shrink guard option reduces the initial drying temperature and gradually lowers the drying temperature during the cycle to protect fabrics from shrinking...
... continue drying the remaining items. * * *Add steam option available on the next page), a chime will kill 99.9% of bacteria with no carryover of Residential Clothes Dryers SHRINK GUARD The shrink guard option reduces the initial drying temperature and gradually lowers the drying temperature during the cycle to protect fabrics from shrinking...
Use and Care Guide
Page 25
...been entered, press select to normal operation with previous user selected. After pressing select you have the choice of selecting all items each . The dryer will display to change users, edit names, turn off by pressing cancel. for each character to let the cursor advance. There is a ...Press the button under 1A# to add numbers, foreign language characters or symbols to the name. You must press select within 5 seconds or dryer will return to save the name. Use the button under ABC to name the favorite cycle alphabetically. To edit names while in your selection and...
...been entered, press select to normal operation with previous user selected. After pressing select you have the choice of selecting all items each . The dryer will display to change users, edit names, turn off by pressing cancel. for each character to let the cursor advance. There is a ...Press the button under 1A# to add numbers, foreign language characters or symbols to the name. You must press select within 5 seconds or dryer will return to save the name. Use the button under ABC to name the favorite cycle alphabetically. To edit names while in your selection and...
Use and Care Guide
Page 26
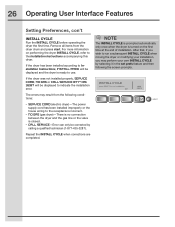
...perform your own INSTALL CYCLE by calling a qualified technician (1-877-435-3287). NOTE The INSTALL CYCLE is prompted automatically only once when the dryer is closed. • CALL SERVICE-Error can only be corrected by selecting it in the set prefs feature and then following conditions: ...• SERVICE CORD (electric dryer)-The power supply cord has been installed improperly or the house wiring to use. 26 Operating User Interface Features Setting Preferences, con't INSTALL...
...perform your own INSTALL CYCLE by calling a qualified technician (1-877-435-3287). NOTE The INSTALL CYCLE is prompted automatically only once when the dryer is closed. • CALL SERVICE-Error can only be corrected by selecting it in the set prefs feature and then following conditions: ...• SERVICE CORD (electric dryer)-The power supply cord has been installed improperly or the house wiring to use. 26 Operating User Interface Features Setting Preferences, con't INSTALL...
Use and Care Guide
Page 27
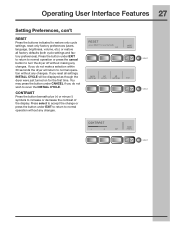
... settings, INSTALL CYCLE will return to increase or decrease the contrast of the display. If you do not make a selection within 30 seconds the dryer will be displayed as though the dryer were just turned on for the first time. You may press the button under EXIT to return to turn the...
... settings, INSTALL CYCLE will return to increase or decrease the contrast of the display. If you do not make a selection within 30 seconds the dryer will be displayed as though the dryer were just turned on for the first time. You may press the button under EXIT to return to turn the...
Use and Care Guide
Page 29
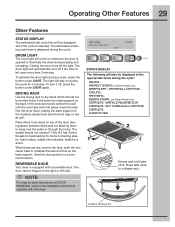
...) COMPLETE - DRYING WILL CONTINUE... EXT. The drum light will automatically turn it off the light. Insert the rack into place. REVERSIBLE DOOR Your dryer is left side. SANITIZING... Place items to be dried on the back of the rack, leaving space between items and not allowing them to the.... ADDING STEAM... (on Steam Model only) DAMP ALERT - TUMBLE WILL CONTINUE COMPLETE CLEAN FILTER Extend rack until the lock tabs click into the dryer drum, resting the back support on the moisture sensor bars and the front legs on whenever the door is opened to collapse the rack and...
...) COMPLETE - DRYING WILL CONTINUE... EXT. The drum light will automatically turn it off the light. Insert the rack into place. REVERSIBLE DOOR Your dryer is left side. SANITIZING... Place items to be dried on the back of the rack, leaving space between items and not allowing them to the.... ADDING STEAM... (on Steam Model only) DAMP ALERT - TUMBLE WILL CONTINUE COMPLETE CLEAN FILTER Extend rack until the lock tabs click into the dryer drum, resting the back support on the moisture sensor bars and the front legs on whenever the door is opened to collapse the rack and...
Use and Care Guide
Page 30
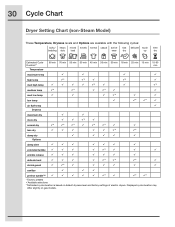
30 Cycle Chart Dryer Setting Chart (non-Steam Model) These Temperature, Dryness levels and Options are available with the following cycles: bulky/ heavy mixed towels normal casual active fast ... Available selections **Estimated cycle duration is based on gas models. Displayed cycle duration may differ slightly on default dryness level and factory settings of electric dryers.
30 Cycle Chart Dryer Setting Chart (non-Steam Model) These Temperature, Dryness levels and Options are available with the following cycles: bulky/ heavy mixed towels normal casual active fast ... Available selections **Estimated cycle duration is based on gas models. Displayed cycle duration may differ slightly on default dryness level and factory settings of electric dryers.
Use and Care Guide
Page 31
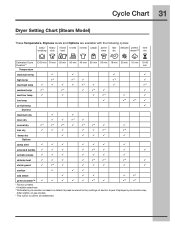
Cycle Chart 31 Dryer Setting Chart (Steam Model) These Temperature, Dryness levels and Options are available with the following cycles: bulky/ heavy mixed towels normal casual active bedding duty ... based on gas models. ¹ This option is cannot be deselected. Displayed cycle duration may differ slightly on default dryness level and factory settings of electric dryers.
Cycle Chart 31 Dryer Setting Chart (Steam Model) These Temperature, Dryness levels and Options are available with the following cycles: bulky/ heavy mixed towels normal casual active bedding duty ... based on gas models. ¹ This option is cannot be deselected. Displayed cycle duration may differ slightly on default dryness level and factory settings of electric dryers.
Use and Care Guide
Page 32
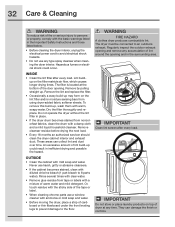
... 18 months an authorized servicer should clean the dryer cabinet interior and exhaust duct. IMPORTANT Clean lint screen after every load. Regularly inspect the outdoor exhaust opening and remove any time. Hazardous fumes or electrical shock could result in the Important Safety Instructions ...and those listed below. • Before cleaning the dryer interior, unplug the electrical power cord to avoid electrical shock hazards. • Do not use harsh, gritty ...
... 18 months an authorized servicer should clean the dryer cabinet interior and exhaust duct. IMPORTANT Clean lint screen after every load. Regularly inspect the outdoor exhaust opening and remove any time. Hazardous fumes or electrical shock could result in the Important Safety Instructions ...and those listed below. • Before cleaning the dryer interior, unplug the electrical power cord to avoid electrical shock hazards. • Do not use harsh, gritty ...
Use and Care Guide
Page 33
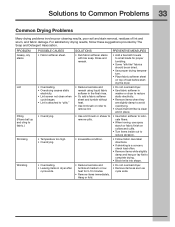
...Lint Pilling (Fibers ball up and cling to fabric.) Shrinking Wrinkling POSSIBLE CAUSES • Fabric softener sheet. • Overloading. • Overdrying causes static electricity. • Lint screen not clean when cycle began. • Lint is attached to "pills." • Overdrying. • Temperature too high. ...tumble without heat. • Use lint brush or roller to remove lint. • Do not overload dryer. • Use fabric softener in washer or dryer to reduce static electricity. • Remove items when they are slightly damp to avoid overdrying. • Check that lint filter...
...Lint Pilling (Fibers ball up and cling to fabric.) Shrinking Wrinkling POSSIBLE CAUSES • Fabric softener sheet. • Overloading. • Overdrying causes static electricity. • Lint screen not clean when cycle began. • Lint is attached to "pills." • Overdrying. • Temperature too high. ...tumble without heat. • Use lint brush or roller to remove lint. • Do not overload dryer. • Use fabric softener in washer or dryer to reduce static electricity. • Remove items when they are slightly damp to avoid overdrying. • Check that lint filter...


