Complete Owner's Guide (English)
Page 4
... before using your new Electrolux cooktop. Caution This symbol will help alert you to situations that may result causing property damage, personal injury or death. WHAT TO DO IF YOU SMELL GAS: • Do not try to the cooktop. • Proper Installation-Be sure your gas .... ! Follow the gas supplier's instructions. • If you to situations that may cause serious bodily harm, death or property damage. ! Installation and service must be performed by a qualified technician in accordance with packaging material. Do not remove the model/serial plate attached to light any ...
... before using your new Electrolux cooktop. Caution This symbol will help alert you to situations that may result causing property damage, personal injury or death. WHAT TO DO IF YOU SMELL GAS: • Do not try to the cooktop. • Proper Installation-Be sure your gas .... ! Follow the gas supplier's instructions. • If you to situations that may cause serious bodily harm, death or property damage. ! Installation and service must be performed by a qualified technician in accordance with packaging material. Do not remove the model/serial plate attached to light any ...
Complete Owner's Guide (English)
Page 6
... part of the cooktop, use of undersized utensils will not be positioned so that it does not extend beyond the edge of different sizes. Improper installation of the burner flame to your health. ! If a burner/unit is turned inward, and does not extend over adjacent surface burners. • Never Leave Surface...
... part of the cooktop, use of undersized utensils will not be positioned so that it does not extend beyond the edge of different sizes. Improper installation of the burner flame to your health. ! If a burner/unit is turned inward, and does not extend over adjacent surface burners. • Never Leave Surface...
Complete Owner's Guide (English)
Page 7
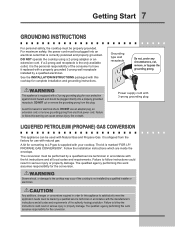
... and should be plugged into a properly grounded receptacle. Warning This appliance is supplied with a properly grounded 3-prong wall receptacle installed by a qualified installer or electrician. ! A kit for converting to LP gas is equipped with natural gas. The kit is shipped from the ...DO NOT operate the cooktop using a 2-prong adapter or an extension cord. DO NOT use with a 3-prong grounding plug for complete installation and grounding instructions. ! It is marked "FOR LP/ PROPANE GAS CONVERSION". The qualified agency performing this warning can be properly grounded...
... and should be plugged into a properly grounded receptacle. Warning This appliance is supplied with a properly grounded 3-prong wall receptacle installed by a qualified installer or electrician. ! A kit for converting to LP gas is equipped with natural gas. The kit is shipped from the ...DO NOT operate the cooktop using a 2-prong adapter or an extension cord. DO NOT use with a 3-prong grounding plug for complete installation and grounding instructions. ! It is marked "FOR LP/ PROPANE GAS CONVERSION". The qualified agency performing this warning can be properly grounded...
Complete Owner's Guide (English)
Page 15
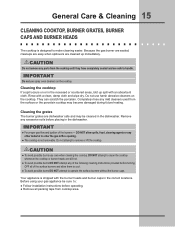
... not use care when cleaning the cooktop. Remove any mild cleaners used from the surface or the porcelain cooktop may be sure to: ● Follow installation instructions before turning OFF all packing tape from the cooktop until they have completely cooled and are still hot. ● To avoid possible burns DO...
... not use care when cleaning the cooktop. Remove any mild cleaners used from the surface or the porcelain cooktop may be sure to: ● Follow installation instructions before turning OFF all packing tape from the cooktop until they have completely cooled and are still hot. ● To avoid possible burns DO...
Complete Owner's Guide (English)
Page 20
...a two through 5th years from your original date of purchase, Electrolux will repair or replace any parts of this appliance that prove to be defective in materials or workmanship when such appliance is installed, used, and maintained in accordance with the provided instructions. USA... 1-877-435-3287 Electrolux Major Appliances North America P.O. In addition, the glass cooktop or radiant surface element of Electrolux Home Products, Inc. ELECTROLUX SHALL NOT BE LIABLE FOR ...
...a two through 5th years from your original date of purchase, Electrolux will repair or replace any parts of this appliance that prove to be defective in materials or workmanship when such appliance is installed, used, and maintained in accordance with the provided instructions. USA... 1-877-435-3287 Electrolux Major Appliances North America P.O. In addition, the glass cooktop or radiant surface element of Electrolux Home Products, Inc. ELECTROLUX SHALL NOT BE LIABLE FOR ...

Installation Instructions (All Languages)
Page 1
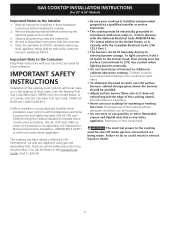
...result causing property damage, personal injury or death. FOR YOUR SAFETY: - GAS COOKTOP INSTALLATION INSTRUCTIONS (For 30" & 36" Models) INSTALLATION AND SERVICE MUST BE PERFORMED BY A QUALIFIED INSTALLER. IMPORTANT: SAVE FOR LOCAL ELECTRICAL INSPECTOR'S USE. If the information in your building...gas supply line. Follow the gas supplier's instructions. • If you cannot reach your gas supplier from a neighbor's phone. Installation and service must be performed by a qualified installer, service agency or the gas supplier. 30" Min. * (76.2 cm) A Gas Cooktop Dimensions E B C D ...
...result causing property damage, personal injury or death. FOR YOUR SAFETY: - GAS COOKTOP INSTALLATION INSTRUCTIONS (For 30" & 36" Models) INSTALLATION AND SERVICE MUST BE PERFORMED BY A QUALIFIED INSTALLER. IMPORTANT: SAVE FOR LOCAL ELECTRICAL INSPECTOR'S USE. If the information in your building...gas supply line. Follow the gas supplier's instructions. • If you cannot reach your gas supplier from a neighbor's phone. Installation and service must be performed by a qualified installer, service agency or the gas supplier. 30" Min. * (76.2 cm) A Gas Cooktop Dimensions E B C D ...
Installation Instructions (All Languages)
Page 2
... Home Construction and Safety, title 24, HUD (part 280)] or, when such standard is not applicable, the Standard for Manufactured Home Installation, ANSI/NCSBCS A225.1 or with your cooktop for warming or heating the room. The electrical power to children in cabinets above see level..., appliance rating shall be reduced by 4 percent for future reference. Observe all instructions contained in these installation instructions before connecting the electrical supply to the Consumer Keep these instructions with the Canadian Fuel Gas Code, CAN/CGA B149 and CAN...
... Home Construction and Safety, title 24, HUD (part 280)] or, when such standard is not applicable, the Standard for Manufactured Home Installation, ANSI/NCSBCS A225.1 or with your cooktop for warming or heating the room. The electrical power to children in cabinets above see level..., appliance rating shall be reduced by 4 percent for future reference. Observe all instructions contained in these installation instructions before connecting the electrical supply to the Consumer Keep these instructions with the Canadian Fuel Gas Code, CAN/CGA B149 and CAN...
Installation Instructions (All Languages)
Page 3
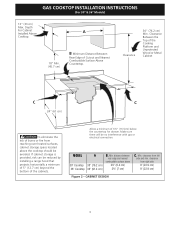
...Cooking Platform and Unprotected Wood or Metal Cabinet C C 24" (61 cm) To eliminate the risk of the cabinets. Make sure there will be reduced by installing a range hood that projects horizontally a minimum of 5" (12.7 cm) beyond the bottom of burns or fire from left side and min. MODEL 30"... the cooktop should be avoided. clearance from reaching over heated surfaces, cabinet storage space located above 2½" (6.4 cm) 2¾" (7 cm) C. GAS COOKTOP INSTALLATION INSTRUCTIONS (For 30" & 36" Models) 13" (33 cm) Max. clearance from right side 9" (22.9 cm) 9" (22.9 cm) Figure 2 -
...Cooking Platform and Unprotected Wood or Metal Cabinet C C 24" (61 cm) To eliminate the risk of the cabinets. Make sure there will be reduced by installing a range hood that projects horizontally a minimum of 5" (12.7 cm) beyond the bottom of burns or fire from left side and min. MODEL 30"... the cooktop should be avoided. clearance from reaching over heated surfaces, cabinet storage space located above 2½" (6.4 cm) 2¾" (7 cm) C. GAS COOKTOP INSTALLATION INSTRUCTIONS (For 30" & 36" Models) 13" (33 cm) Max. clearance from right side 9" (22.9 cm) 9" (22.9 cm) Figure 2 -
Installation Instructions (All Languages)
Page 4
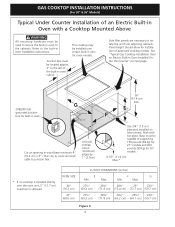
... left of the built-in oven cutout. Junction box must be located approx. 3" to junction box. See "Typical Gas Cooktop Installation Over an Electric Built-in Oven Installed Under the Counter" on two runners, flush with a Cooktop Mounted Above All mounting hardware must be used to secure the built-...- 28¼" 247/8" - 25¼" 23½" (69.2 cm) - (71.8 cm) (63.2 cm) - (64.1 cm) (59.7 cm) Figure 3 4 Refer to the built-in oven installation instructions. This cooktop may be capable of supporting 150 pounds (68 kg) for 27" models and 200 pounds (90 kg) for 30" models. 4 1/2" (11.4 cm...
... left of the built-in oven cutout. Junction box must be located approx. 3" to junction box. See "Typical Gas Cooktop Installation Over an Electric Built-in Oven Installed Under the Counter" on two runners, flush with a Cooktop Mounted Above All mounting hardware must be used to secure the built-...- 28¼" 247/8" - 25¼" 23½" (69.2 cm) - (71.8 cm) (63.2 cm) - (64.1 cm) (59.7 cm) Figure 3 4 Refer to the built-in oven installation instructions. This cooktop may be capable of supporting 150 pounds (68 kg) for 27" models and 200 pounds (90 kg) for 30" models. 4 1/2" (11.4 cm...
Installation Instructions (All Languages)
Page 5
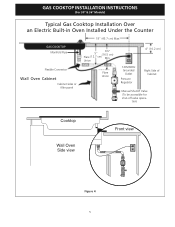
GAS COOKTOP INSTALLATION INSTRUCTIONS (For 30" & 36" Models) Typical Gas Cooktop Installation Over an Electric Built-in Oven Installed Under the Counter 18" (45.7 cm) Max. tion) Cooktop Wall Oven Side view Front view Figure 4 5 Union Flare Union 4" (10.2 cm) 120V/60Hz Grounded Outlet Pressure Regulator Right Side of Cabinet Manual Shutoff Valve (To be accessible for shut-off valve opera- GAS COOKTOP Manifold Pipe Flexible Connector Wall Oven Cabinet Cabinet sides or filler panel 6½" 5" (16.5 cm) Flare (12.7 cm) Min.
GAS COOKTOP INSTALLATION INSTRUCTIONS (For 30" & 36" Models) Typical Gas Cooktop Installation Over an Electric Built-in Oven Installed Under the Counter 18" (45.7 cm) Max. tion) Cooktop Wall Oven Side view Front view Figure 4 5 Union Flare Union 4" (10.2 cm) 120V/60Hz Grounded Outlet Pressure Regulator Right Side of Cabinet Manual Shutoff Valve (To be accessible for shut-off valve opera- GAS COOKTOP Manifold Pipe Flexible Connector Wall Oven Cabinet Cabinet sides or filler panel 6½" 5" (16.5 cm) Flare (12.7 cm) Min.

Installation Instructions (All Languages)
Page 6
For checking the regulator, the inlet pressure must be used with the manifold on each side of the counter. Granite countertop Installation Kit A Granite Countertop Installation kit # 903103-9010 can be at least 1" (or 2.5 kPa) greater than 14" of water column (W.C.) pressure. Cooktop ... regulator is connected in series with your cooktop. It is designed to cooktop. Important: Remove all local codes and requirements. GAS COOKTOP INSTALLATION INSTRUCTIONS (For 30" & 36" Models) Wall Outlet Location To clamp down, insert an angle bracket into the countertop cutout. Set ...
For checking the regulator, the inlet pressure must be used with the manifold on each side of the counter. Granite countertop Installation Kit A Granite Countertop Installation kit # 903103-9010 can be at least 1" (or 2.5 kPa) greater than 14" of water column (W.C.) pressure. Cooktop ... regulator is connected in series with your cooktop. It is designed to cooktop. Important: Remove all local codes and requirements. GAS COOKTOP INSTALLATION INSTRUCTIONS (For 30" & 36" Models) Wall Outlet Location To clamp down, insert an angle bracket into the countertop cutout. Set ...

Installation Instructions (All Languages)
Page 7
... 9) to the appliance. Where a standard 2-prong wall receptacle is properly grounded. Do not make sure the receptacle is installed, it replaced by a qualified electrician to or less than 1/2 psig (3.5 kPa or 14" water column). Do not ...60 Hertz, properly grounded branch circuit protected by closing . Grounding Instructions IMPORTANT Please read carefully. GAS COOKTOP INSTALLATION INSTRUCTIONS (For 30" & 36" Models) Install Pressure Regulator Install the pressure regulator with an approved manual shutoff valve. flexible connector 5. 1/2" (1.3 cm) flare union adapter...
... 9) to the appliance. Where a standard 2-prong wall receptacle is properly grounded. Do not make sure the receptacle is installed, it replaced by a qualified electrician to or less than 1/2 psig (3.5 kPa or 14" water column). Do not ...60 Hertz, properly grounded branch circuit protected by closing . Grounding Instructions IMPORTANT Please read carefully. GAS COOKTOP INSTALLATION INSTRUCTIONS (For 30" & 36" Models) Install Pressure Regulator Install the pressure regulator with an approved manual shutoff valve. flexible connector 5. 1/2" (1.3 cm) flare union adapter...
Installation Instructions (All Languages)
Page 8
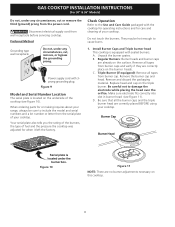
... fits correctly into slot in burner head (see Figure 10). Preferred Method Grounding type wall receptacle Do not, under the burner box. Install Burner Caps and Triple burner head This cooktop is located under any circumstances, cut , remove, or bypass the grounding prong. GAS COOKTOP... INSTALLATION INSTRUCTIONS (For 30" & 36" Models) Do not, under any circumstances, cut or remove the third (ground) prong from burner cap. Disconnect...
... fits correctly into slot in burner head (see Figure 10). Preferred Method Grounding type wall receptacle Do not, under the burner box. Install Burner Caps and Triple burner head This cooktop is located under any circumstances, cut , remove, or bypass the grounding prong. GAS COOKTOP... INSTALLATION INSTRUCTIONS (For 30" & 36" Models) Do not, under any circumstances, cut or remove the third (ground) prong from burner cap. Disconnect...

Installation Instructions (All Languages)
Page 9
... hear a small ticking noise; d. Refer to adjust the flame size of the center portion of each portion should be set at a particular mark. GAS COOKTOP INSTALLATION INSTRUCTIONS (For 30" & 36" Models) 2. After the burner lights, turn knob from LITE to LOWEST POSITION. b. Turn counterclockwise the screw to OFF. Note: Air mixture...
... hear a small ticking noise; d. Refer to adjust the flame size of the center portion of each portion should be set at a particular mark. GAS COOKTOP INSTALLATION INSTRUCTIONS (For 30" & 36" Models) 2. After the burner lights, turn knob from LITE to LOWEST POSITION. b. Turn counterclockwise the screw to OFF. Note: Air mixture...

Product Specifications Sheet (English)
Page 1
...450-BTU simmer. Easy-to be used over any Electrolux Single Wall Oven. Appliance must be grounded for safe operation. *Approved to -Clean Design Deep-well cooktop and sealed burners are designed for Single Oven Combination Installation* Product Weight Shipping Weight (Approx.) 4-1/4" 4-7/8" 36...Electrical Cable Approved for easy cleaning. Wall Ovens Warmer Drawers Cooktops Built-In Ranges Freestanding Ranges Microwaves Gas Drop-In Cooktops EW36GC55GS Min-2-Max™ Burner Designed with a dual-flame sealed burner, this cooktop offers the widest range of even the heaviest...
...450-BTU simmer. Easy-to be used over any Electrolux Single Wall Oven. Appliance must be grounded for safe operation. *Approved to -Clean Design Deep-well cooktop and sealed burners are designed for Single Oven Combination Installation* Product Weight Shipping Weight (Approx.) 4-1/4" 4-7/8" 36...Electrical Cable Approved for easy cleaning. Wall Ovens Warmer Drawers Cooktops Built-In Ranges Freestanding Ranges Microwaves Gas Drop-In Cooktops EW36GC55GS Min-2-Max™ Burner Designed with a dual-flame sealed burner, this cooktop offers the widest range of even the heaviest...

Product Specifications Sheet (English)
Page 2
...8226; 5855 Terry Fox Way • Mississauga, ON L5V 3E4 • 1-800-265-8352 • electroluxappliances.ca EW36GC55GS 12/10 © 2008 Electrolux Major Appliances, NA High standards of quality at electroluxappliances.ca or supplied with product for inspection and service. • Cooktop... wood or metal overhead cabinetry. • Absolute minimum horizontal distance between overhead cabinets installed to improve our products. Refer to Product Installation Guide on the web at Electrolux Major Appliances mean we are constantly working to either side of cooktop centerline. Printed...
...8226; 5855 Terry Fox Way • Mississauga, ON L5V 3E4 • 1-800-265-8352 • electroluxappliances.ca EW36GC55GS 12/10 © 2008 Electrolux Major Appliances, NA High standards of quality at electroluxappliances.ca or supplied with product for inspection and service. • Cooktop... wood or metal overhead cabinetry. • Absolute minimum horizontal distance between overhead cabinets installed to improve our products. Refer to Product Installation Guide on the web at Electrolux Major Appliances mean we are constantly working to either side of cooktop centerline. Printed...

