
Complete Owner's Guide (English)
Page 9
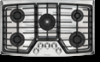
...position. The surface burners are located on the cooktop as follows (See Figure): - and a 14 000 BTU (natural gas) burner located at the left front position; - OFF OFF OFF OFF 30" cooktop 36" cooktop Placement of the burners The 30" cooktop is equipped with different sized burners. Make ... yourself. The surface burners are located on the burner head. two 9 500 BTU (natural gas) burners located at the right rear position; - The 36" cooktop is properly Burner Head Gas Opening Electrode Burner Head aligned and level. The cap for each burner cap is equipped with ...
...position. The surface burners are located on the cooktop as follows (See Figure): - and a 14 000 BTU (natural gas) burner located at the left front position; - OFF OFF OFF OFF 30" cooktop 36" cooktop Placement of the burners The 30" cooktop is equipped with different sized burners. Make ... yourself. The surface burners are located on the burner head. two 9 500 BTU (natural gas) burners located at the right rear position; - The 36" cooktop is properly Burner Head Gas Opening Electrode Burner Head aligned and level. The cap for each burner cap is equipped with ...

Installation Instructions (All Languages)
Page 1
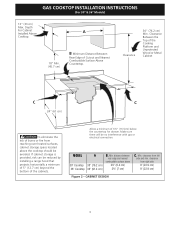
... not use gasoline or other appliance. - Installation and service must be performed by a qualified installer, service agency or the gas supplier. 30" Min. * (76.2 cm) A Gas Cooktop Dimensions E B C D H G F Gas Cooktop Cutout Dimensions Figure 1 MODEL 30" Gas Cooktop 36" Gas Cooktop MODEL 30" Gas Cooktop 36" Gas Cooktop A. WIDTH PRODUCT DIMENSIONS B. BOX WIDTH 21¾ (55.2) 4¼ (10.8) 27 (68.6) 21¾ (55.2) 4¼ (10.8) 33...
... not use gasoline or other appliance. - Installation and service must be performed by a qualified installer, service agency or the gas supplier. 30" Min. * (76.2 cm) A Gas Cooktop Dimensions E B C D H G F Gas Cooktop Cutout Dimensions Figure 1 MODEL 30" Gas Cooktop 36" Gas Cooktop MODEL 30" Gas Cooktop 36" Gas Cooktop A. WIDTH PRODUCT DIMENSIONS B. BOX WIDTH 21¾ (55.2) 4¼ (10.8) 27 (68.6) 21¾ (55.2) 4¼ (10.8) 33...
Installation Instructions (All Languages)
Page 2
... United States, or in Canada, with the consumer. 5. Observe all packing material before installing the cooktop. 2. Important Note to the cooktop. 3. This cooktop has been design certified by 4 percent for warming or heating the room. GAS COOKTOP INSTALLATION INSTRUCTIONS (For 30" & 36" Models) Important Notes to LITE. Excessive flame is installed and grounded properly by a qualified...
... United States, or in Canada, with the consumer. 5. Observe all packing material before installing the cooktop. 2. Important Note to the cooktop. 3. This cooktop has been design certified by 4 percent for warming or heating the room. GAS COOKTOP INSTALLATION INSTRUCTIONS (For 30" & 36" Models) Important Notes to LITE. Excessive flame is installed and grounded properly by a qualified...
Installation Instructions (All Languages)
Page 3
...cm) C. If cabinet storage is provided, risk can be avoided. Min. distance between rear edge and nearest combustible surface above the cooktop should be reduced by installing a range hood that projects horizontally a minimum of 5" (12.7 cm) beyond the bottom of the cabinets... 3 Make sure there will be no interference with gas or electrical connection. clearance from right side 9" (22.9 cm) 9" (22.9 cm) Figure 2 - MODEL 30" Cooktop 36" Cooktop A 30" (76.2 cm) 36" (91.4 cm) B. GAS COOKTOP INSTALLATION INSTRUCTIONS (For 30" & 36" Models) 13" (33 cm) Max. Allow ...
...cm) C. If cabinet storage is provided, risk can be avoided. Min. distance between rear edge and nearest combustible surface above the cooktop should be reduced by installing a range hood that projects horizontally a minimum of 5" (12.7 cm) beyond the bottom of the cabinets... 3 Make sure there will be no interference with gas or electrical connection. clearance from right side 9" (22.9 cm) 9" (22.9 cm) Figure 2 - MODEL 30" Cooktop 36" Cooktop A 30" (76.2 cm) 36" (91.4 cm) B. GAS COOKTOP INSTALLATION INSTRUCTIONS (For 30" & 36" Models) 13" (33 cm) Max. Allow ...
Installation Instructions (All Languages)
Page 4
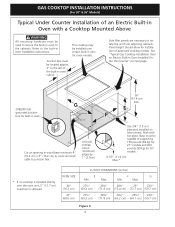
Side filler panels are necessary to junction box. Panel height should allow for built-in oven. 36" (91.4 cm) Min. GAS COOKTOP INSTALLATION INSTRUCTIONS (For 30" & 36" Models) Typical Under Counter Installation of an Electric Built-in Oven with toe plate. Cut an opening in ...to secure the built-in Oven Installed Under the Counter" on two runners, flush with a Cooktop Mounted Above All mounting hardware must be capable of approved cooktop models. See "Typical Gas Cooktop Installation Over an Electric Built-in oven to the cabinets. Base must be located approx. ...
Side filler panels are necessary to junction box. Panel height should allow for built-in oven. 36" (91.4 cm) Min. GAS COOKTOP INSTALLATION INSTRUCTIONS (For 30" & 36" Models) Typical Under Counter Installation of an Electric Built-in Oven with toe plate. Cut an opening in ...to secure the built-in Oven Installed Under the Counter" on two runners, flush with a Cooktop Mounted Above All mounting hardware must be capable of approved cooktop models. See "Typical Gas Cooktop Installation Over an Electric Built-in oven to the cabinets. Base must be located approx. ...
Installation Instructions (All Languages)
Page 5
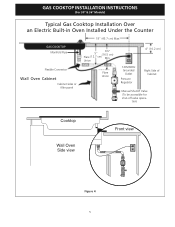
GAS COOKTOP INSTALLATION INSTRUCTIONS (For 30" & 36" Models) Typical Gas Cooktop Installation Over an Electric Built-in Oven Installed Under the Counter 18" (45.7 cm) Max. Union Flare Union 4" (10.2 cm) 120V/60Hz Grounded Outlet Pressure Regulator Right Side of Cabinet Manual Shutoff Valve (To be accessible for shut-off valve opera- tion) Cooktop Wall Oven Side view Front view Figure 4 5 GAS COOKTOP Manifold Pipe Flexible Connector Wall Oven Cabinet Cabinet sides or filler panel 6½" 5" (16.5 cm) Flare (12.7 cm) Min.
GAS COOKTOP INSTALLATION INSTRUCTIONS (For 30" & 36" Models) Typical Gas Cooktop Installation Over an Electric Built-in Oven Installed Under the Counter 18" (45.7 cm) Max. Union Flare Union 4" (10.2 cm) 120V/60Hz Grounded Outlet Pressure Regulator Right Side of Cabinet Manual Shutoff Valve (To be accessible for shut-off valve opera- tion) Cooktop Wall Oven Side view Front view Figure 4 5 GAS COOKTOP Manifold Pipe Flexible Connector Wall Oven Cabinet Cabinet sides or filler panel 6½" 5" (16.5 cm) Flare (12.7 cm) Min.

Installation Instructions (All Languages)
Page 6
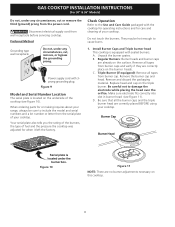
...Granite countertop Installation Kit A Granite Countertop Installation kit # 903103-9010 can result in accordance with natural gas. Set the cooktop into the slot on natural gas at 1-877ELECTROLUX (1-877-435-3287). It is designed to the regulator must be ordered through the bracket...is secure. Run thumb screw up against the bottom of manifold pressure only. Failure to cooktop. Visually inspect the cooktop for the conversion. GAS COOKTOP INSTALLATION INSTRUCTIONS (For 30" & 36" Models) Wall Outlet Location To clamp down, insert an angle bracket into the countertop ...
...Granite countertop Installation Kit A Granite Countertop Installation kit # 903103-9010 can result in accordance with natural gas. Set the cooktop into the slot on natural gas at 1-877ELECTROLUX (1-877-435-3287). It is designed to the regulator must be ordered through the bracket...is secure. Run thumb screw up against the bottom of manifold pressure only. Failure to cooktop. Visually inspect the cooktop for the conversion. GAS COOKTOP INSTALLATION INSTRUCTIONS (For 30" & 36" Models) Wall Outlet Location To clamp down, insert an angle bracket into the countertop ...

Installation Instructions (All Languages)
Page 7
.... manual shutoff valve 2. 1/2" (1.3 cm) nipple 3. 1/2" (1.3 cm) flare union adapter 4. For personal safety, this cooktop. After connecting the cooktop to check for use a flame to prevent gas leakage in a fire or explosion. GAS COOKTOP INSTALLATION INSTRUCTIONS (For 30" & 36" Models) Install Pressure Regulator Install the pressure regulator with the arrow on the regulator pointing up toward the...
.... manual shutoff valve 2. 1/2" (1.3 cm) nipple 3. 1/2" (1.3 cm) flare union adapter 4. For personal safety, this cooktop. After connecting the cooktop to check for use a flame to prevent gas leakage in a fire or explosion. GAS COOKTOP INSTALLATION INSTRUCTIONS (For 30" & 36" Models) Install Pressure Regulator Install the pressure regulator with the arrow on the regulator pointing up toward the...
Installation Instructions (All Languages)
Page 8
... Refer to include the model and serial numbers and a lot number or letter from the serial plate of the cooktop (see Figure 11). Do not touch the burners. GAS COOKTOP INSTALLATION INSTRUCTIONS (For 30" & 36" Models) Do not, under any circumstances, cut or remove the third (ground) prong from burner caps and verify if...
... Refer to include the model and serial numbers and a lot number or letter from the serial plate of the cooktop (see Figure 11). Do not touch the burners. GAS COOKTOP INSTALLATION INSTRUCTIONS (For 30" & 36" Models) Do not, under any circumstances, cut or remove the third (ground) prong from burner caps and verify if...

Installation Instructions (All Languages)
Page 9
... of the burner. It may save you have inquiries about your Use and Care Guide for leaks and the cooktop has been connected to the LITE position. GAS COOKTOP INSTALLATION INSTRUCTIONS (For 30" & 36" Models) 2. Quickly turn a surface burner knob to electric power. Insert a thin-bladed screwdriver into the ...increase flame size. e. Flame size can quickly turn of electric igniters should be increased or decreased with the turn knob from LITE to the cooktop is the sound of the bridge burner ignites only. b. d. Use screw B to adjust the flame size of the center portion of ...
... of the burner. It may save you have inquiries about your Use and Care Guide for leaks and the cooktop has been connected to the LITE position. GAS COOKTOP INSTALLATION INSTRUCTIONS (For 30" & 36" Models) 2. Quickly turn a surface burner knob to electric power. Insert a thin-bladed screwdriver into the ...increase flame size. e. Flame size can quickly turn of electric igniters should be increased or decreased with the turn knob from LITE to the cooktop is the sound of the bridge burner ignites only. b. d. Use screw B to adjust the flame size of the center portion of ...

Product Specifications Sheet (English)
Page 1
...gas codes. Flex-2-Fit™ System Premium gas cooktop versatility with small cooking utensils. Easy-to use on a single cooktop. without lifting. 36" GAS DROP-IN COOKTOPS Features Deep-Well Formed Cooktop... Cooktops Built-In Ranges Freestanding Ranges Microwaves Gas Drop-In Cooktops EW36GC55GS Min-2-Max™ Burner Designed with a dual-flame sealed burner, this cooktop offers...Electrolux Single Wall Oven. These grates allow easy movement of BTU performance in the industry for Single Oven Combination Installation* Product Weight Shipping Weight (Approx.) 4-1/4" 4-7/8" 36...
...gas codes. Flex-2-Fit™ System Premium gas cooktop versatility with small cooking utensils. Easy-to use on a single cooktop. without lifting. 36" GAS DROP-IN COOKTOPS Features Deep-Well Formed Cooktop... Cooktops Built-In Ranges Freestanding Ranges Microwaves Gas Drop-In Cooktops EW36GC55GS Min-2-Max™ Burner Designed with a dual-flame sealed burner, this cooktop offers...Electrolux Single Wall Oven. These grates allow easy movement of BTU performance in the industry for Single Oven Combination Installation* Product Weight Shipping Weight (Approx.) 4-1/4" 4-7/8" 36...

Product Specifications Sheet (English)
Page 2
... of 5" beyond bottom of cabinets. • Gas Drop-In Cooktop model EW36GC55G is on the web at Electrolux Major Appliances mean we are constantly working to right side of cooktop centerline. Access to underside of cooktop and junction box must be no less than No...by 10" high area, positioned 22" above countertop. • Allow 9" minimum clearance from edge of cooktop to change specifications or discontinue models without notice. Gas Drop-In Cooktops EW36GC55GS 36" Gas Drop-In Cooktop Specifications • Product Weight - 53 Lbs. • Voltage Rating - 120V / 60 Hz / 15...
... of 5" beyond bottom of cabinets. • Gas Drop-In Cooktop model EW36GC55G is on the web at Electrolux Major Appliances mean we are constantly working to right side of cooktop centerline. Access to underside of cooktop and junction box must be no less than No...by 10" high area, positioned 22" above countertop. • Allow 9" minimum clearance from edge of cooktop to change specifications or discontinue models without notice. Gas Drop-In Cooktops EW36GC55GS 36" Gas Drop-In Cooktop Specifications • Product Weight - 53 Lbs. • Voltage Rating - 120V / 60 Hz / 15...


