Installation Instructions (All Languages)
Page 1
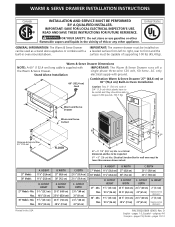
...(1,9 cm) thick planks have to floor 4½" (11,4 cm) FLOOR H* = 11 7/8" (30,2 cm) Min. United States GENERAL INFORMATION: The Warm & Serve Drawer IMPORTANT: The warmer drawer must be capable of supporting 100 lbs (45,4 Kg). HEIGHT 27" Models 11 ¼" (28,6 cm) 30" Models 11 ¼" (28,6 cm...width 25 ½" (64,8 cm) 25 ¾" (65,4 cm) 28 ½" (72,4 cm) 28 ¾" (73 cm) F. WARM & SERVE DRAWER INSTALLATION INSTRUCTIONS Canada INSTALLATION AND SERVICE MUST BE PERFORMED BY A QUALIFIED INSTALLER. Max. single phase three-wire 120 volt, 60 hertz, AC only Stand ...
...(1,9 cm) thick planks have to floor 4½" (11,4 cm) FLOOR H* = 11 7/8" (30,2 cm) Min. United States GENERAL INFORMATION: The Warm & Serve Drawer IMPORTANT: The warmer drawer must be capable of supporting 100 lbs (45,4 Kg). HEIGHT 27" Models 11 ¼" (28,6 cm) 30" Models 11 ¼" (28,6 cm...width 25 ½" (64,8 cm) 25 ¾" (65,4 cm) 28 ½" (72,4 cm) 28 ¾" (73 cm) F. WARM & SERVE DRAWER INSTALLATION INSTRUCTIONS Canada INSTALLATION AND SERVICE MUST BE PERFORMED BY A QUALIFIED INSTALLER. Max. single phase three-wire 120 volt, 60 hertz, AC only Stand ...
Installation Instructions (All Languages)
Page 2
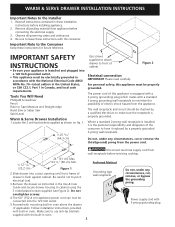
... Ruler or Tape Measure and Straight-edge Hand Saw or Saber Saw Spirit Level Warm & Serve Drawer Installation 1.Locate the 2 anti-tip brackets supplied as instructed in oven above the drawer (if applicable). The power cord of this appliance must be checked by a qualified.... 5.Proceed with mounting built-in the Use & Care Guide and secure drawer housing to use anti-tip brackets supplied with built-in these installation instructions before installing appliance. 2. WARM & SERVE DRAWER INSTALLATION INSTRUCTIONS Important Notes to front of cabinet. IMPORTANT SAFETY INSTRUCTIONS •...
... Ruler or Tape Measure and Straight-edge Hand Saw or Saber Saw Spirit Level Warm & Serve Drawer Installation 1.Locate the 2 anti-tip brackets supplied as instructed in oven above the drawer (if applicable). The power cord of this appliance must be checked by a qualified.... 5.Proceed with mounting built-in the Use & Care Guide and secure drawer housing to use anti-tip brackets supplied with built-in these installation instructions before installing appliance. 2. WARM & SERVE DRAWER INSTALLATION INSTRUCTIONS Important Notes to front of cabinet. IMPORTANT SAFETY INSTRUCTIONS •...

Installation Instructions (All Languages)
Page 3
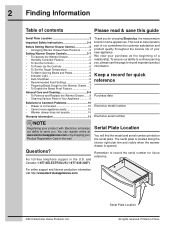
... cooktop to include the model and serial numbers and a lot number or letter from the serial plate on your Warm & Serve Drawer. WARM & SERVE DRAWER INSTALLATION INSTRUCTIONS Model and Serial Number Location The serial plate is located as shown below. When ordering parts for or... making inquiries about your Warm & Serve Drawer, always be sure to avoid interference with an electric or gas cooktop. Combination Warm & Serve Drawer and Cooktop Installation Cooktop Cutout Serial Plate Location Warmer Drawer Cutout You can install the warmer drawer in combination with the gas or electric...
... cooktop to include the model and serial numbers and a lot number or letter from the serial plate on your Warm & Serve Drawer. WARM & SERVE DRAWER INSTALLATION INSTRUCTIONS Model and Serial Number Location The serial plate is located as shown below. When ordering parts for or... making inquiries about your Warm & Serve Drawer, always be sure to avoid interference with an electric or gas cooktop. Combination Warm & Serve Drawer and Cooktop Installation Cooktop Cutout Serial Plate Location Warmer Drawer Cutout You can install the warmer drawer in combination with the gas or electric...
Complete Owner's Guide (English)
Page 2
... to customer satisfaction and product quality throughout the service life of your product with Electrolux enhances our ability to Common Problems 10 • Drawer is opened. Printed in the U.S. Keep a record for future reference. The serial...Drawer 5 • Humidity Controller Feature 5 • To Set the Controls 6 • To Power-Up the Controls 6 • To Set the Target Temperature 6 • To Warm Serving Bowls and Plates 6 • Indicator Light 6 • Auto-Shutdown 6 • Recommended Food Settings 6 • Preparing Bread Dough for choosing Electrolux...
... to customer satisfaction and product quality throughout the service life of your product with Electrolux enhances our ability to Common Problems 10 • Drawer is opened. Printed in the U.S. Keep a record for future reference. The serial...Drawer 5 • Humidity Controller Feature 5 • To Set the Controls 6 • To Power-Up the Controls 6 • To Set the Target Temperature 6 • To Warm Serving Bowls and Plates 6 • Indicator Light 6 • Auto-Shutdown 6 • Recommended Food Settings 6 • Preparing Bread Dough for choosing Electrolux...
Complete Owner's Guide (English)
Page 4
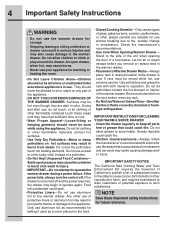
... glazed utensils are dark in color. Check the manufacturer's recommendations. • Use Care When Opening Warmer Drawer- IMPORTANT INSTRUCTIONS FOR CLEANING YOUR WARM & SERVE DRAWER • Clean the drawer regularly to keep all utensils from steam. Do not allow children to such substances. During and after use... had sufficient time to line warmer drawer. Surfaces may cause burns. • Never use your appliance for use without breaking due to operate again. NOTE Save these areas until they are suitable for warming or heating the room. • Do Not...
... glazed utensils are dark in color. Check the manufacturer's recommendations. • Use Care When Opening Warmer Drawer- IMPORTANT INSTRUCTIONS FOR CLEANING YOUR WARM & SERVE DRAWER • Clean the drawer regularly to keep all utensils from steam. Do not allow children to such substances. During and after use... had sufficient time to line warmer drawer. Surfaces may cause burns. • Never use your appliance for use without breaking due to operate again. NOTE Save these areas until they are suitable for warming or heating the room. • Do Not...
Complete Owner's Guide (English)
Page 6
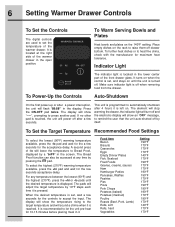
...show "----", prompting to press another pad. It is pressed. Make sure indicator light is set the temperature of the warmer drawer. To select the highest (210°F) warming temperature available, press the +hi pad and wait for the few seconds for the controls to accept the input. The ...to set , and stays on the rack to raise them off drawer bottom. A second press of the front drawer glass. When the desired temperature is displayed. Press the ON-OFF pad twice. The element will stop warming the drawer, the indicator light will turn off and the electronic display will ...
...show "----", prompting to press another pad. It is pressed. Make sure indicator light is set the temperature of the warmer drawer. To select the highest (210°F) warming temperature available, press the +hi pad and wait for the few seconds for the controls to accept the input. The ...to set , and stays on the rack to raise them off drawer bottom. A second press of the front drawer glass. When the desired temperature is displayed. Press the ON-OFF pad twice. The element will stop warming the drawer, the indicator light will turn off and the electronic display will ...
Complete Owner's Guide (English)
Page 7
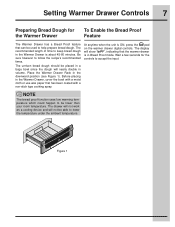
... ambient temperature. Figure 1 At anytime when the unit is in the Warmer Drawer is about 45-60 minutes. Wait a few seconds for the Warmer Drawer To Enable the Bread Proof Feature The Warmer Drawer has a Bread Proof feature that can be lower than your room temperature....volume. Setting Warmer Drawer Controls 7 Preparing Bread Dough for the controls to accept the input. The recommended length of time to follow the recipe's recommended times. Before placing in the downward position (see Figure 1). NOTE The bread proof function uses low warming temperature which could ...
... ambient temperature. Figure 1 At anytime when the unit is in the Warmer Drawer is about 45-60 minutes. Wait a few seconds for the Warmer Drawer To Enable the Bread Proof Feature The Warmer Drawer has a Bread Proof feature that can be lower than your room temperature....volume. Setting Warmer Drawer Controls 7 Preparing Bread Dough for the controls to accept the input. The recommended length of time to follow the recipe's recommended times. Before placing in the downward position (see Figure 1). NOTE The bread proof function uses low warming temperature which could ...
Product Specifications Sheet (English)
Page 1
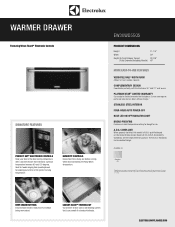
EW30WD55QS Product Dimensions Height Width Depth (to keeping your food at the perfect serving temperature. A.D.A. Accessibility Guidelines and the Department of purchase. Standards for more usable capacity. Keep-Warm Setting Ensures food remains ready to rise. Humidity Controls Keeps food from proofing bread to Front Drawer... warranty that is A.D.A.-qualified based on product registration with Electrolux North America within 60 days of Justice's 2010 A.D.A. Complementary Design Coordinates perfectly with the Electrolux 30" and 27" wall ovens. Compliant When properly ...
EW30WD55QS Product Dimensions Height Width Depth (to keeping your food at the perfect serving temperature. A.D.A. Accessibility Guidelines and the Department of purchase. Standards for more usable capacity. Keep-Warm Setting Ensures food remains ready to rise. Humidity Controls Keeps food from proofing bread to Front Drawer... warranty that is A.D.A.-qualified based on product registration with Electrolux North America within 60 days of Justice's 2010 A.D.A. Complementary Design Coordinates perfectly with the Electrolux 30" and 27" wall ovens. Compliant When properly ...