Installation Instructions (All Languages)
Page 2
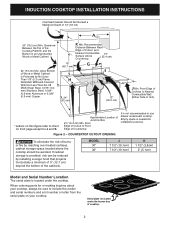
AMin. Approximate Location of 13" (33 cm) 30" (76.2 cm) Min. induction COOKTOP INSTALLATION INSTRUCTIONS Overhead Cabinet Should Not Exceed a Maximum Depth of Junction Box 2½" (6.4 cm) Min. when Bottom of Wood or Metal Cabinet is ...of cooktop. 2 From Edge of Cooktop to Nearest Combustible Wall (Either Side of Countertop It is located under the cooktop. Empty space is located under the burner box of Cutout and Nearest Combustible 10" Surface Above ( 25.4 cm) Countertop 18" (45.7 cm) G I H 24" (61 cm) 12" (30.5 cm) J Min. When ordering parts ...
AMin. Approximate Location of 13" (33 cm) 30" (76.2 cm) Min. induction COOKTOP INSTALLATION INSTRUCTIONS Overhead Cabinet Should Not Exceed a Maximum Depth of Junction Box 2½" (6.4 cm) Min. when Bottom of Wood or Metal Cabinet is ...of cooktop. 2 From Edge of Cooktop to Nearest Combustible Wall (Either Side of Countertop It is located under the cooktop. Empty space is located under the burner box of Cutout and Nearest Combustible 10" Surface Above ( 25.4 cm) Countertop 18" (45.7 cm) G I H 24" (61 cm) 12" (30.5 cm) J Min. When ordering parts ...

Complete Owner's Guide (English)
Page 4
...can be advisable to comply with a pacemaker or similar medical device should exercise caution using or standing near an induction unit while it is no guarantee that to Part 18 of fire, electrical shock, or injury when using your particular situation. • Remove all tape and...following : This unit has been tested and found to consult your Doctor or the pacemaker or similar medical device manufacturer about your electric cooktop, follow all instructions given. ! 4 Safety Important Safety Instructions Read all instructions before using the appliance. It would be determined by ...
...can be advisable to comply with a pacemaker or similar medical device should exercise caution using or standing near an induction unit while it is no guarantee that to Part 18 of fire, electrical shock, or injury when using your particular situation. • Remove all tape and...following : This unit has been tested and found to consult your Doctor or the pacemaker or similar medical device manufacturer about your electric cooktop, follow all instructions given. ! 4 Safety Important Safety Instructions Read all instructions before using the appliance. It would be determined by ...
Complete Owner's Guide (English)
Page 5
...appliance. ! Loose-fitting or hanging garments should never be allowed to sit or stand on any part of interest to cause burns. Moist or damp pot holders on Appliance. They should not be...children in the manuals. Warning Never use . Fat or grease may be stored near or on the cooktop to cool. ! Do not use a towel or other flammable materials touch these areas until they are... do not touch, or let clothing or other bulky cloth instead of panels, wire covers or any part of pressure may explode and result in burns from residual heat even though they have had sufficient time ...
...appliance. ! Loose-fitting or hanging garments should never be allowed to sit or stand on any part of interest to cause burns. Moist or damp pot holders on Appliance. They should not be...children in the manuals. Warning Never use . Fat or grease may be stored near or on the cooktop to cool. ! Do not use a towel or other flammable materials touch these areas until they are... do not touch, or let clothing or other bulky cloth instead of panels, wire covers or any part of pressure may explode and result in burns from residual heat even though they have had sufficient time ...
Complete Owner's Guide (English)
Page 6
... may cause permanent damage in temperature. Select utensils having flat bottoms large enough to hood manufacturer's instructions for cooktop use aluminum foil to line any part of the cooktop. The pan detection sensors will not allow grease to accumulate on the hood or filter. Any other reproductive...a risk of electric shock. 6 Safety IMPORTANT SAFETY INSTRUCTIONS FOR USING YOUR COOKTOP • Know which touch key pads controls each surface of the Cooking Zones. • Clean the appliance regularly to keep all parts free of grease that has boiled dry may melt or become damaged. &#...
... may cause permanent damage in temperature. Select utensils having flat bottoms large enough to hood manufacturer's instructions for cooktop use aluminum foil to line any part of the cooktop. The pan detection sensors will not allow grease to accumulate on the hood or filter. Any other reproductive...a risk of electric shock. 6 Safety IMPORTANT SAFETY INSTRUCTIONS FOR USING YOUR COOKTOP • Know which touch key pads controls each surface of the Cooking Zones. • Clean the appliance regularly to keep all parts free of grease that has boiled dry may melt or become damaged. &#...
Complete Owner's Guide (English)
Page 9
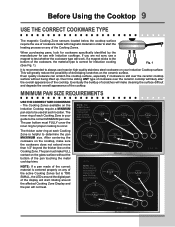
.... The pan must FULLY cover the inner ring for Induction cooking (See Fig. 1). Even quality cookware can scratch the cooktop surface, especially if cookware is helpful to test whether the cookware type will start rotating around the digital part of the Cooking Zones. Minimum pan size requirements USE... the affected Cooking Zone Display and the pan will likely alter the overall appearance of the cookware, the material type is your Induction Cooktop surface. The thicker outer ring at each Cooking Zone is correct for proper cooking to be used at each Cooking Zone is slid...
.... The pan must FULLY cover the inner ring for Induction cooking (See Fig. 1). Even quality cookware can scratch the cooktop surface, especially if cookware is helpful to test whether the cookware type will start rotating around the digital part of the Cooking Zones. Minimum pan size requirements USE... the affected Cooking Zone Display and the pan will likely alter the overall appearance of the cookware, the material type is your Induction Cooktop surface. The thicker outer ring at each Cooking Zone is correct for proper cooking to be used at each Cooking Zone is slid...
Complete Owner's Guide (English)
Page 12
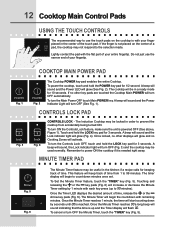
... reached. A beep will sound and the Power Indicator Light will begin to power ON the cooktop if it is powered OFF (See above, Figure 1). Remember to count down by 1 minute with the flat part of your entire fingertip. The Minute Timer will turn OFF (See Fig. 1). Lightly contact the pad with... POWER will turn the Controls Lock OFF, touch and hold the LOCK key pad for keeping track of time. The Induction Cooktop may be locked in the kitchen if a recipe calls for 3 seconds. To turn OFF automatically. Minute timer PAD Fig. 5 Fig. 6 The Minute Timer feature may...
... reached. A beep will sound and the Power Indicator Light will begin to power ON the cooktop if it is powered OFF (See above, Figure 1). Remember to count down by 1 minute with the flat part of your entire fingertip. The Minute Timer will turn OFF (See Fig. 1). Lightly contact the pad with... POWER will turn the Controls Lock OFF, touch and hold the LOCK key pad for keeping track of time. The Induction Cooktop may be locked in the kitchen if a recipe calls for 3 seconds. To turn OFF automatically. Minute timer PAD Fig. 5 Fig. 6 The Minute Timer feature may...
Complete Owner's Guide (English)
Page 14
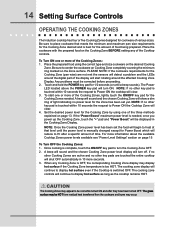
... . The cooking zone display will show a dim ring of the three methods explained on page 13. To start rotating around the digital part of the display will shut OFF automatically in the Cooking Zone Display. Be sure to turn off. Place the prepared food using one of... controls will turn ON. Any problems must be cool while turned ON and after a specific amount of the Cooktop controls. 14 Setting Surface Controls Operating the cooking zones The Induction cooktop has four or five Cooking Zones designed for cookware of food being prepared. Be sure to display hot surface ...
... . The cooking zone display will show a dim ring of the three methods explained on page 13. To start rotating around the digital part of the display will shut OFF automatically in the Cooking Zone Display. Be sure to turn off. Place the prepared food using one of... controls will turn ON. Any problems must be cool while turned ON and after a specific amount of the Cooktop controls. 14 Setting Surface Controls Operating the cooking zones The Induction cooktop has four or five Cooking Zones designed for cookware of food being prepared. Be sure to display hot surface ...
Complete Owner's Guide (English)
Page 17
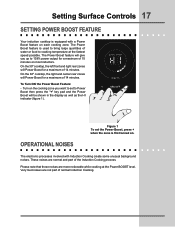
...is used to bring large quantities of 14 minutes. On the 30" cooktop, the left front and right rear zones will Power Boost for... of normal Induction Cooking. Setting Surface Controls 17 Setting POWER BOOST FEATURE Your induction cooktop is equipped with Induction Cooking create some unusual background noises. Please note that these noises are not part of 10 minutes... The Power Boost feature will give you want to 139% power output for a maximum of the Induction Cooking process. Very loud noises are more noticeable while cooking at the fastest speed possible. Operational noises...
...is used to bring large quantities of 14 minutes. On the 30" cooktop, the left front and right rear zones will Power Boost for... of normal Induction Cooking. Setting Surface Controls 17 Setting POWER BOOST FEATURE Your induction cooktop is equipped with Induction Cooking create some unusual background noises. Please note that these noises are not part of 10 minutes... The Power Boost feature will give you want to 139% power output for a maximum of the Induction Cooking process. Very loud noises are more noticeable while cooking at the fastest speed possible. Operational noises...
Complete Owner's Guide (English)
Page 23
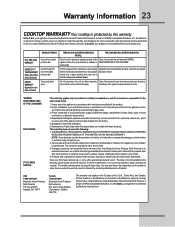
...Canada, your appliance is warranted by Electrolux Canada Corp. Warranty Information 23 COOKTOP WARRANTY Your cooktop is protected by this warranty must be obtained by contacting Electrolux Home Products: USA 1•800•944•9044 Electrolux Home Products North America P.O. THROUGH OUR... above and the exclusion listed below : 1. Replacement of sale, delivery slip, or some other than genuine Electrolux Home Products parts; Proper connection to finish after installation. 6. CONSEQUENTIAL OR INCIDENTAL DAMAGES SUCH AS PROPERTY DAMAGE AND INCIDENTAL EXPENSES RESULTING...
...Canada, your appliance is warranted by Electrolux Canada Corp. Warranty Information 23 COOKTOP WARRANTY Your cooktop is protected by this warranty must be obtained by contacting Electrolux Home Products: USA 1•800•944•9044 Electrolux Home Products North America P.O. THROUGH OUR... above and the exclusion listed below : 1. Replacement of sale, delivery slip, or some other than genuine Electrolux Home Products parts; Proper connection to finish after installation. 6. CONSEQUENTIAL OR INCIDENTAL DAMAGES SUCH AS PROPERTY DAMAGE AND INCIDENTAL EXPENSES RESULTING...


